
Artificial Intelligence (AI)
The Artificial Intelligence (AI) is the new chatbot supercharged: instead of only following the menu, it understands the customer’s messages (text and audio), replies in natural language and even books by voice. It lives on the same screen as the chatbot, tecpet AI → Service: and that’s where you set the service mode, the personality, the actions the AI is allowed to run and, inside the bookings action, how far ahead the customer may reschedule or cancel on their own over WhatsApp. Everything you set here applies to real WhatsApp conversations and shows up straight away in your calendar.
How to book 24/7 without being stuck on WhatsApp? #

Is your WhatsApp working for you, or holding you back?
While you're grooming, the sale cools down on WhatsApp.
“Whoever replies first books the slot. Whoever's late loses it to a competitor.”
Demand comes in through WhatsApp, and a lot of it arrives after hours, when no one can reply. A message sitting for hours is an owner who already messaged another shop.
The AI handles text and audio in natural language, checks your real calendar and closes the booking on its own, handing off to a human only when there's an exception. You stop losing opportunities to slow replies.
Step 1: Open the Service screen
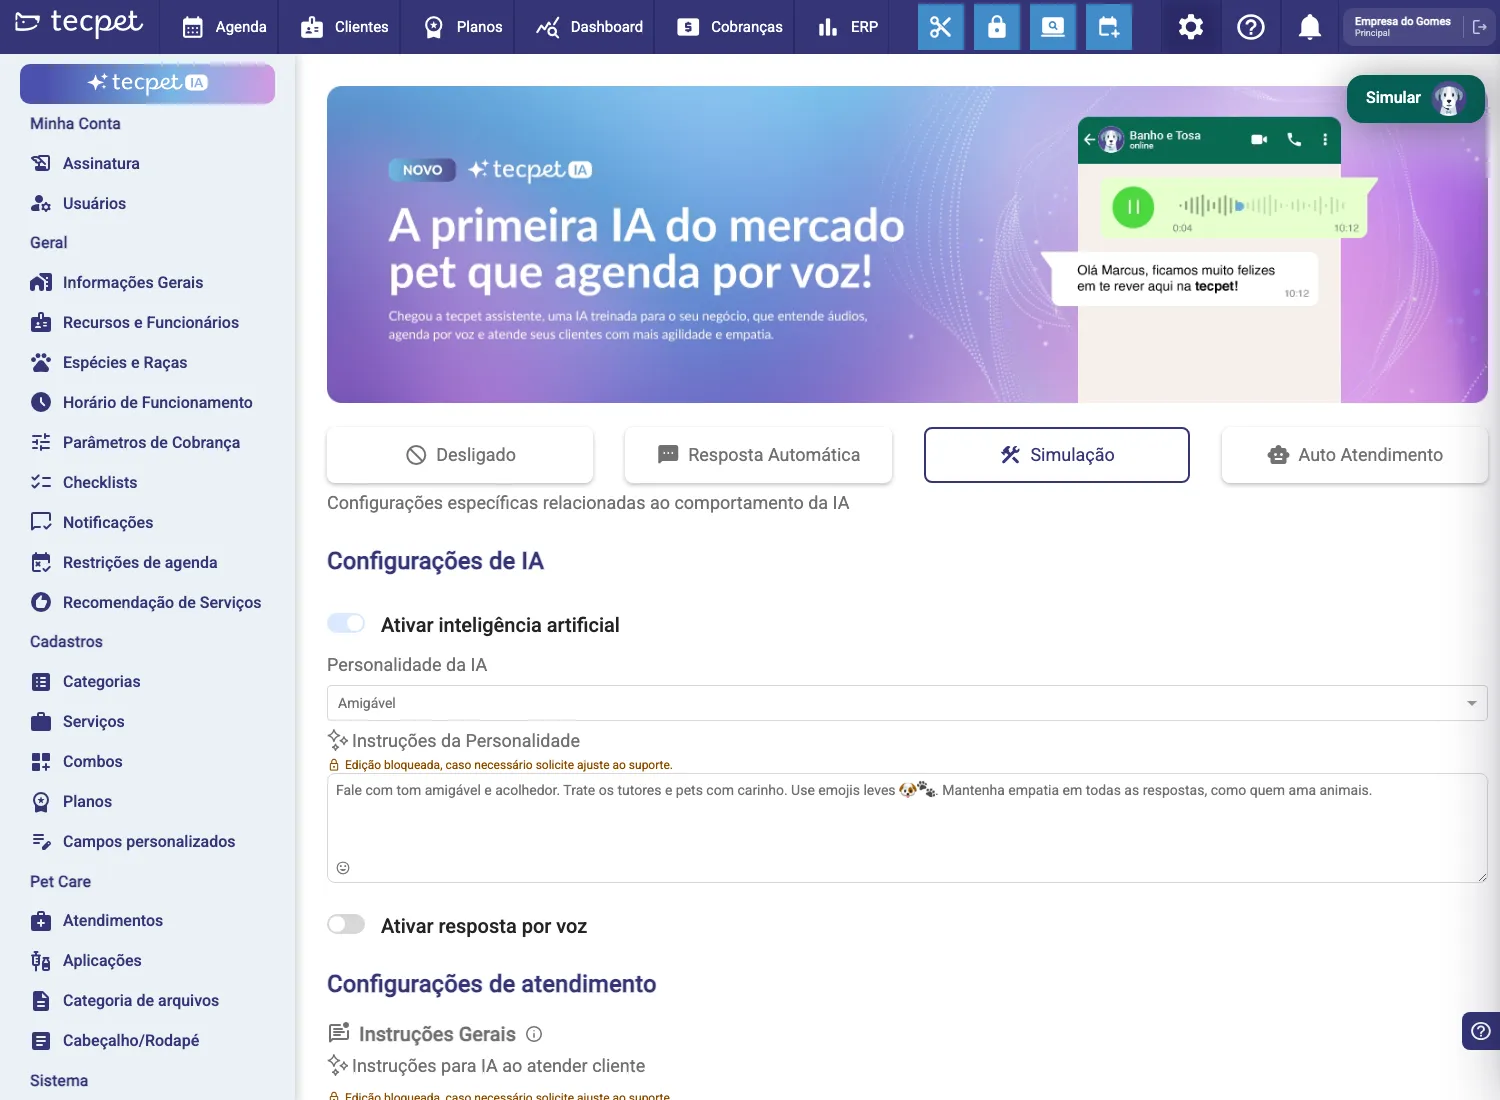
Section titled “Step 1: Open the Service screen”In the left side menu, click the purple tecpet AI item (at the top of the menu) and then Service. Before opening, the system shows the Attention screen asking for the administrator password: the same one used on the other Settings screens.
Step 2: Choose the service mode
Section titled “Step 2: Choose the service mode”Right below the banner there are four buttons, side by side. The highlighted one (with the marked border) is the mode in use:
- Off: the chatbot is disabled and sends no reply at all over WhatsApp. In this mode the body of the screen disappears and only the PetBot Off illustration shows;
- Automatic reply: always answers with a single standard message, defined in the settings;
- Simulation: lets you test and fine-tune the service flows, but sends no real replies on WhatsApp;
- Self-service: the chatbot live in production: it answers automatically on WhatsApp according to what you set up.
Switching modes is saved immediately (the message “Success, Bot mode changed successfully” appears) and does not depend on the Save button at the bottom.
Step 3: Check the AI settings
Section titled “Step 3: Check the AI settings”Still at the top of the screen, the AI settings block holds the artificial intelligence behaviour:
- Enable artificial intelligence: shows whether the AI is on for your shop. This switch is not clickable by the shop owner: releasing it depends on your plan. If you don’t have the feature yet, the Unlock feature button (with the padlock) shows next to it and opens a WhatsApp chat with the sales team;
- AI personality: a dropdown with the AI’s conversation style (e.g. Friendly);
- Personality instructions: the text that describes that style (e.g. “Speak in a friendly, welcoming tone. Treat owners and pets with care. Use light emojis 🐶🐾…”);
- Enable voice reply: when on, the AI answers with audio and the Voice type field appears. If the feature isn’t part of your plan, the Unlock feature button shows instead.
Just below, the Service settings block brings General instructions → Instructions for the AI when serving a customer: the guidance that applies to the whole conversation.
Step 4: Open the bookings action
Section titled “Step 4: Open the bookings action”Scroll down to Actions allowed in AI service. Here, one under the other, are the actions the AI may run, each row has an on/off switch, the action name and the Action settings button. Actions that are off don’t show up for the customer.
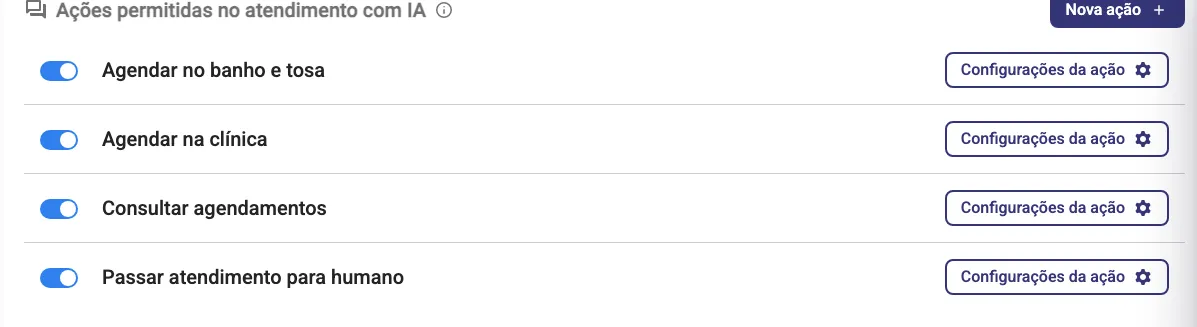
Look for the bookings action, the one that lets the customer view, reschedule and cancel their appointments. In the example it’s called Check appointments, but your shop may have given it another name. Click Action settings.
Also in this block:
- New action (top-right corner) creates a custom option. The limit is 10 active actions: beyond that you get “Limit reached, The maximum is 10 active actions. Disable or remove existing actions to create new ones.”;
- Actions not included in your plan show a padlock and an Unlock action button instead of Action settings;
- The Reorder button (which changes the menu order) only shows with the AI off: with the AI on, it decides the order of the conversation.
Step 5: Review the menu settings (block 1)
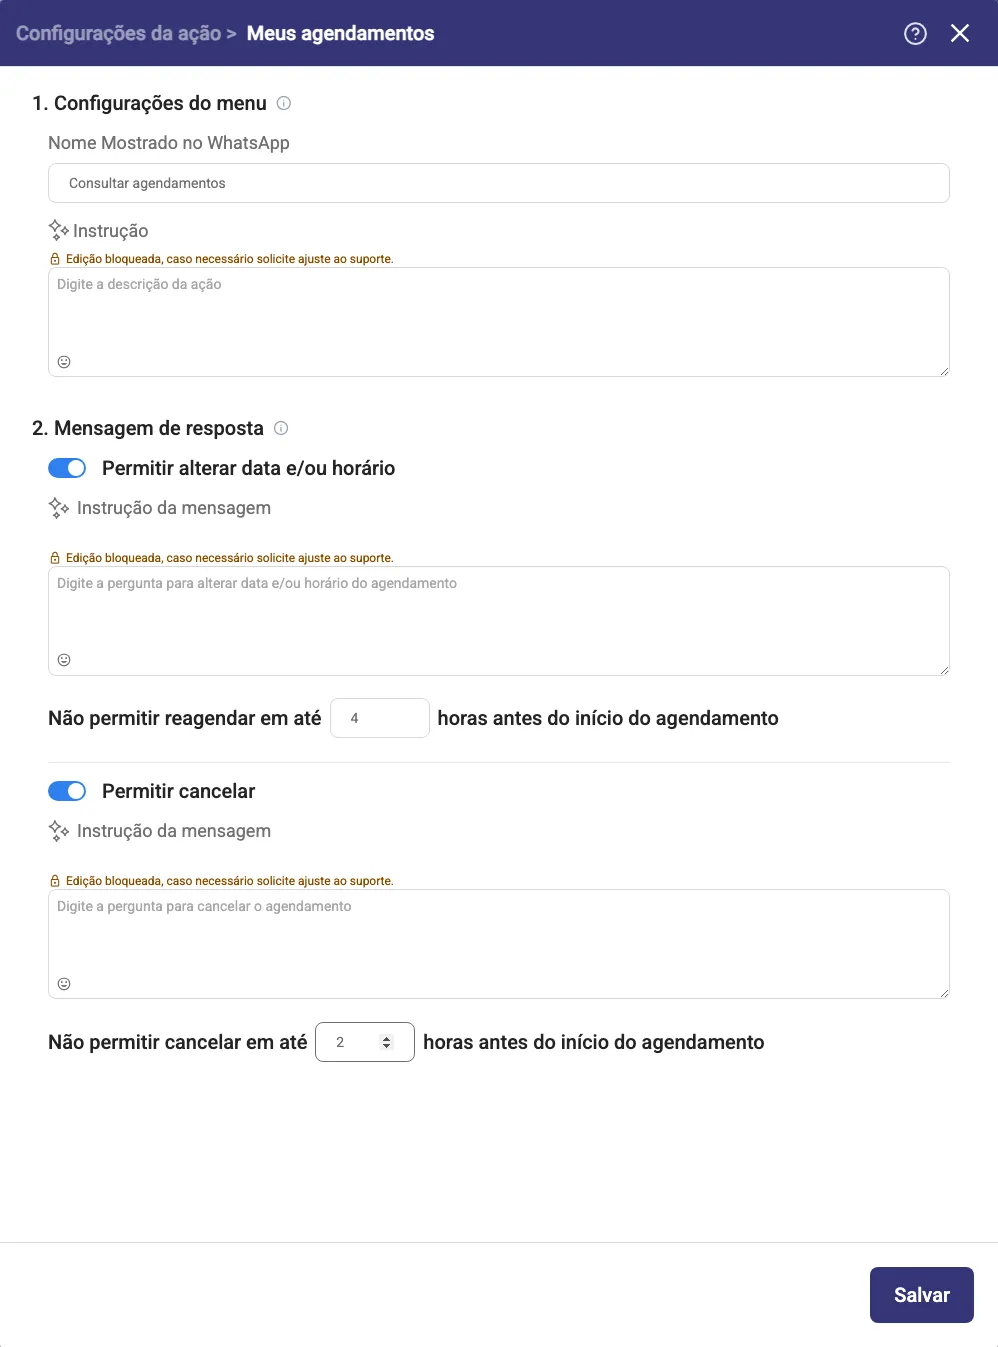
Section titled “Step 5: Review the menu settings (block 1)”The window opens with the title Action settings > My appointments (this title is fixed, even if the action has another name on the list). The first block, 1. Menu settings, defines how the action is presented in the conversation:
- Name shown on WhatsApp *, the name the customer sees (in the example, Check appointments). It can’t be left blank;
- Instruction: tells the AI when and how to use this action (placeholder “Type the action description”). With the AI off, this same field is called Description.
Step 6: Set the notice to reschedule
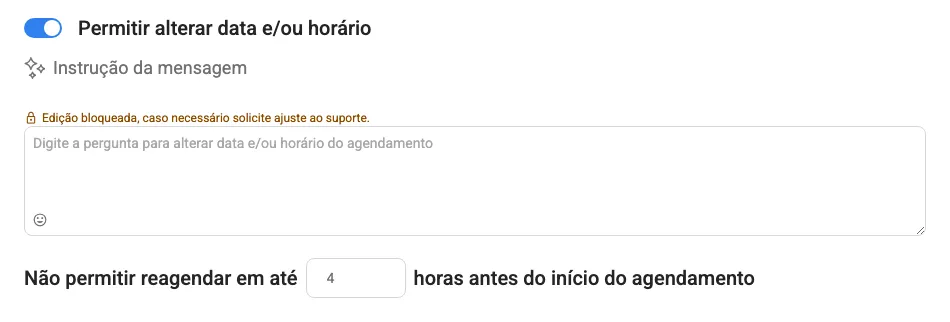
Section titled “Step 6: Set the notice to reschedule”In the 2. Reply message block, the first item is the Allow changing date and/or time switch. With it on, the customer can reschedule over WhatsApp and two fields appear:
- Message instruction: what the AI should say/ask when rescheduling (placeholder “Type the question to change the date and/or time of the appointment”). With the AI off, the label is Message text;
- Don’t allow rescheduling within __ hours before the appointment starts: the numeric field with the minimum notice. In the example, 4 hours: from there on the AI no longer reschedules.
Leave the field blank (or 0) if you want rescheduling allowed at any time, even at the last minute.
Step 7: Set the notice to cancel
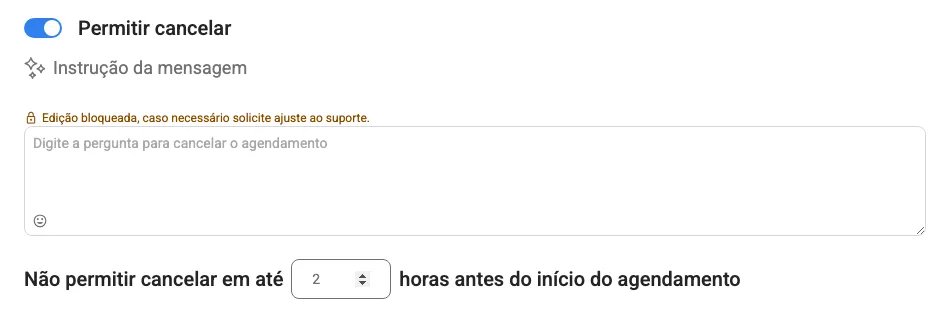
Section titled “Step 7: Set the notice to cancel”Right below, separated by a line, is the Allow cancelling switch. Once on, it enables cancelling over WhatsApp and shows the same two fields:
- Message instruction: what the AI says when handling a cancellation (placeholder “Type the question to cancel the appointment”);
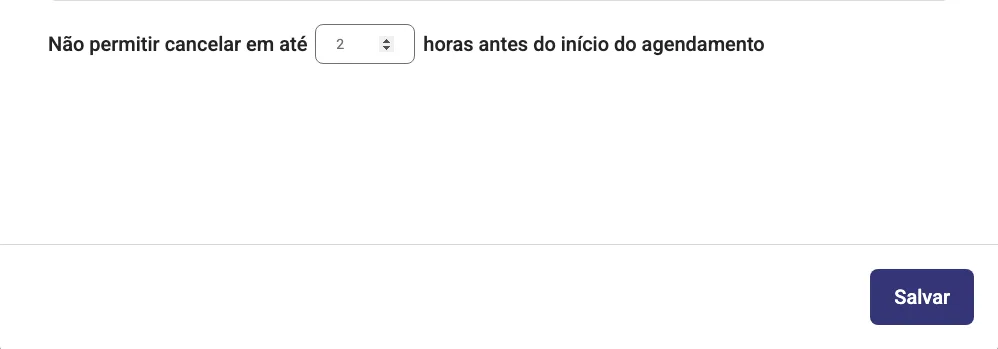
- Don’t allow cancelling within __ hours before the appointment starts: the minimum notice to cancel. In the example, 2 hours.
Just like with rescheduling, a blank field (or 0) means no limit: the customer can cancel until minutes before the time.
Step 8: Save the action
Section titled “Step 8: Save the action”Click Save (the purple button at the bottom-right of the window). You get “Success, Setting saved successfully!” and the window closes. If something goes wrong, “Error!, The setting could not be saved!” shows and nothing is stored.
What happens inside the blocked window
Section titled “What happens inside the blocked window”When the customer asks to reschedule or cancel and the appointment starts within the notice you set, the AI:
- Does not perform the operation, it doesn’t reschedule, doesn’t cancel and doesn’t offer alternative time slots;
- Explains to the customer, with empathy, that so close to the time that change has to go through an agent;
- Transfers the conversation to a human agent once the customer confirms.
The countdown is based on the appointment start time, in your shop’s time zone. Example: with 2 hours in Don’t allow cancelling, a bath at 2 pm can be cancelled by the customer until noon; from noon on, the AI explains and calls the agent. The block also applies when the customer asks to reschedule several appointments at once.
Other settings on the same screen
Section titled “Other settings on the same screen”A bit further down, still on the same screen:
- Inactivity preferences: what to do when the conversation goes quiet, in two tabs: Conversation with the AI (Inactivity time, in minutes, minimum of 60, and the Action when the inactivity time runs out) and Conversation with the agent (Inactivity time from 30 minutes, Closing time from 60, plus Inactive employee: Notify someone or Do nothing, Who will be notified (1st and 2nd option) and the Message to the employee);
- Extra settings → Campaign triggers: takes the customer straight to an action when they type a keyword. When the feature isn’t part of your plan, the Unlock feature button shows; once released, you use the Triggers accordion and the New trigger button.
How to change or remove the limits later
Section titled “How to change or remove the limits later”- Go back to tecpet AI → Service (enter the administrator password);
- Under Actions allowed in AI service, click Action settings on the bookings action;
- In the 2. Reply message block, change the number of hours, or clear the field to go back to having no limit at all;
- Click Save. The change applies to the next conversations; anyone already talking to the AI at that moment may carry on under the previous rule.
To switch off entirely the customer’s ability to touch the appointment, turn off the Allow changing date and/or time and/or Allow cancelling switch and save.