
Commissions panel
The Commissions panel lives under Dashboard → Painel de comissões and calculates, for the period you choose, each employee’s commission from the services and appointments. It now also identifies the funcionário solicitante (requesting employee), whoever originated the sale/service, in addition to who performed it. It’s a system module: if your shop doesn’t have it yet, an option to acquire it appears instead of the panel.
How do I use commissions to make the team sell more? #

A motivated team sells more
Whoever brings the sale deserves credit, not just who performs it.
“A fair commission is the cheapest way to motivate the team.”
Every month-end, commission becomes a headache: a spreadsheet, manual math, and in the end only whoever performed the service counts. Whoever brought the client or offered the add-on, the front desk, the requester, is left out and, with no recognition, stops offering.
The Commissions panel calculates each employee's commission for the period, by the rule you choose (execution, scheduling, who booked, or the requester), with filters by service, segment and employee, per-record detail and export. And now you can also reward the **requesting employee**: whoever originated the sale.
Step 1: Open the Commissions panel
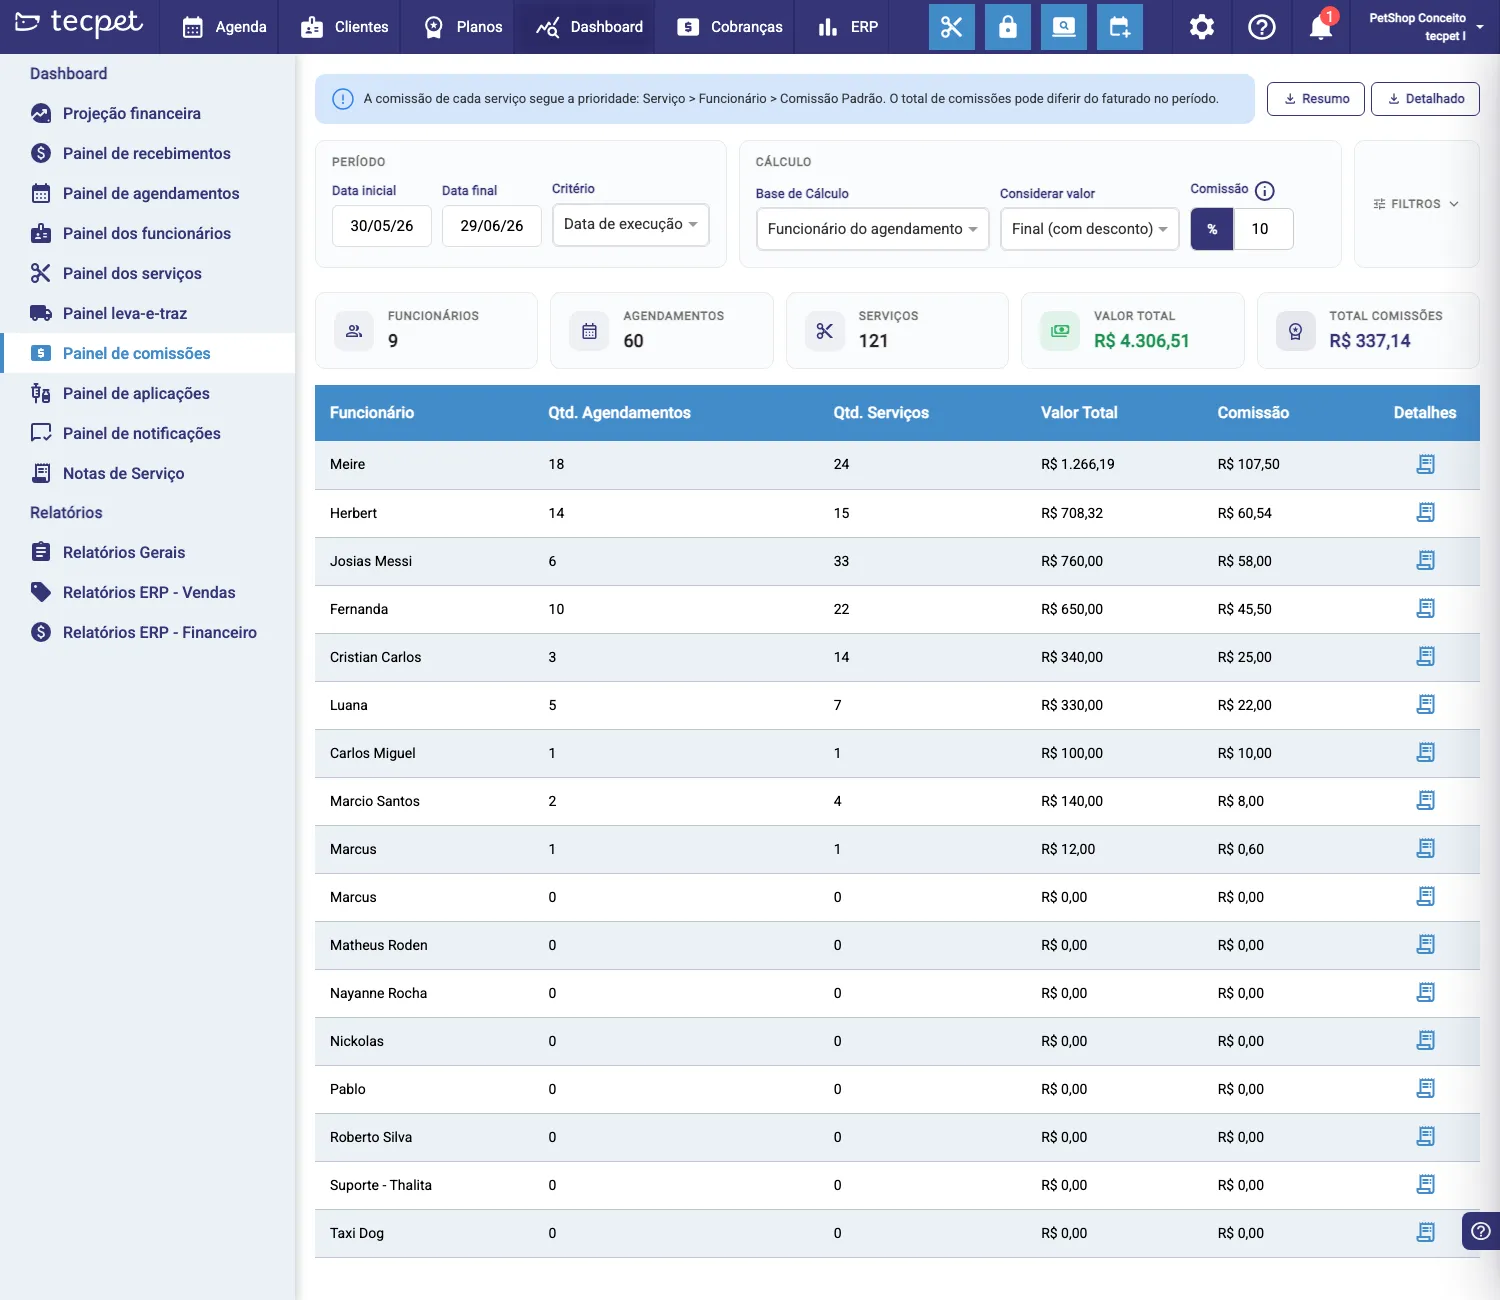
Section titled “Step 1: Open the Commissions panel”In the Dashboard menu, click Painel de comissões (commissions panel) in the left side menu. The panel opens with the filters at the top, the period totals and the per-employee table.
Step 2: Set how the commission is calculated
Section titled “Step 2: Set how the commission is calculated”At the top, under Cálculo (calculation), you set the rule:
- Período (period), Data inicial (start) and Data final (end), and the Critério (criterion): Data de execução (when the service was done) or Data de pagamento (paid appointments only).
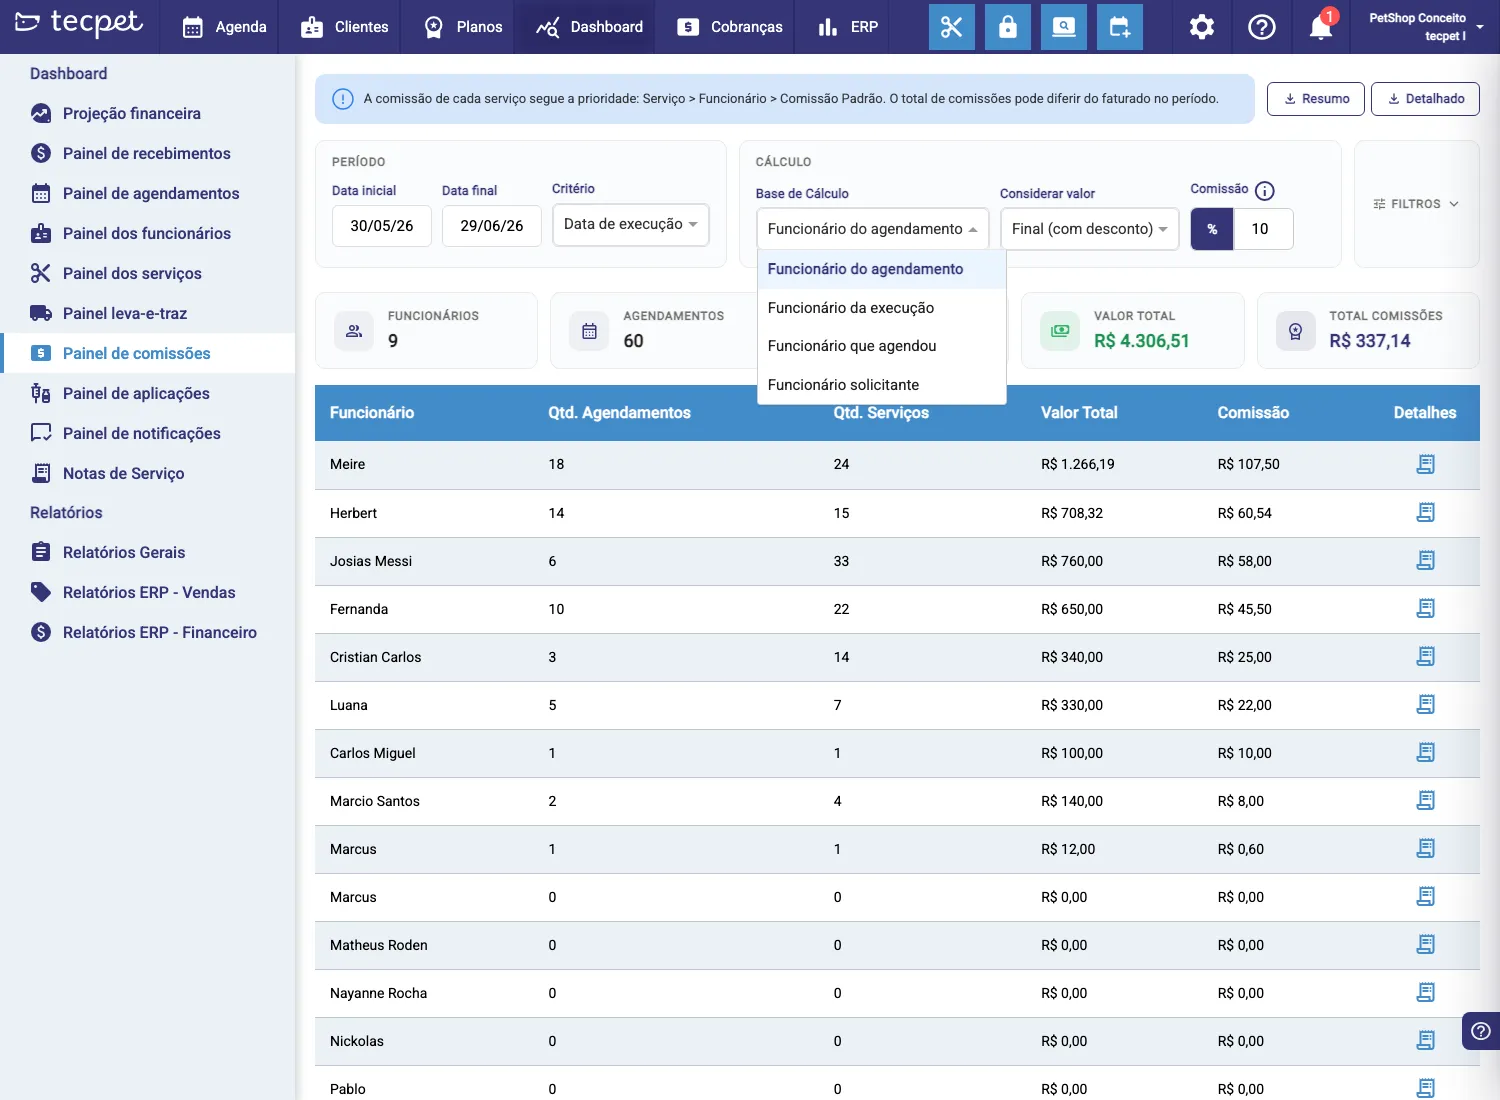
- Base de Cálculo (calculation base), who the commission is attributed to: Funcionário do agendamento (booking employee, default), Funcionário da execução (executor), Funcionário que agendou (who booked) or Funcionário solicitante (the requesting employee who brought the sale).
- Considerar valor (value to consider), Final (com desconto) (final, with discount) or Unitário (original).
- Comissão (commission), the default % used when there’s no % set on the service or the employee.
The totals and the columns
Section titled “The totals and the columns”Above the table, the period totals: Funcionários (employees), Agendamentos (appointments), Serviços (services), Valor Total (total value) and Total Comissões (total commissions). The table lists, per employee:
- Funcionário (employee);
- Qtd. Agendamentos (appointment count);
- Qtd. Serviços (service count);
- Valor Total (R$ in the period);
- Comissão (R$ calculated);
- Detalhes (icon to open the records).
Detail per employee
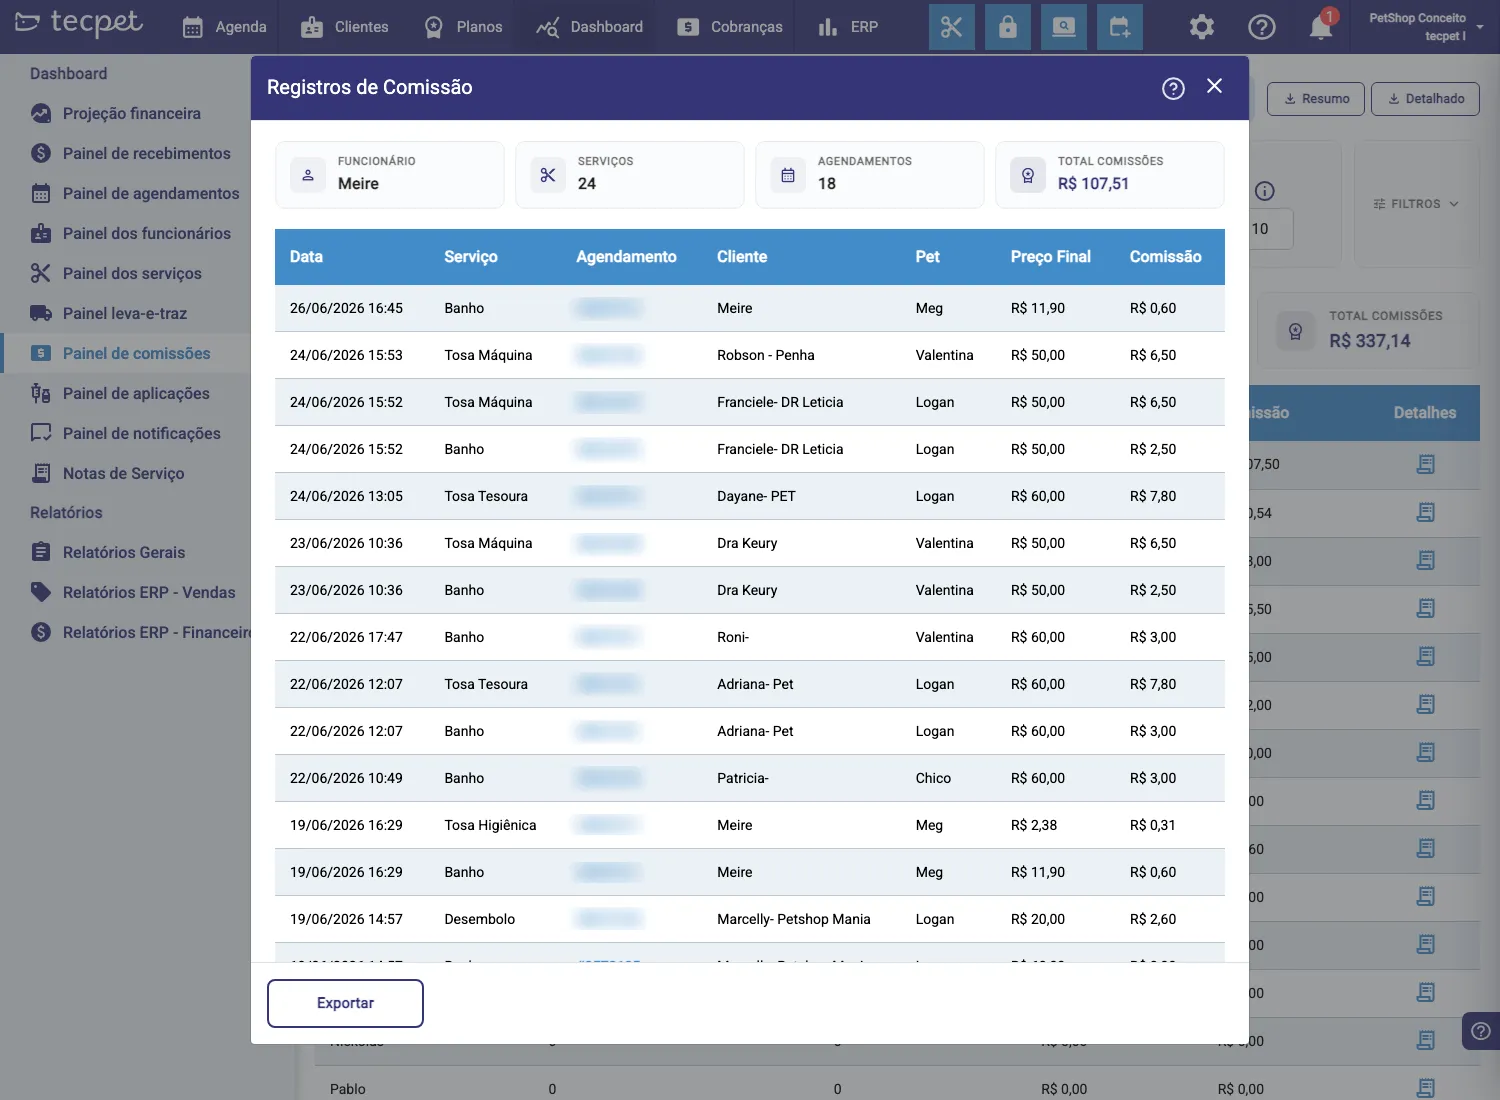
Section titled “Detail per employee”Click the Detalhes (details) icon on an employee’s row to open the Registros de Comissão (commission records), each service that went into the total, with Data (date), Serviço (service), Agendamento (appointment, clickable), Cliente (client), Pet, Preço Final (final price) and Comissão (commission). This is where you check where each amount came from.
Requesting employee
Section titled “Requesting employee”The funcionário solicitante (requesting employee) is whoever originated the sale/service: for example, the front desk that offered the add-on or whoever closed the plan, even if someone else performs it. To see commission by that rule, choose Funcionário solicitante in the Base de Cálculo.
You set the requester in three places:
- in the new appointment, in the Funcionário solicitante field (shown for loose/à-la-carte services);
- when selling a plan (see Sell a plan);
- when adding an item to the invoice (Inside the invoice), for services and products.
If the field is left blank, the item has no requesting employee.
Filters and export
Section titled “Filters and export”The Filtros (filters) button refines by Serviços (services), Segmentos (segments) and Funcionário (employee). To take the numbers out, use Resumo (summary, one line per employee) or Detalhado (detailed, record by record).
Head-office account (chain)
On the head-office account, the panel gains a Loja (store) filter (with an All stores option) and also shows a per-chain-unit view, comparing commissions across stores.
On a single store (the default), the panel shows your store’s employees, without the chain filter.