
Set up the New AI
The Nova IA (New AI) is the new version of the tecpet IA screen, where you set up how artificial intelligence serves your customers on WhatsApp. Instead of a single robot, it works as a team of agents: the Recepcionista (Receptionist) receives every contact, understands what the customer wants and hands the conversation to the right specialist (Agente petshop, Agente Veterinário, Agente Daycare/Hotel, Agente Cadastro or Agente de Vendas). On top of all of them sit the shared rules: service mode, personality, inactivity preferences and the Configurações gerais. Everything you define here applies to real WhatsApp conversations, works directly on your schedule (appointments, reschedules and cancellations made by the AI) and shows up later in the Estatísticas da IA. Each conversation handled by the AI uses up the AI conversations and credits of your plan.
How do I get a whole team answering on WhatsApp? #

One bot can't handle it all
Grooming, vet visits, daycare and quotes arrive together. Each one needs a specialist.
“Pet owners don't want to talk to a bot. They want someone who knows their topic.”
In the same minute you get a grooming request, a vaccine question, a hotel booking and a "how much?". Whoever answers has to know everything, and when the team is busy the conversation cools down or gets a generic reply.
In the New AI, the Receptionist understands what the customer wants and hands the conversation to the right agent: grooming, veterinary, daycare and hotel, registration or sales. Each one follows the rules you set, and the Statistics show what the AI booked and where it needs you.
What the AI understands
Section titled “What the AI understands”The AI serves customers on WhatsApp in three formats:
- Text: understands written messages however the customer writes them, with no menu or exact words needed;
- Audio: listens to the customer’s voice message and replies to what they said;
- Image (new): reads the photo the customer sends and uses its content in the conversation. It recognizes:
- Payment receipt (Pix, bank transfer, boleto or card): understands the amount, the date, who paid and who received, when they are readable. For security, the AI does not read CPF, CNPJ, Pix key, card number or authentication code;
- Pet photo: identifies the animal and what shows on it, such as size, coat, dirt or injury, and uses that to continue the conversation;
- Other images: describes what the image is about to understand the customer’s request.
Step 1: Open tecpet IA
Section titled “Step 1: Open tecpet IA”At the top of the system, click the gear (Configurações). In the left side menu, the first item is the purple block with the tecpet IA logo: click it. If your shop uses an administrator password, the system asks for the 6 digits on the Atenção screen before opening (only the first time in the session).
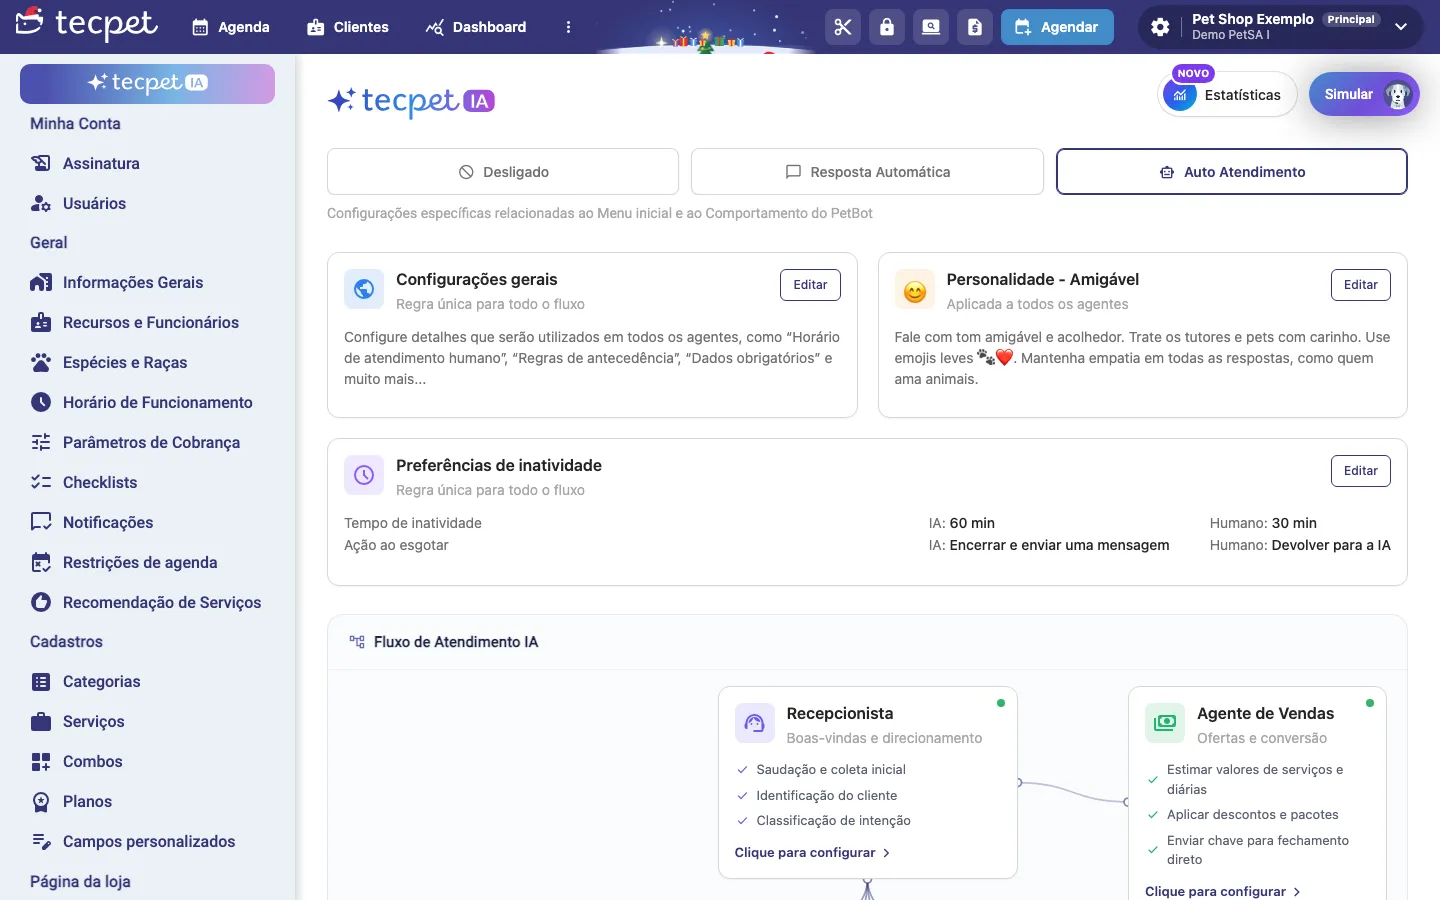
The New AI home screen shows, from top to bottom: the service modes, the Configurações gerais, Personalidade and Preferências de inatividade cards, the Fluxo de Atendimento IA with the agents and the Gatilhos de campanha card. In the top right corner are the Estatísticas and Simular buttons.
Step 2: Choose the service mode
Section titled “Step 2: Choose the service mode”Right below the logo there are three tabs. The highlighted one is the mode in use:
- Desligado (Off): automatic service is turned off and nothing is answered on WhatsApp;
- Resposta Automática (Automatic Reply): PetBot answers through the initial menu (automatic reply), without the AI chatting with the customer;
- Auto Atendimento (Self-service): the AI really serves customers, chatting, answering questions and booking appointments. It is the only mode in which the agents work.
The change is saved right away (you will see “Configurações salvas com sucesso”), with no need for a Save button.

Step 3: Check the summary cards
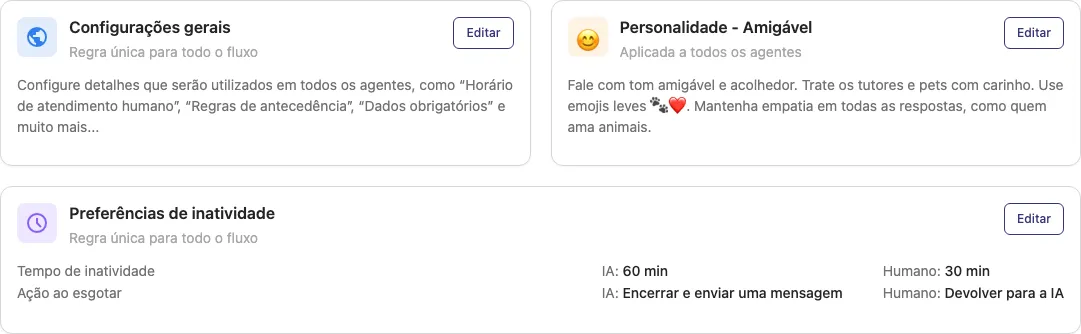
Section titled “Step 3: Check the summary cards”The three cards show the rules that apply to all agents. Each one has an Editar (Edit) button:
- Configurações gerais (Regra única para todo o fluxo): opens the general settings screen (Step 6);
- Personalidade (Aplicada a todos os agentes): the title shows the chosen personality, for example Personalidade - Amigável, and the text shows how it talks. Editar opens the modal from Step 4;
- Preferências de inatividade (Regra única para todo o fluxo): shows the Tempo de inatividade and the Ação ao esgotar for the conversation with the AI and with the human attendant. Editar opens the modal from Step 5.
Step 4: Choose the personality
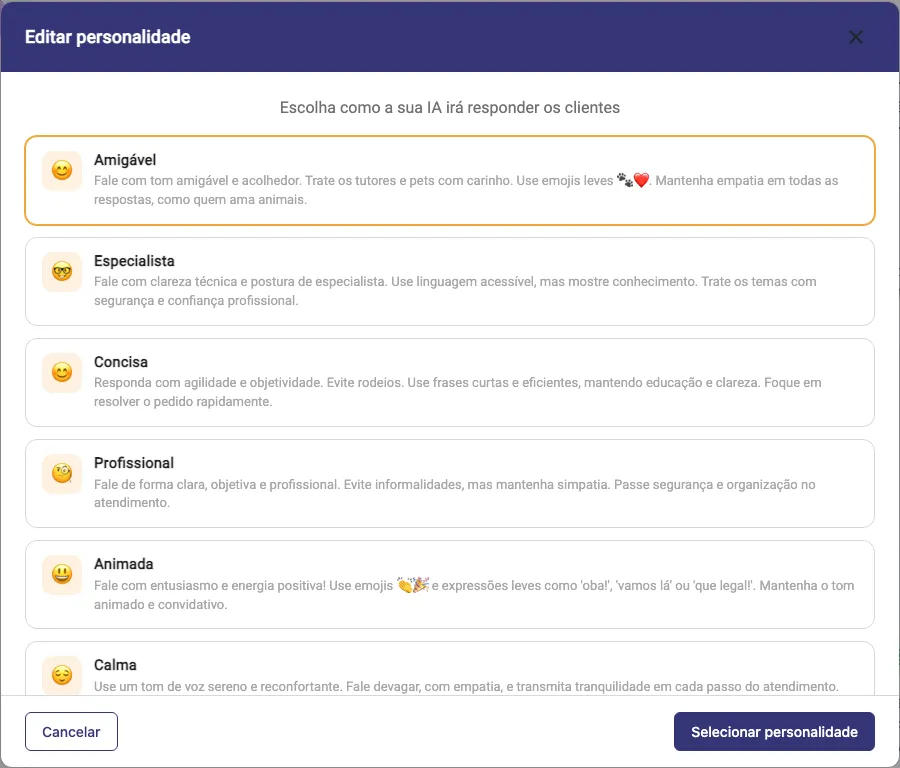
Section titled “Step 4: Choose the personality”On the Personalidade card, click Editar. The Editar personalidade modal opens (Escolha como a sua IA irá responder os clientes). Choose one option:
- Amigável (Friendly) 😊 (default): warm and caring tone, with light emojis;
- Especialista (Expert) 🤓: technical clarity and an expert attitude, in accessible language;
- Concisa (Concise): short, objective answers, no detours;
- Profissional (Professional) 🧐: clear and organized, no informalities, but friendly;
- Animada (Upbeat) 😃: enthusiasm, emojis and expressions like “oba!” and “que legal!”;
- Calma (Calm) 😌: serene and reassuring tone, never rushed;
- Mãe de Pet (Pet Parent) 🥰: talks like a loving caretaker, treating the pet as family;
- Descolada (Laid-back) 😎: light and informal, with light slang like “top!” and “show!”;
- Personalizado (Custom): opens a field for you to describe how the AI should behave (up to 200 characters).
Click Selecionar personalidade to save (it saves right away). Cancelar or the X close without changing anything. The personality applies to all agents. If you switch from Personalizado to another option, the custom text is erased.
Step 5: Set the inactivity preferences
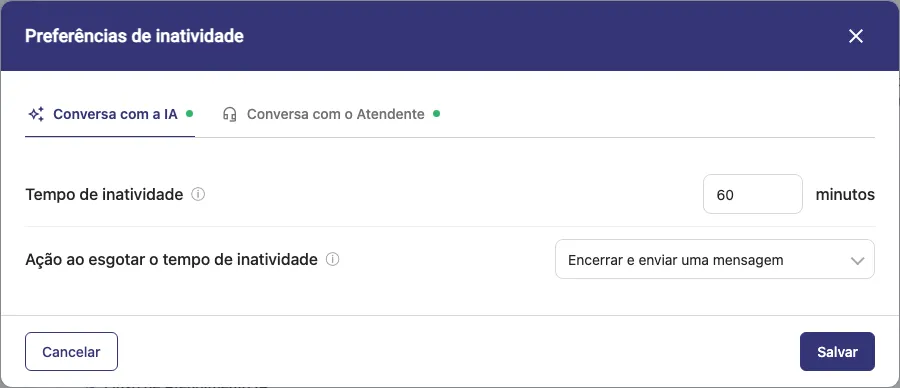
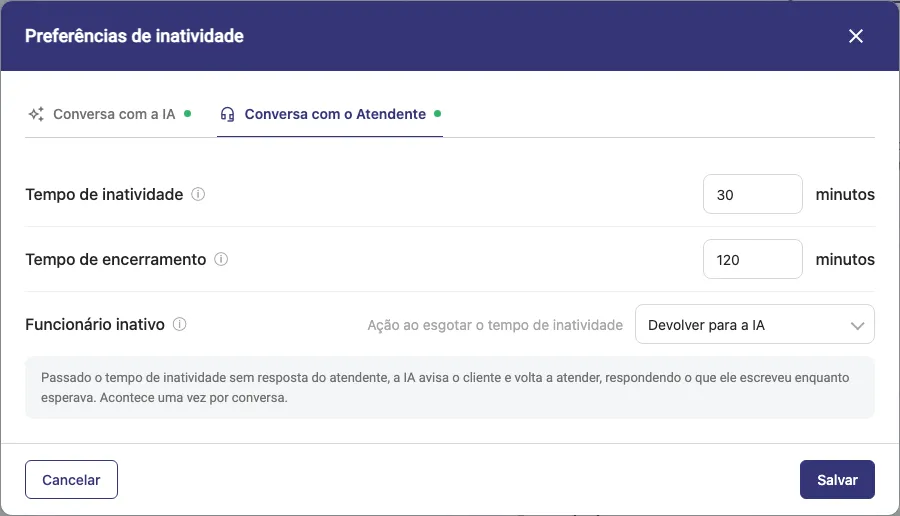
Section titled “Step 5: Set the inactivity preferences”On the Preferências de inatividade card, click Editar. The modal has two tabs.
Conversa com a IA tab (when the customer stops answering the AI):
- Tempo de inatividade*: how many minutes without a reply from the customer until the action happens. Minimum 60, maximum 360 minutes (6 hours);
- Ação ao esgotar o tempo de inatividade: Encerrar e enviar uma mensagem (close and send a message) or Manter conversa aberta (keep the conversation open).
Conversa com o Atendente tab (when the conversation has already been passed to a team member and the attendant stops answering):
- Tempo de inatividade*: minutes without a reply from the attendant until the action (60 to 360);
- Tempo de encerramento*: minutes without a reply from the attendant until the conversation is closed (60 to 360);
- Funcionário inativo: what to do when the attendant disappears. Options: Avisar alguém (notify someone), Encerrar e enviar uma mensagem and, when available for your shop, Devolver para a IA (the AI tells the customer and goes back to serving them, answering what they wrote while waiting; it happens once per conversation);
- Quem será avisado (only with Avisar alguém): 1ª opção* (required) and 2ª opção (for when the first one is unavailable). Only employees with a registered phone number in Recursos e Funcionários appear.
Click Salvar. Values below 60 or above 360 are adjusted to the nearest limit. Cancelar discards the changes.
Step 6: Adjust the Configurações gerais
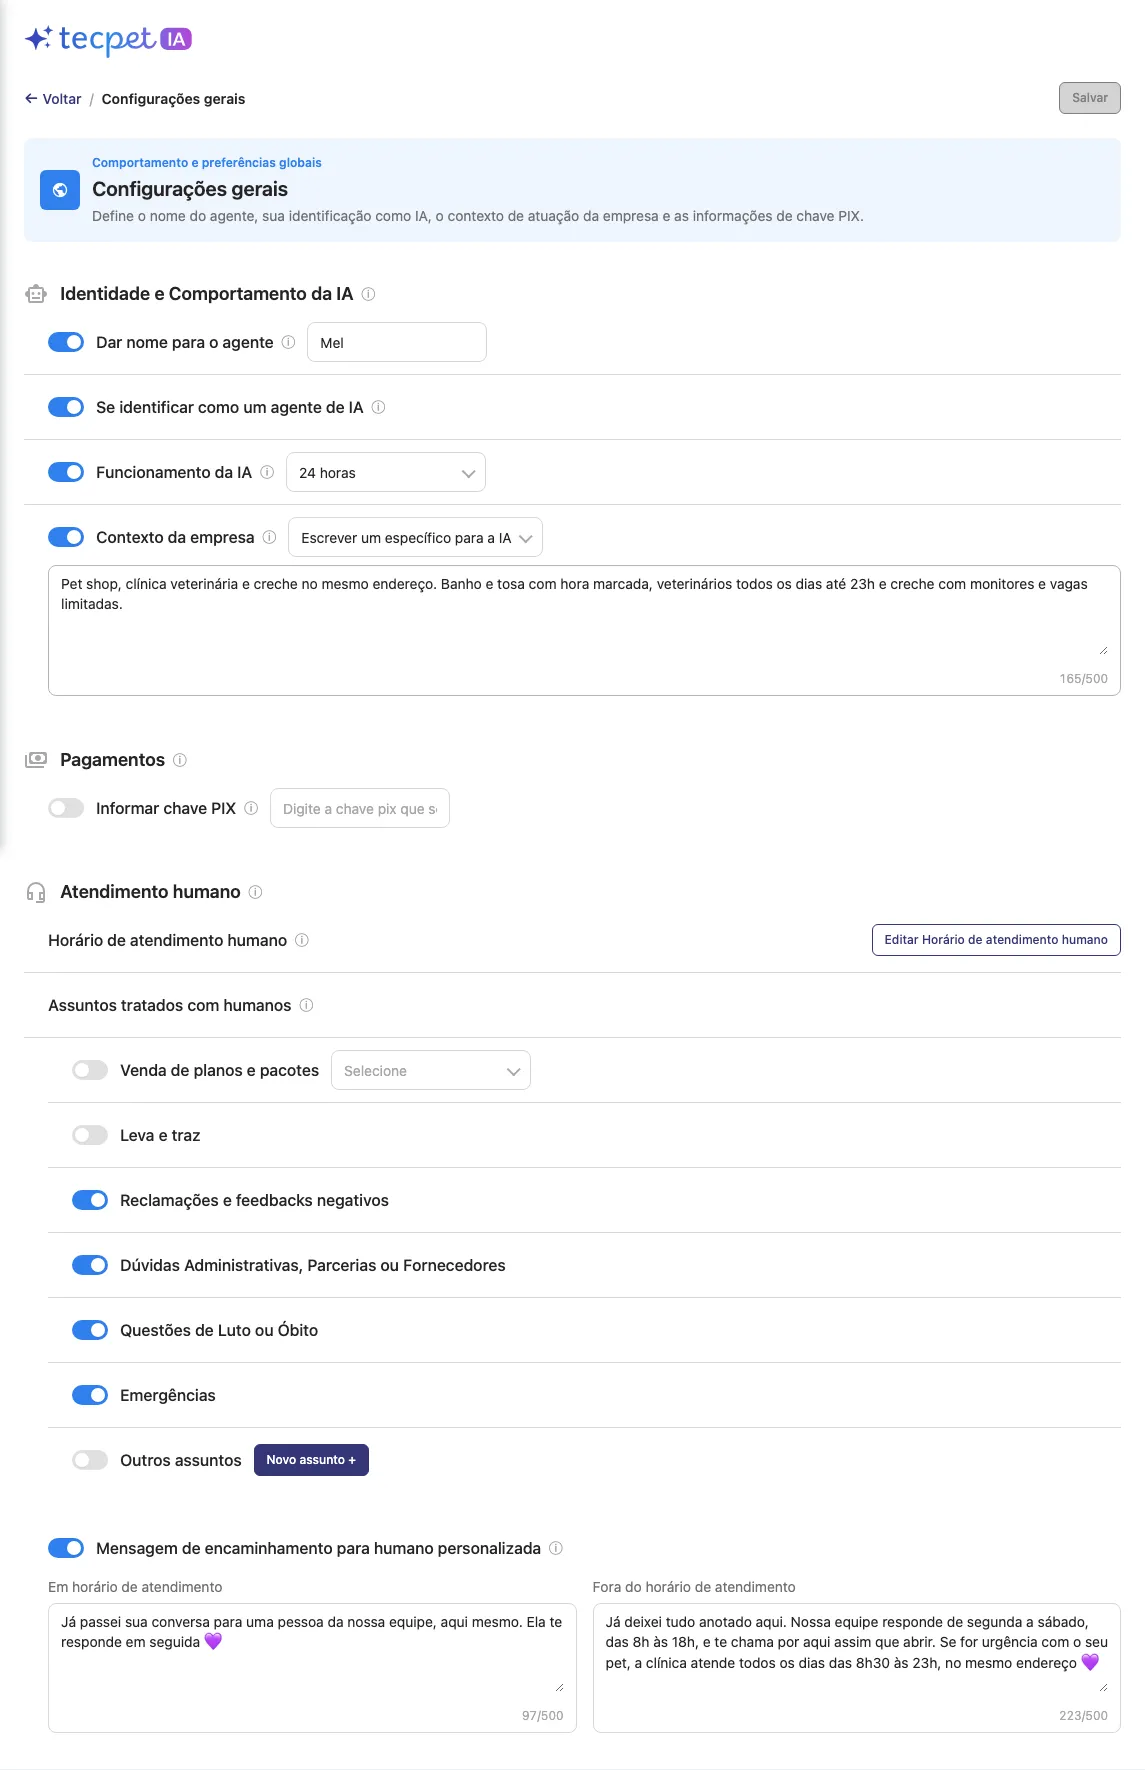
Section titled “Step 6: Adjust the Configurações gerais”On the Configurações gerais card, click Editar. Here are the behavior rules that apply to all service. Nothing is saved until you click Salvar (at the top right), except for the Outros assuntos list, which saves right away.
Identidade e Comportamento da IA (AI identity and behavior)
- Dar nome para o agente: when on, the AI introduces itself with the name you type (e.g. Mel);
- Se identificar como um agente de IA (default on): the AI tells the customer it is an automated service;
- Funcionamento da IA: defines when the AI answers. Off, it answers 24 hours. On, choose: 24 horas, Só fora do horário do time (answers when the team is away, based on the human service hours of each segment), Só com a loja aberta (based on the business hours of each segment) or Horários personalizados (the Editar horários da IA button, with time ranges per day of the week and the Aplicar horário para todos os dias shortcut). Outside the chosen hours, the customer receives the Aviso enviado fora do horário da IA (up to 500 characters) and the conversation goes to the team;
- Contexto da empresa: when on, choose Usar o contexto padrão da tecpet or Escrever um específico para a IA (a text of up to 500 characters about your business, e.g. pet shop, clinic and daycare at the same address).
Pagamentos (Payments)
- Informar chave PIX: when on, the AI sends the PIX key you typed so the customer can complete the payment.
Atendimento humano (Human service)
- Horário de atendimento humano: the Editar Horário de atendimento humano button takes you to Horário de Funcionamento, where the team’s hours are set;
- Assuntos tratados com humanos: each topic that is turned on makes the AI stop and pass the conversation to the team when the customer brings it up. The list: Venda de planos e pacotes (with the option Encaminhar com lista de serviços simples, Encaminhar com lista de serviços detalhada or Encaminhar sem lista), Leva e traz, Reclamações e feedbacks negativos, Dúvidas Administrativas, Parcerias ou Fornecedores, Questões de Luto ou Óbito, Emergências and Outros assuntos (your own, see Step 7).
Mensagem de encaminhamento para humano personalizada (custom handoff message)
- When on, you write the message the AI sends when passing the conversation to the team, one Em horário de atendimento and another Fora do horário de atendimento (up to 500 characters each). When off, the AI uses its default message.
Step 7: Create your own topics for the team
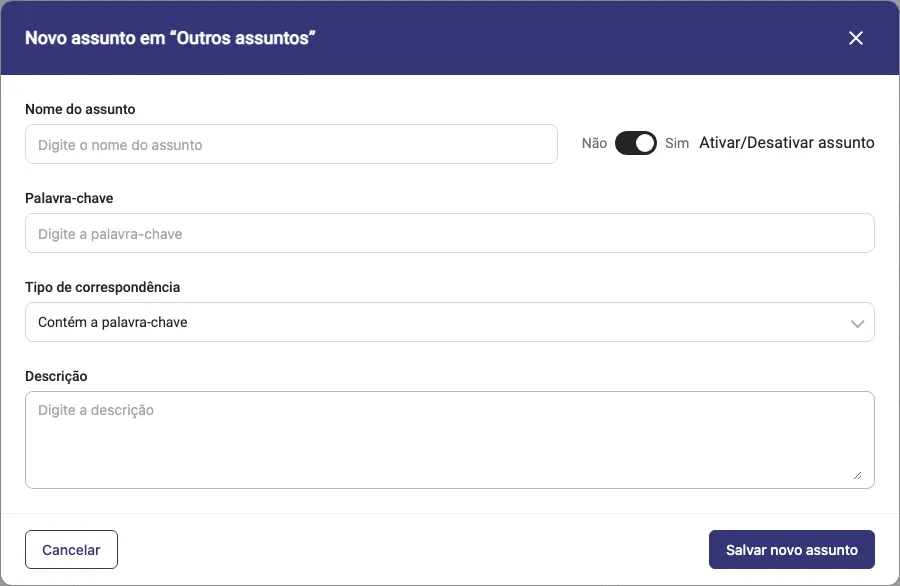
Section titled “Step 7: Create your own topics for the team”In Assuntos tratados com humanos, click Novo assunto + (next to Outros assuntos) to create a topic that the AI must pass to the team. Fields:
- Nome do assunto* and the Ativar/Desativar assunto button;
- Palavra-chave: the term that identifies the topic in the customer’s message;
- Tipo de correspondência: Contém a palavra-chave (default) or Correspondência exata;
- Descrição: explain to the AI what it is about.
Click Salvar novo assunto: it is saved right away and appears in the Assuntos personalizados list (with Outros assuntos turned on), with a button to turn it on or off, edit or delete. Deletion is immediate, with no confirmation.
Step 8: Understand the agent flow
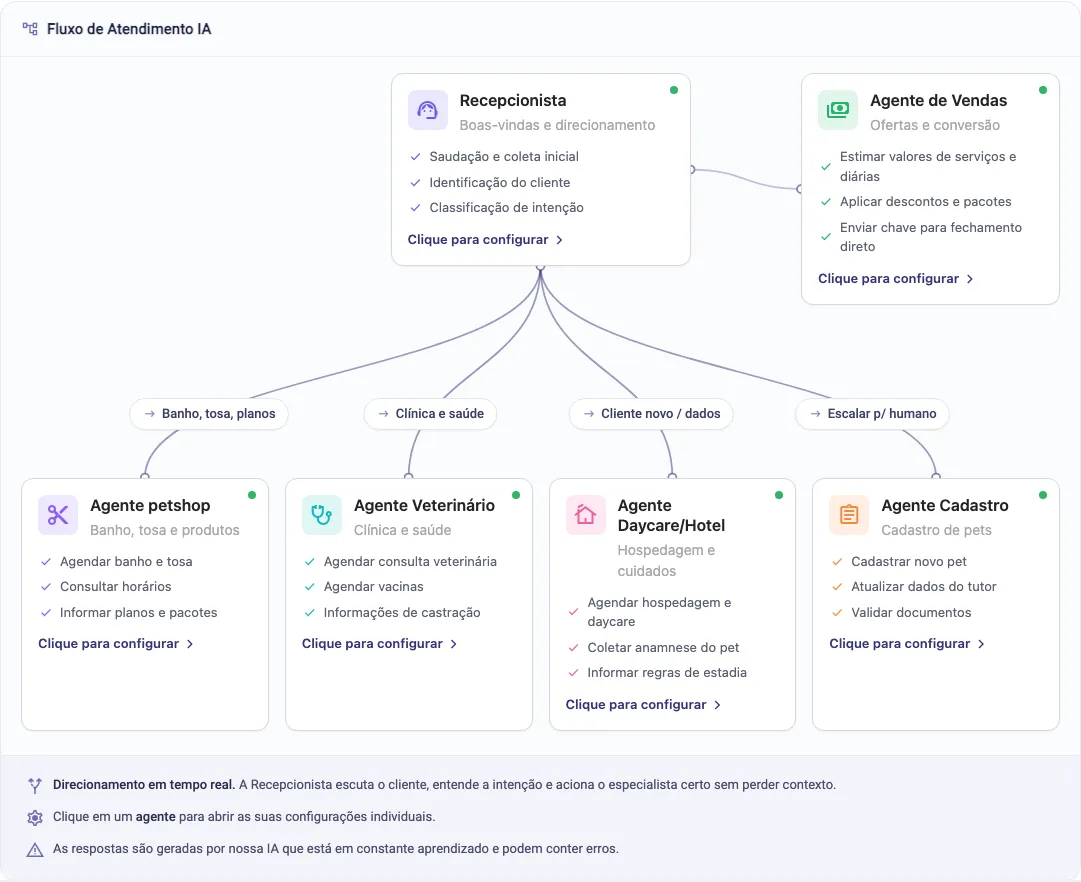
Section titled “Step 8: Understand the agent flow”The Fluxo de Atendimento IA shows how the conversation moves: the Recepcionista listens to the customer, understands the intent and calls the right specialist without losing context. Each card has a status dot (green = active) and the Clique para configurar link, which opens that agent’s screen:
- Recepcionista (Boas-vindas e direcionamento): greeting, customer identification and intent classification;
- Agente de Vendas (Ofertas e conversão): estimates prices, applies discounts and packages and sends the key to close the deal;
- Agente petshop (Banho, tosa e produtos): books baths and grooming, checks available times and informs about plans and packages;
- Agente Veterinário (Clínica e saúde): books appointments and vaccines and informs about neutering;
- Agente Daycare/Hotel (Hospedagem e cuidados): books boarding and daycare, collects the medical and behavior history (anamnese) and informs the stay rules;
- Agente Cadastro (Cadastro de pets): registers new pets and updates the owner’s data.
All agents appear for every shop. If you do not offer a service (for example, you have no daycare), turn the agent off with the Agente ativo button on its screen.
Step 9: Set up the Recepcionista
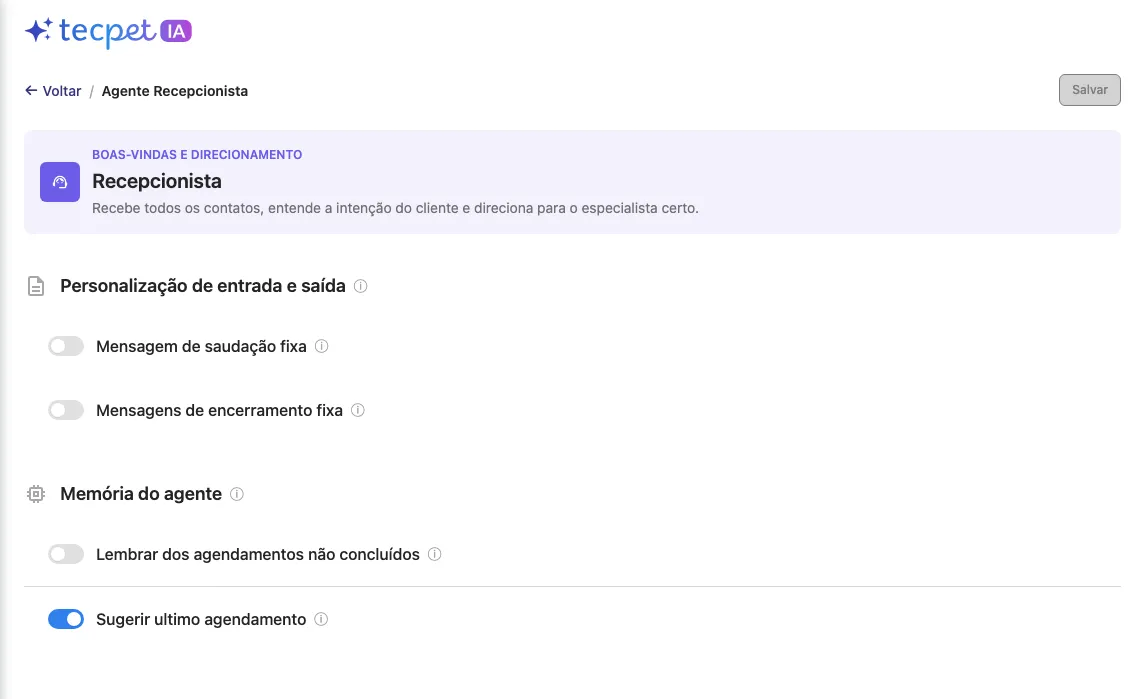
Section titled “Step 9: Set up the Recepcionista”The Recepcionista is the front door: it is always active and has no off button.
Personalização de entrada e saída (entry and exit customization)
- Mensagem de saudação fixa: when on, you write the greeting Para clientes já cadastrados and Para novos clientes (up to 500 characters each). Click the chips to insert variables: Nome do tutor, Nome do pet (registered customers only), Nome da loja, Endereço da loja and Telefone da loja. Leave the field blank to let the AI choose the greeting on its own;
- Mensagens de encerramento fixa: the same, for the goodbye.
Memória do agente (agent memory)
- Lembrar dos agendamentos não concluídos: the AI picks up appointments that were left halfway;
- Sugerir ultimo agendamento: the AI suggests repeating the customer’s last appointment.
Step 10: Set up the Agente petshop (bath and grooming)
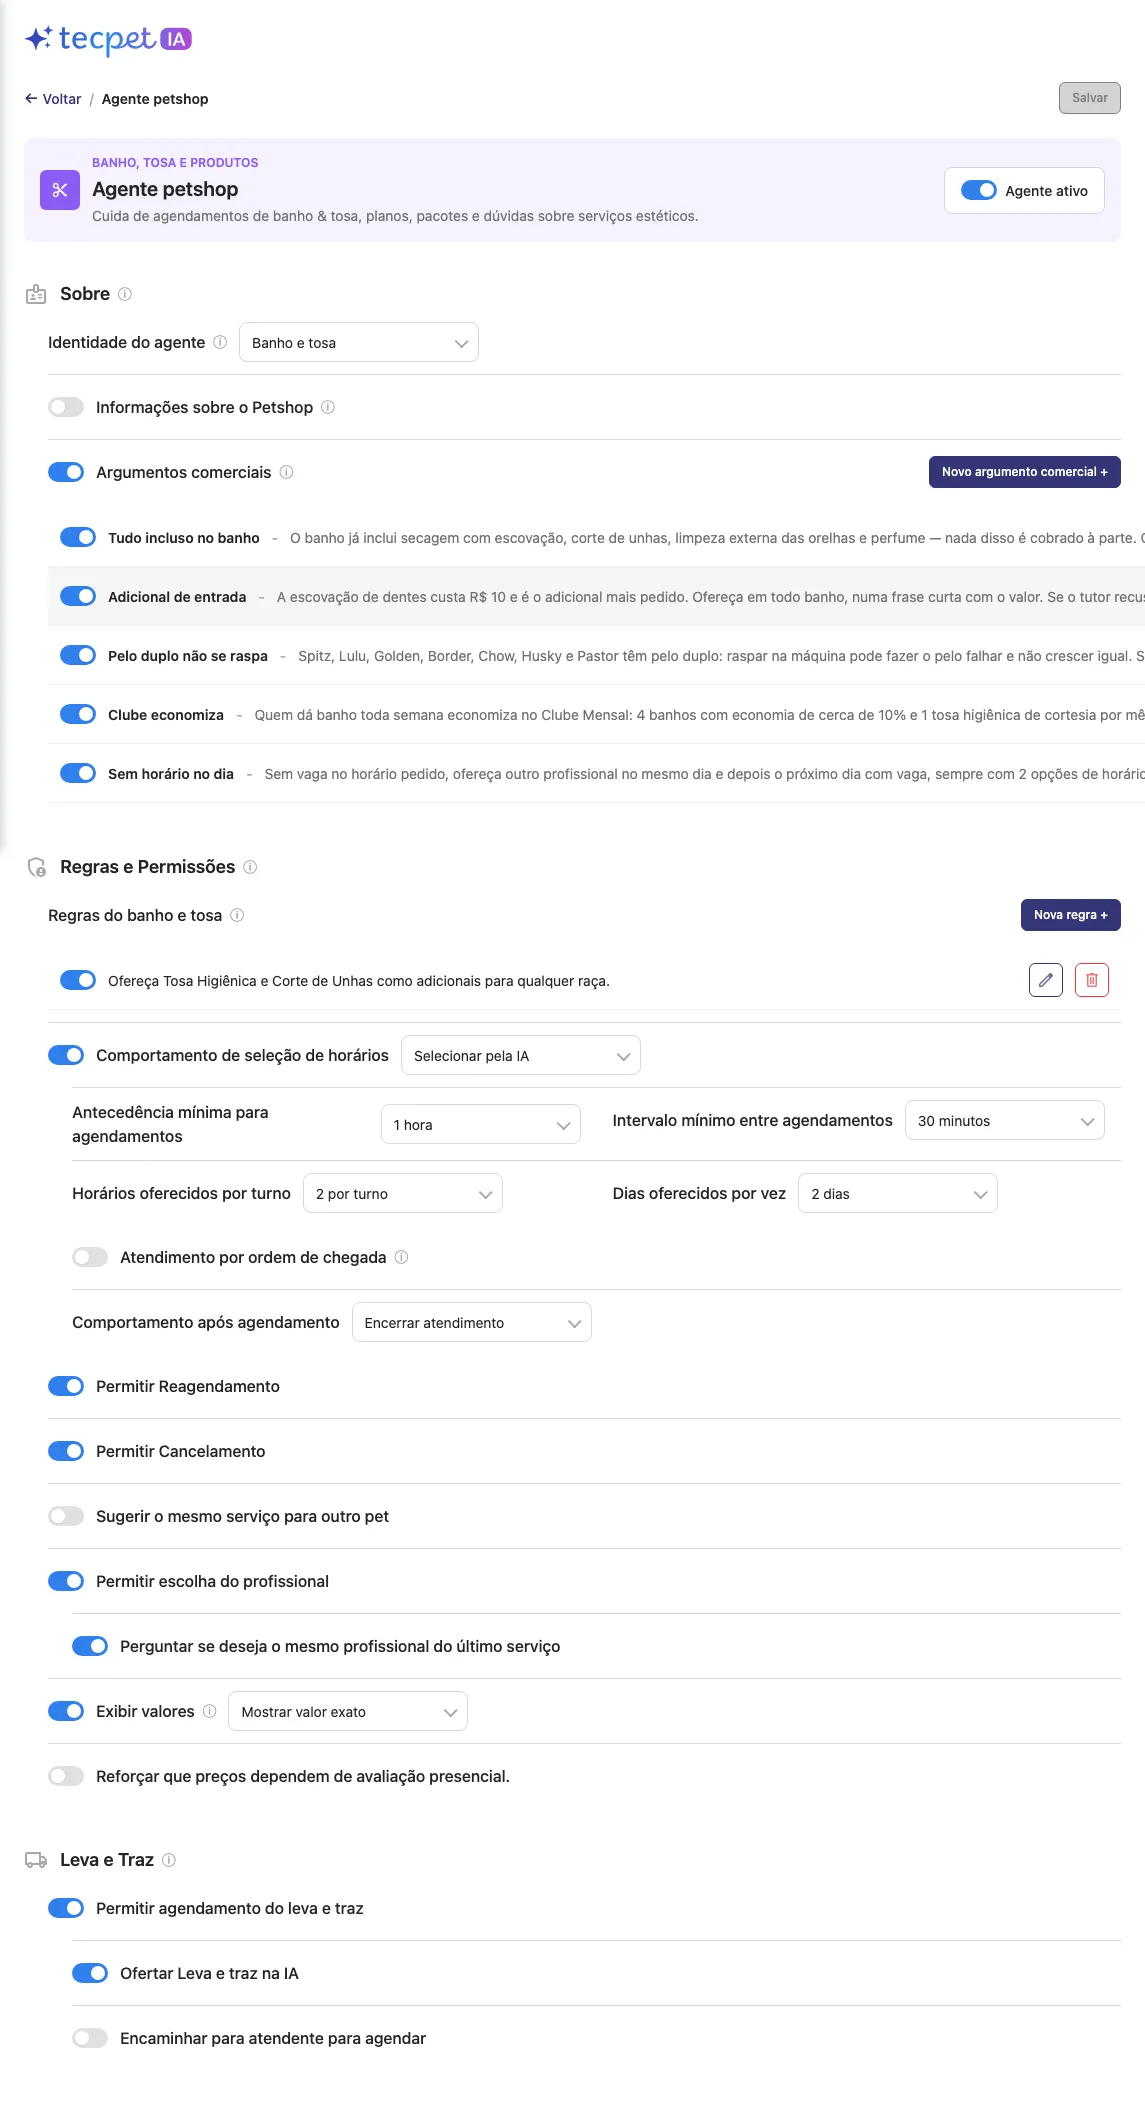
Section titled “Step 10: Set up the Agente petshop (bath and grooming)”Click the Agente petshop card. At the top, the Agente ativo button turns the agent on or off (saves right away). The other fields are only saved with Salvar.
Sobre (About)
- Identidade do agente: how it introduces itself: Petshop (default), Banho e tosa, Estética animal or Beleza animal;
- Informações sobre o Petshop: when on, you build information layers that the AI presents in order (Nova camada button). For now each layer is Texto (up to 500 characters); Arquivo and Áudio show up as coming soon. In Mostrar informações para, choose Todos os clientes, Somente novos clientes or Somente clientes cadastrados;
- Argumentos comerciais: when on, use Novo argumento comercial + to register the arguments the AI uses to sell (Step 11).
Regras e Permissões (Rules and permissions)
- Regras do banho e tosa: short rules the AI follows, one per item, with Nova regra + (Step 11);
- Comportamento de seleção de horários: Selecionar pela IA (the AI offers and books the time) or Encaminhar para humano;
- Antecedência mínima para agendamentos: from 15 minutos to 24 horas (default 30 minutes);
- Intervalo mínimo entre agendamentos: 15 minutos, 30 minutos or 1 hora;
- Horários oferecidos por turno: Todos or from 1 to 5 per shift;
- Dias oferecidos por vez: 1, 2 or 3 dias;
- Atendimento por ordem de chegada: when on, the AI tells the owner (once per appointment) that the shop serves in order of arrival, with the Mensagem do aviso you write;
- Comportamento após agendamento: Encerrar atendimento, Pedir comprovante e encerrar or Encaminhar para humano;
- Permitir Reagendamento and Permitir Cancelamento: whether the customer can reschedule or cancel through the AI;
- Sugerir o mesmo serviço para outro pet: the AI offers to repeat the service for another pet of the owner;
- Permitir escolha do profissional and Perguntar se deseja o mesmo profissional do último serviço;
- Exibir valores: when on, the AI shows prices as Mostrar valor “A partir de” or Mostrar valor exato;
- Reforçar que preços dependem de avaliação presencial.
Leva e Traz (Pickup and delivery)
- Permitir agendamento do leva e traz, with Ofertar Leva e traz na IA (the AI offers the transport on its own) and Encaminhar para atendente para agendar.
Step 11: Register arguments and rules
Section titled “Step 11: Register arguments and rules”Arguments and rules exist in the petshop, Veterinário and Daycare/Hotel agents and work the same way in all of them. They are saved right away, without the screen’s Salvar button.
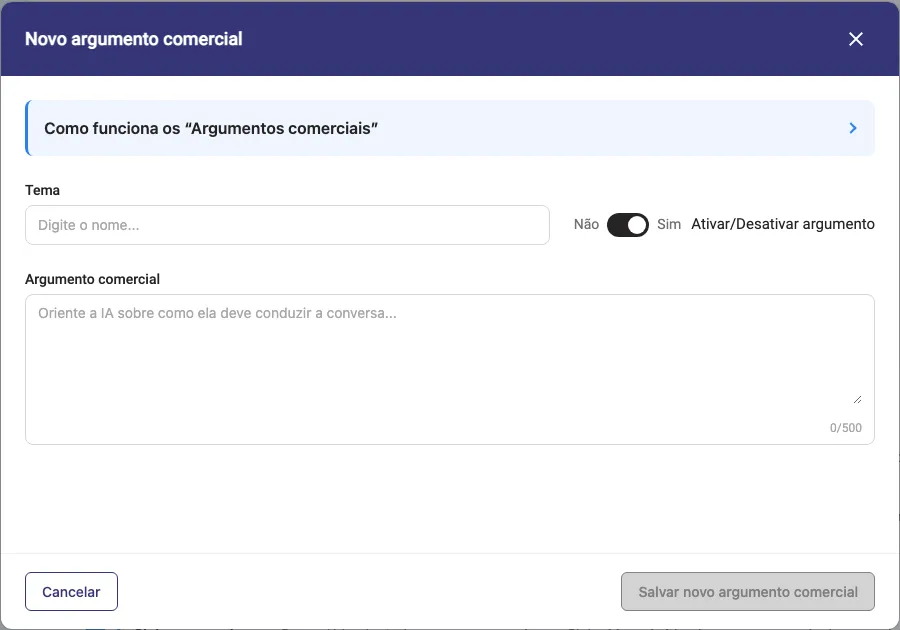
Novo argumento comercial: fill in the Tema* (the subject, e.g. Tudo incluso no banho) and the Argumento comercial (up to 500 characters: how the AI should lead the conversation about that topic). The Ativar/Desativar argumento button lets you pause it without deleting. Click Salvar novo argumento comercial.
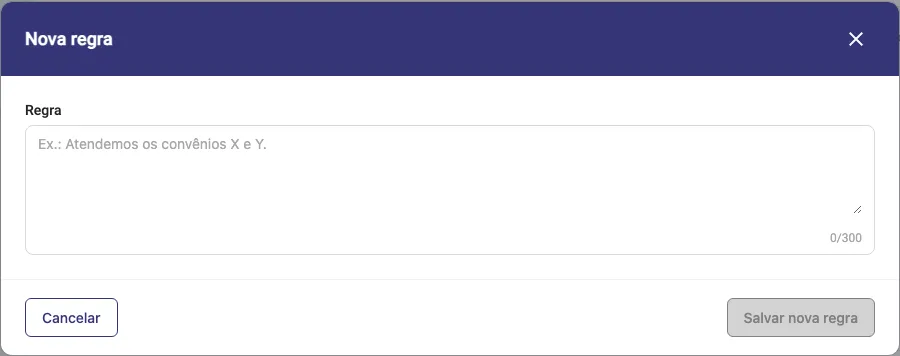
Nova regra: write the Regra (up to 300 characters), for example “Atendemos os convênios X e Y”, “Fazemos leva e traz só nos bairros A e B” or “Não fazemos tosa na tesoura”. Every new rule starts active. Click Salvar nova regra.
In the list, each argument and rule has a button to turn it on and off, edit (pencil) and delete (trash can, with confirmation: deletion cannot be undone).
Step 12: Set up the Agente Veterinário
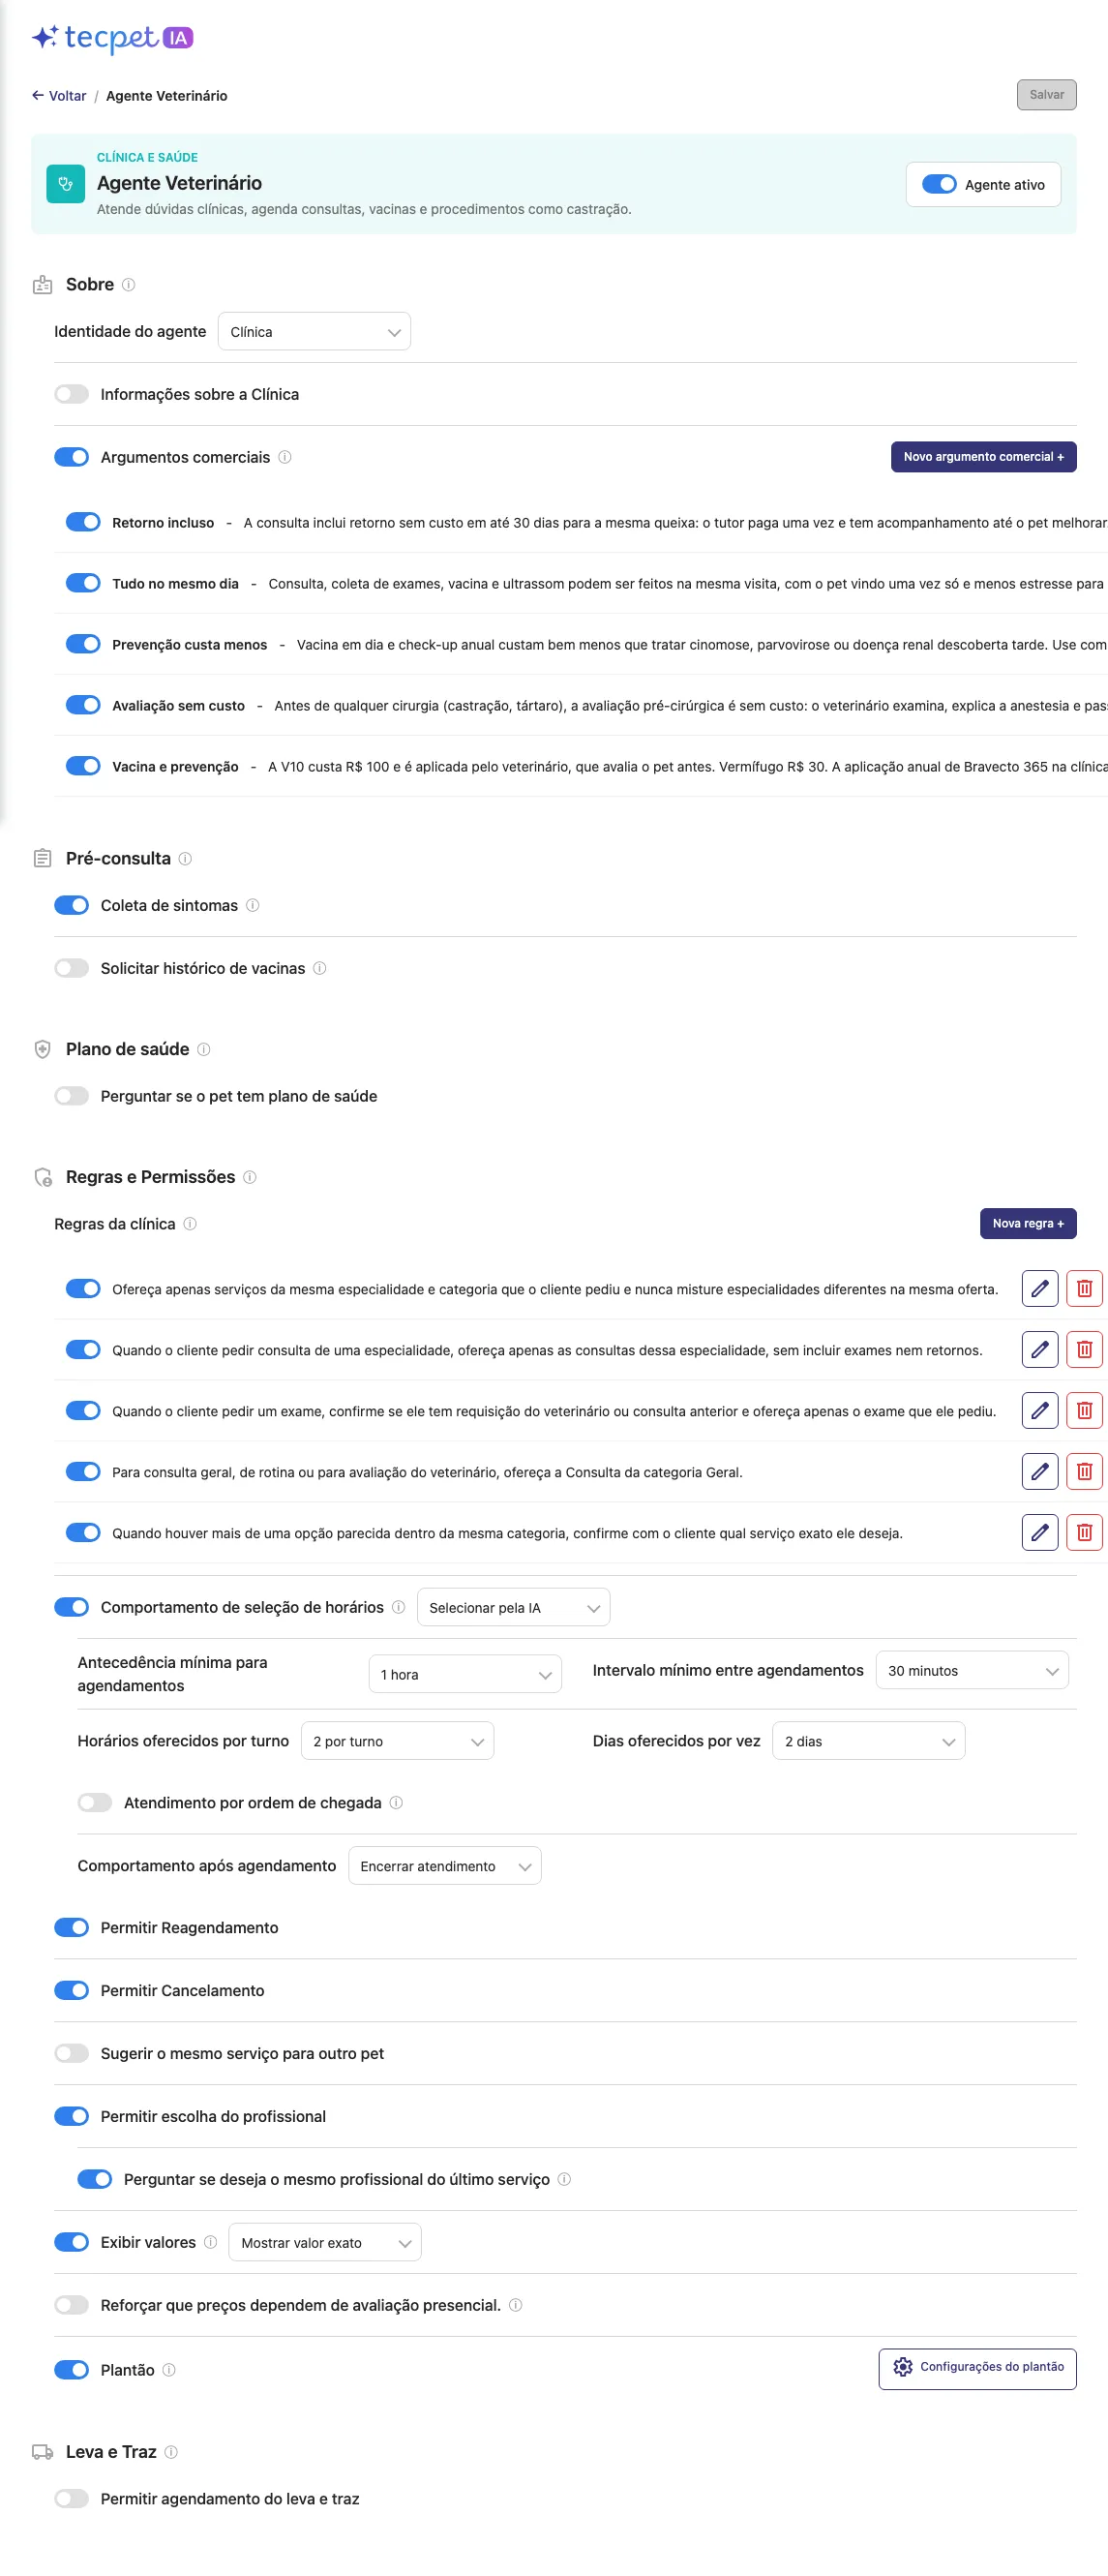
Section titled “Step 12: Set up the Agente Veterinário”Click the Agente Veterinário card. It has the same blocks as the Agente petshop (information layers, arguments, Regras da clínica, times, permissions, prices and pickup and delivery), with these differences:
- Identidade do agente: Clínica (default) or Consultório;
- Pré-consulta: Coleta de sintomas (the AI asks about symptoms before the appointment) and Solicitar histórico de vacinas;
- Plano de saúde: Perguntar se o pet tem plano de saúde and, if so, Solicitar nome do plano de saúde, Solicitar CPF do tutor and Solicitar número do microchip;
- Plantão (on-call service): turn it on if the clinic works on call and click Configurações do plantão;
- Leva e Traz: in the clinic, Permitir agendamento do leva e traz starts off.
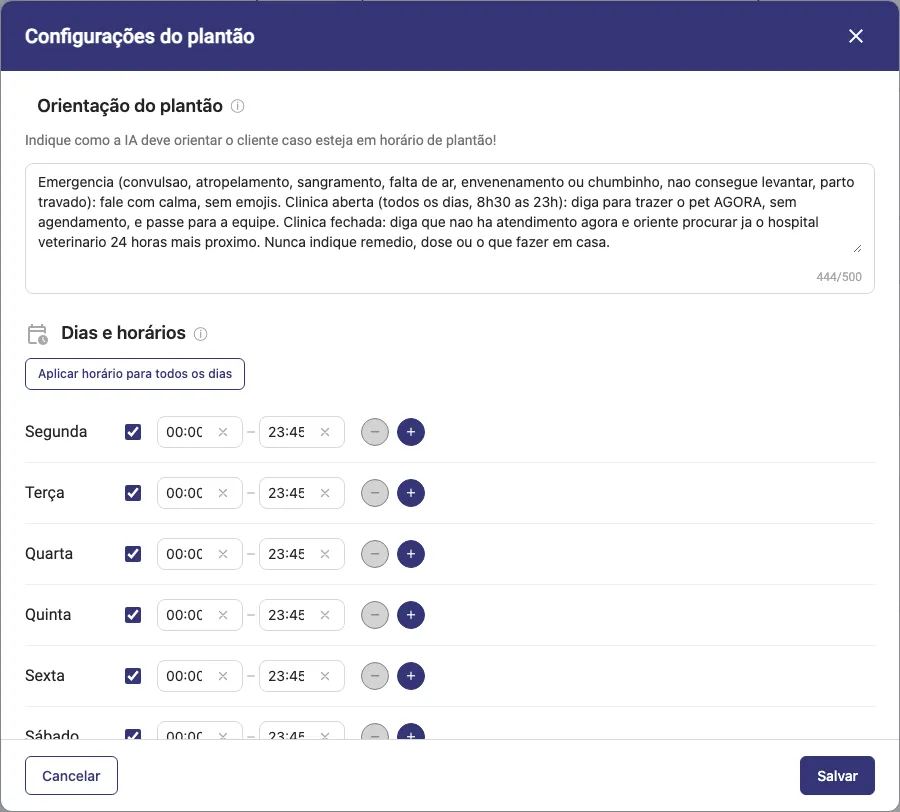
In the Configurações do plantão modal, write the Orientação do plantão (up to 500 characters: how the AI should guide the customer during that time) and mark the Dias e horários of the on-call service, with ranges per day or the Aplicar horário para todos os dias shortcut. Click Salvar: the hours and the guidance are saved right away. The Plantão button itself is only saved with the screen’s Salvar.
Step 13: Set up the Agente Daycare/Hotel
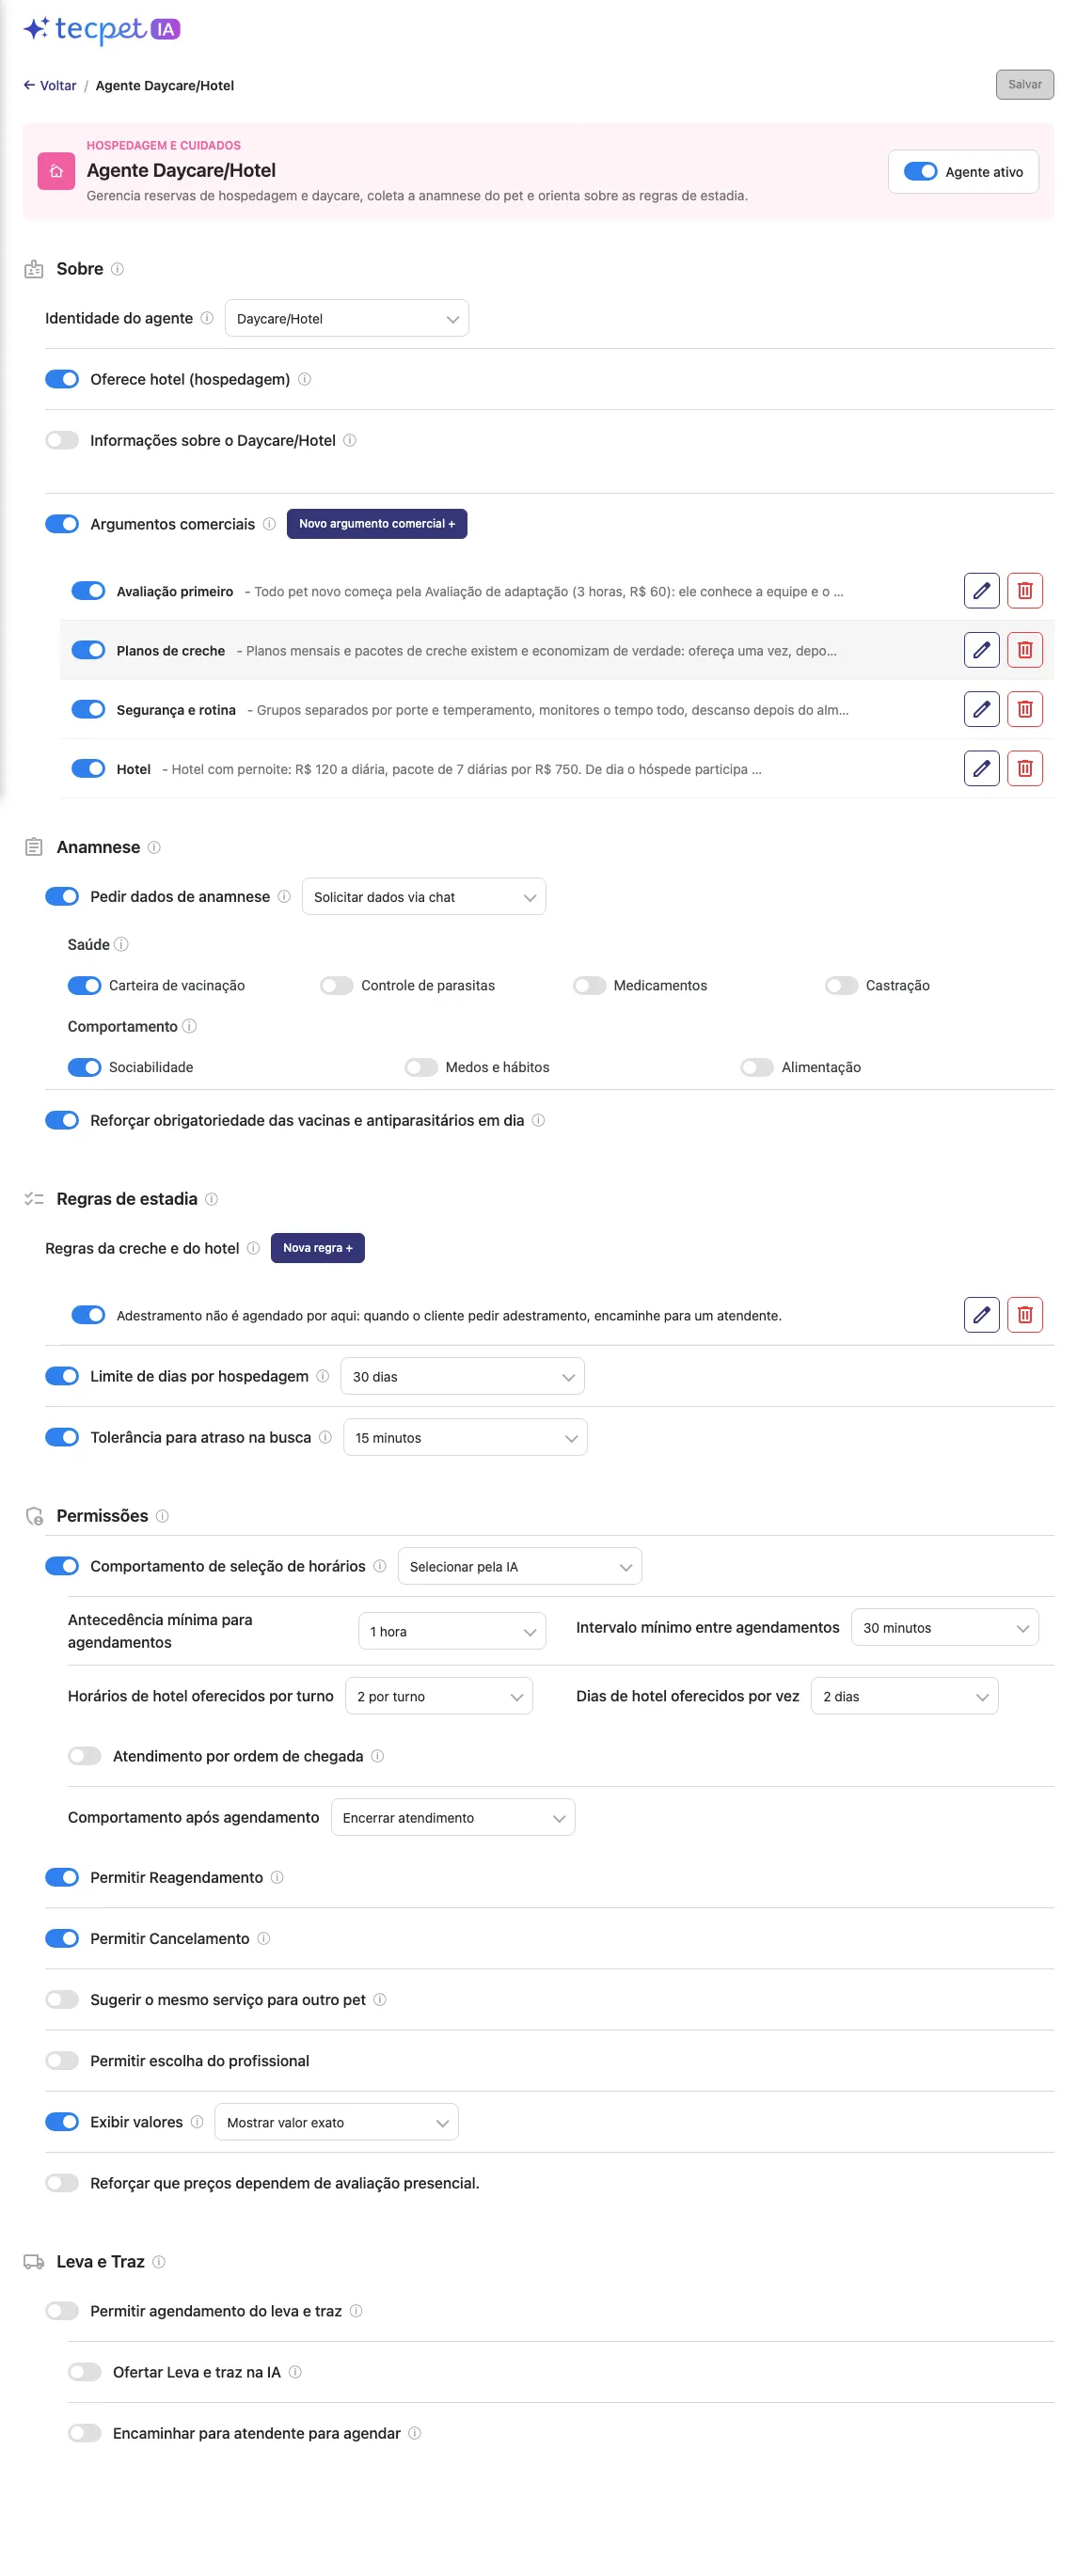
Section titled “Step 13: Set up the Agente Daycare/Hotel”Click the Agente Daycare/Hotel card. Besides the common blocks (information layers, arguments, Regras da creche e do hotel, permissions and pickup and delivery):
- Identidade do agente: Daycare (default), Hotel Pet, Creche or Daycare/Hotel;
- Oferece hotel (hospedagem): off, the AI says the shop has no hotel; on, boarding requests go to this agent and Horários de hotel oferecidos por turno and Dias de hotel oferecidos por vez appear;
- Anamnese (medical and behavior history): Pedir dados de anamnese through Solicitar dados via chat or Solicitar dados via formulário, choosing what to ask in Saúde (Carteira de vacinação, Controle de parasitas, Medicamentos, Castração) and Comportamento (Sociabilidade, Medos e hábitos, Alimentação), and Reforçar obrigatoriedade das vacinas e antiparasitários em dia;
- Regras de estadia: Limite de dias por hospedagem (Sem limites, 7, 15 or 30 dias) and Tolerância para atraso na busca (15 minutos, 30 minutos or 1 hora);
- Comportamento após agendamento: here the default is Pedir comprovante e encerrar.
Step 14: Set up the Agente de Vendas
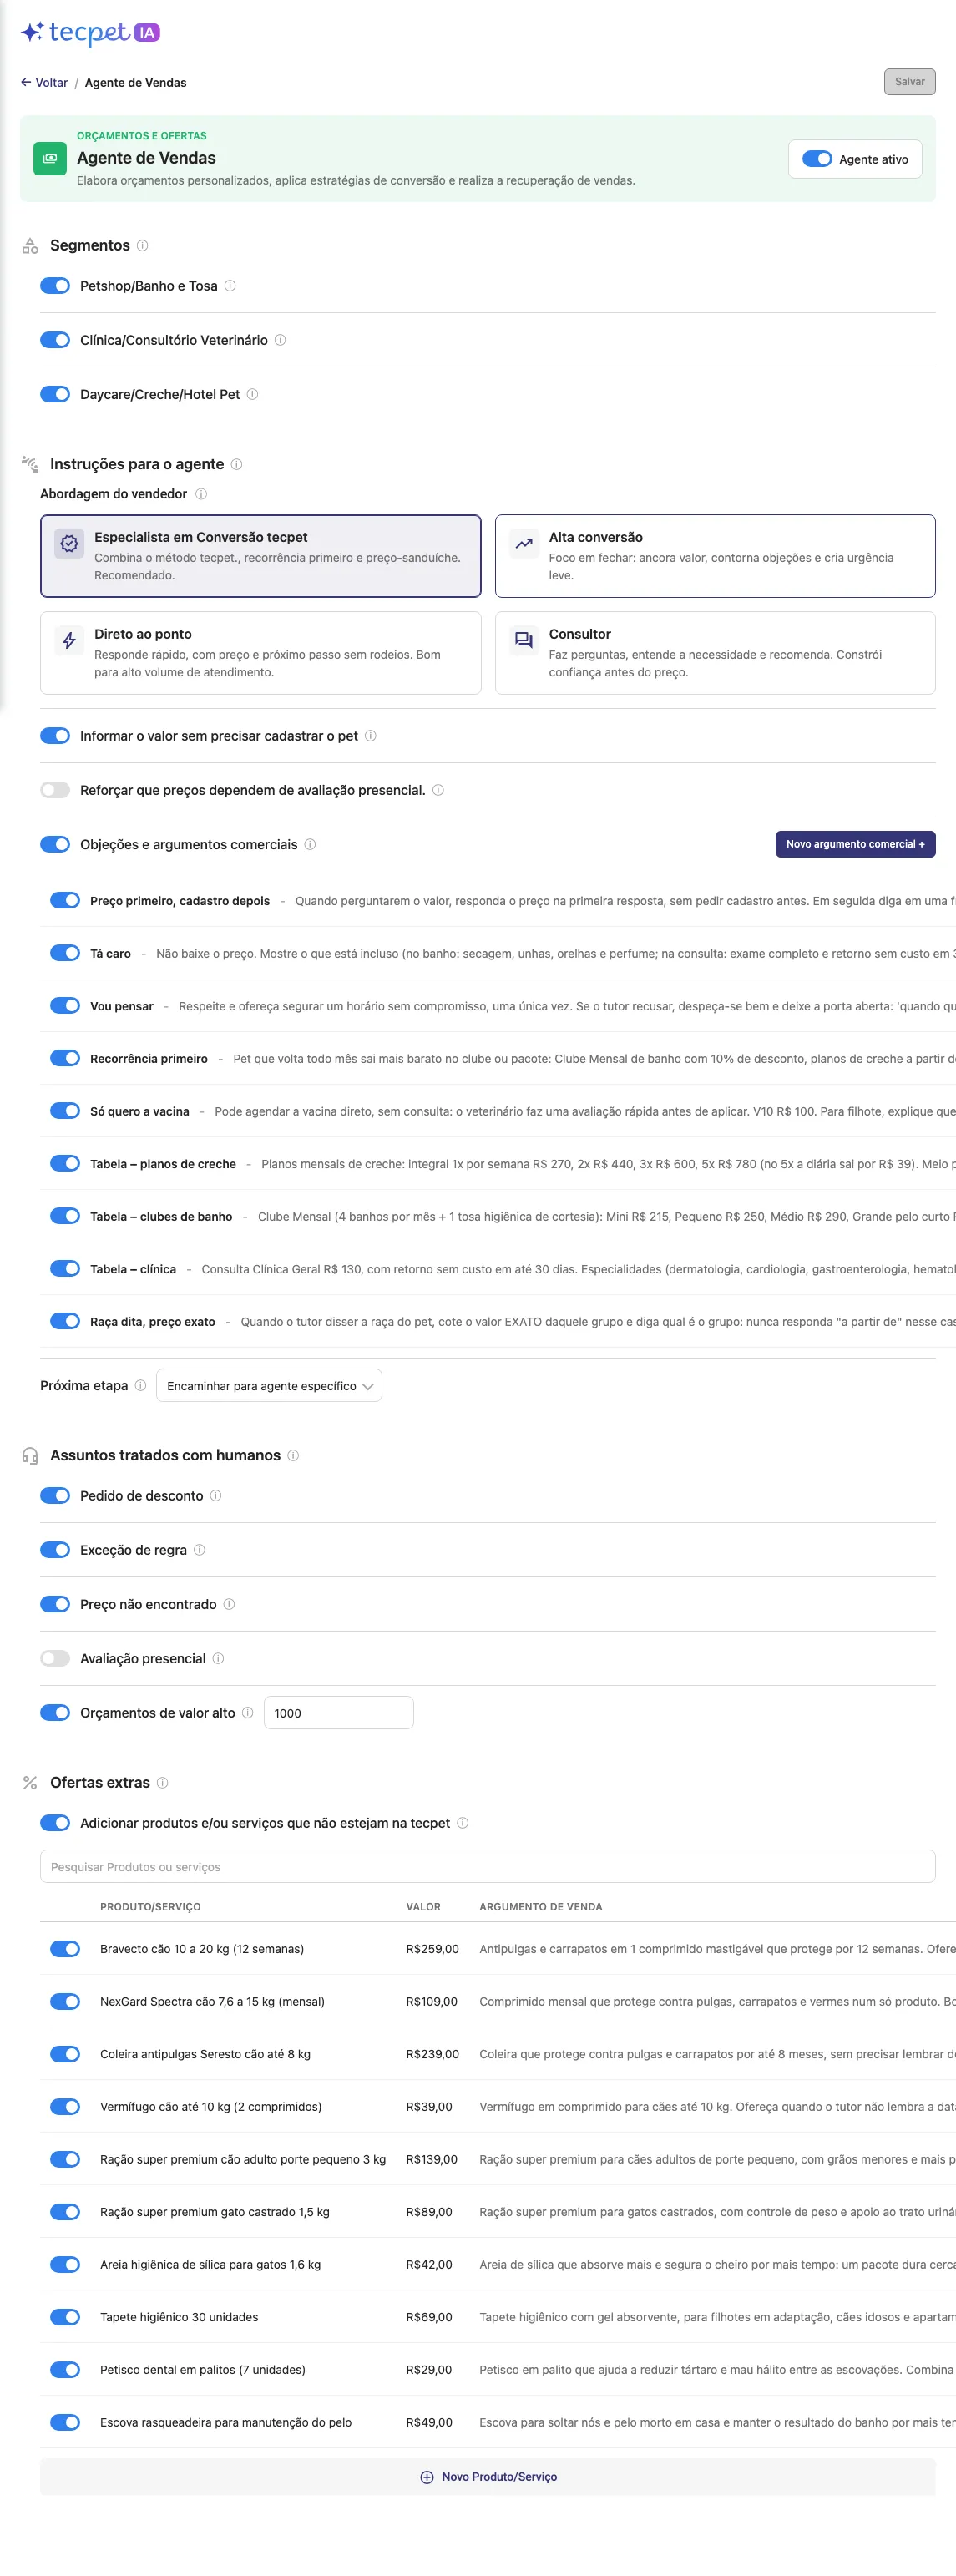
Section titled “Step 14: Set up the Agente de Vendas”Click the Agente de Vendas card. It builds quotes, handles objections and sends the customer on to close the deal.
- Segmentos: in which areas it quotes: Petshop/Banho e Tosa, Clínica/Consultório Veterinário and Daycare/Creche/Hotel Pet;
- Abordagem do vendedor (sales approach): Especialista em Conversão tecpet (default, recommended: recurrence first and sandwich pricing), Alta conversão (anchors value and creates light urgency), Direto ao ponto (price and next step, good for high volume) or Consultor (asks, understands and recommends before the price);
- Informar o valor sem precisar cadastrar o pet: answers right away for those who only want to know the price. For a pet that is not yet registered, the price comes out as “A partir de”;
- Reforçar que preços dependem de avaliação presencial.;
- Objeções e argumentos comerciais: with Novo argumento comercial +, register the customer’s Objeção (e.g. Tá caro, Vou pensar) and how the AI should respond to it;
- Próxima etapa: when the price simulation is done, Encaminhar para agente específico (the service’s agent books) or Encaminhar para humano;
- Assuntos tratados com humanos: Pedido de desconto, Exceção de regra, Preço não encontrado, Avaliação presencial and Orçamentos de valor alto (with the Valor limite (R$) from which the conversation goes to the team);
- Ofertas extras: turn on Adicionar produtos e/ou serviços que não estejam na tecpet and use Novo Produto/Serviço to register Produto/Serviço*, Valor (R$) and the Argumento de venda the AI uses when offering it. Offers are saved right away.
Step 15: Set up the Agente Cadastro
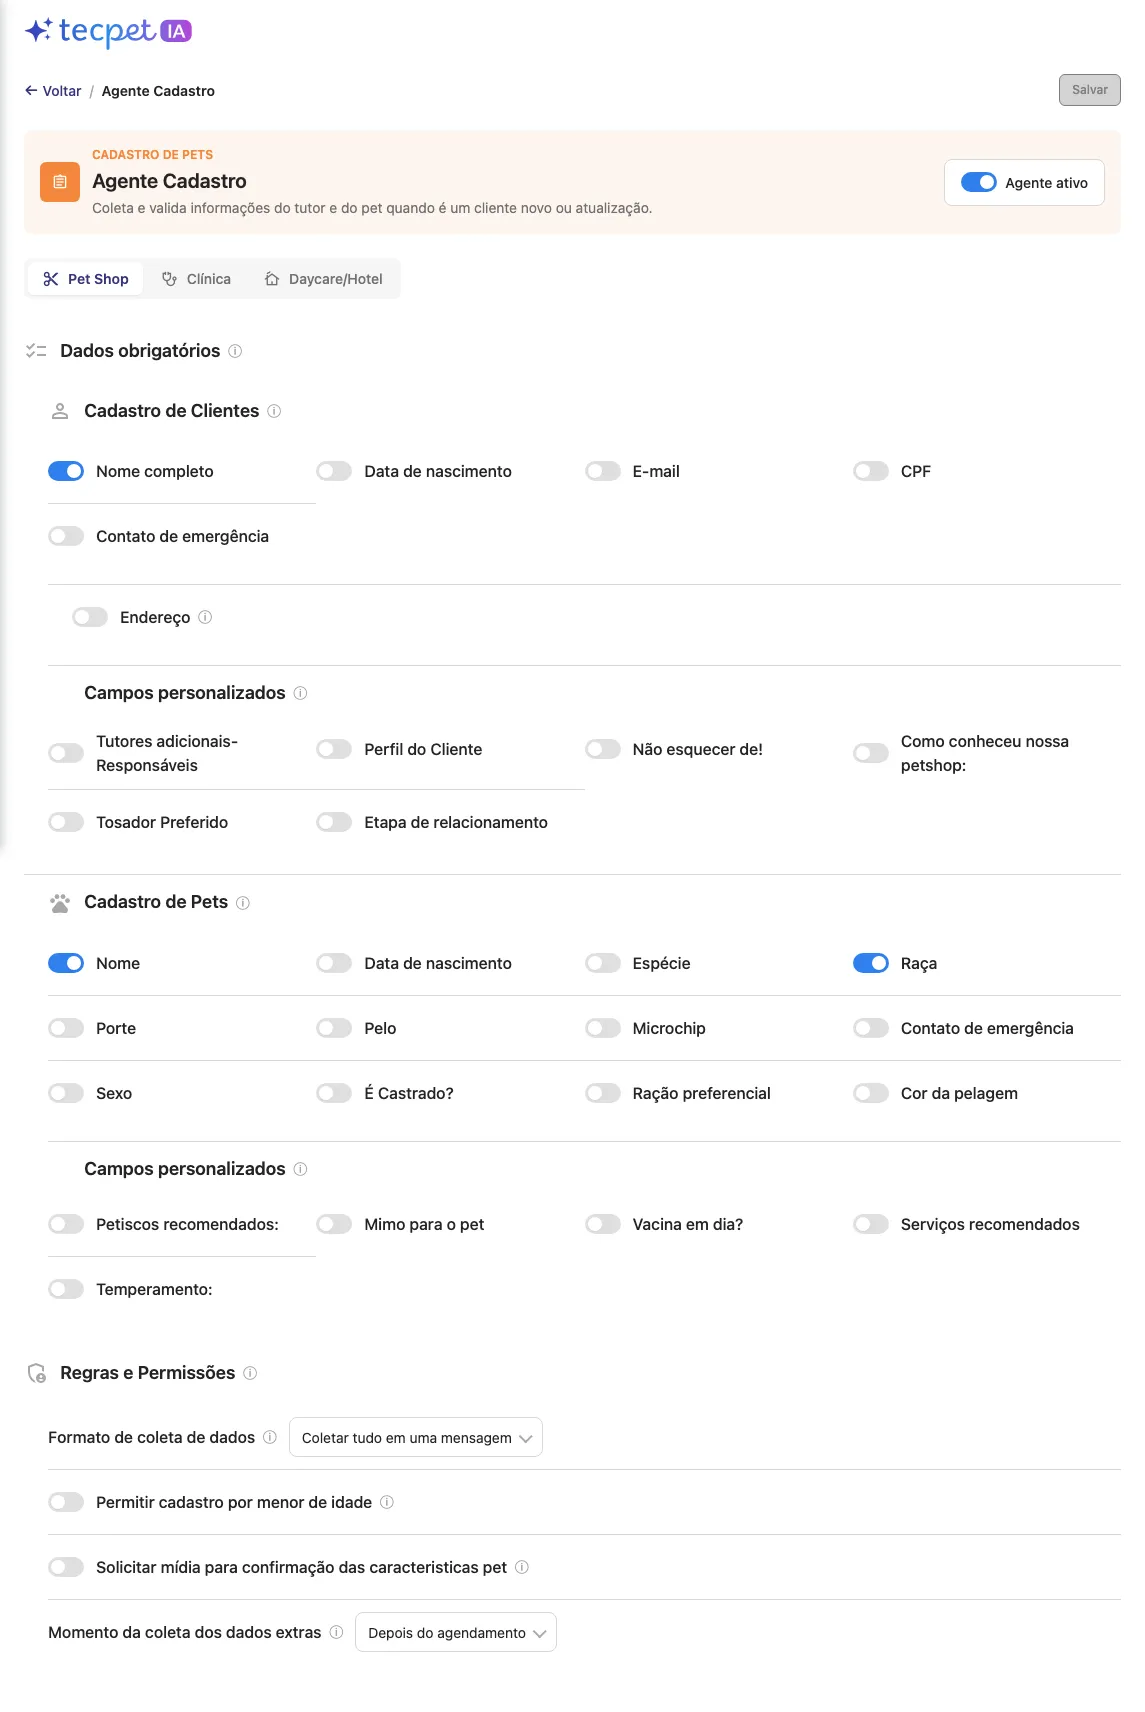
Section titled “Step 15: Set up the Agente Cadastro”Click the Agente Cadastro card. Use the Pet Shop, Clínica and Daycare/Hotel tabs: each one has its own settings, and Salvar saves all three together.
Dados obrigatórios (required data): each data item that is turned on is requested and validated by the AI during registration.
- Cadastro de Clientes: Nome completo, Data de nascimento, E-mail, CPF, Contato de emergência and Endereço (when on, Coletar apenas de clientes sem endereço no cadastro and Coletar apenas de clientes com leva e traz appear; without these options, customers who already have an address only confirm whether it is still the same), plus your customer custom fields;
- Cadastro de Pets: Nome, Data de nascimento, Espécie, Raça, Porte, Pelo, Microchip, Contato de emergência, Sexo, É Castrado?, Ração preferencial, Cor da pelagem and the pet custom fields.
Regras e Permissões
- Formato de coleta de dados: Coletar tudo em uma mensagem or Perguntar separadamente;
- Permitir cadastro por menor de idade;
- Solicitar mídia para confirmação das caracteristicas pet: the AI asks for a photo or video of the pet;
- Momento da coleta dos dados extras: Antes do agendamento or Depois do agendamento.
Step 16: Save and follow the AI review
Section titled “Step 16: Save and follow the AI review”In the Configurações gerais and in the agent screens, click Salvar (at the top right). It is only enabled when there is a change and shows “Agente atualizado com sucesso” when saved.
What saves right away, without Salvar: the service mode, the personality, the inactivity, the Agente ativo button, arguments, rules, extra offers, custom topics, the on-call service and campaign triggers. Everything else is only saved with Salvar: if you leave the screen without saving, the change is lost.
AI review of the texts: when you leave a free text field (agent name, context, messages, layers, arguments, rules, etc.), the AI itself analyzes the text. You see Analisando… and then one of these results: Aprovado pela IA; Sugestão da IA (with Por quê?, Editar o meu and Usar sugestão); Reescreva para salvar (the text asks for something the AI cannot do); or Não analisado (with Tentar de novo).
Step 17: Create campaign triggers
Section titled “Step 17: Create campaign triggers”The Gatilhos de campanha card (Resposta pronta para quem chega por um anúncio ou campanha) is at the end of the home screen. It shows how many triggers are in use out of your plan’s limit (e.g. 0 de 1 em uso). If your plan does not include the feature, the Desbloquear funcionalidade button appears.
In the list, each trigger shows its status (Pausado, Vencido, Sem data de término or Termina em dd/mm), the phrases that fire it, what it sends and what happens Depois (Continua com a IA, Vai para o atendente or Direto para o atendente). The button on each row pauses or activates it right away. The trigger only applies to the first message of the conversation, and triggers that go to the attendant do not use up an AI session.
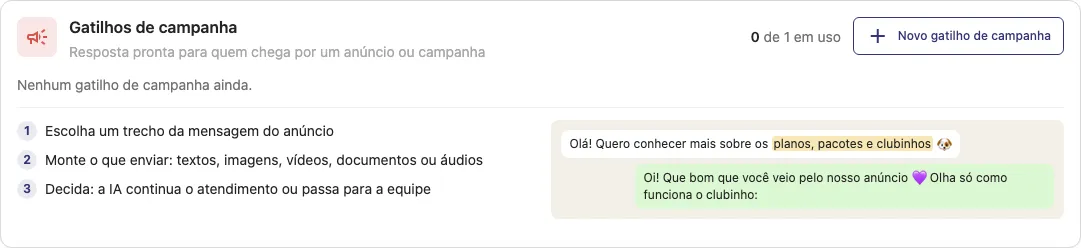
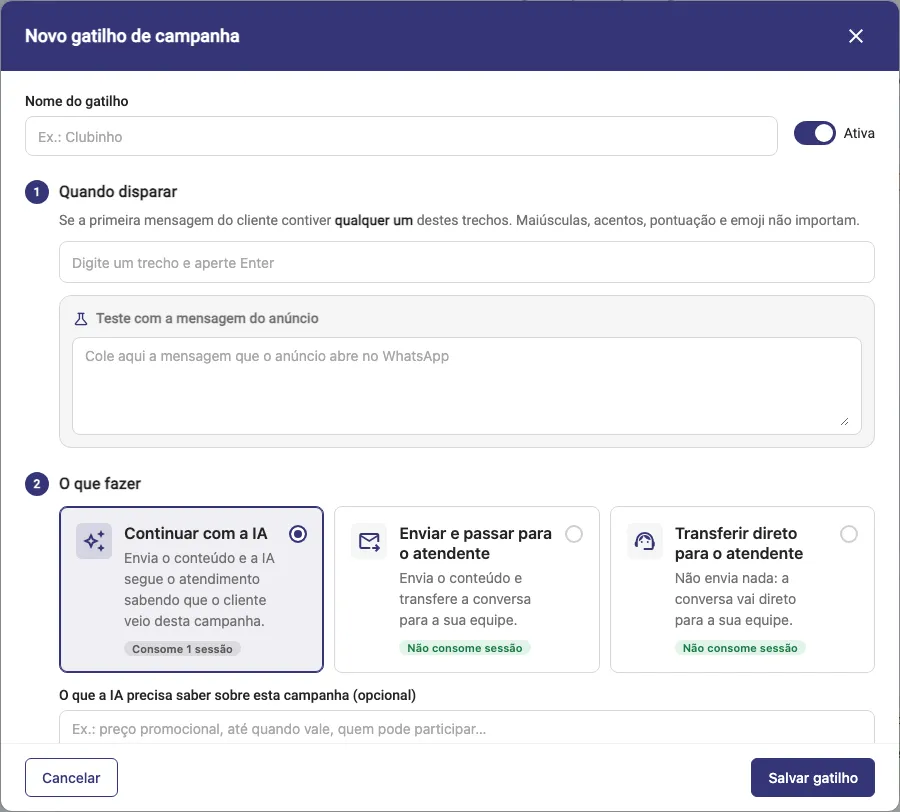
Click Novo gatilho de campanha and fill in:
- Nome do gatilho* (up to 60 characters) and the Ativa button;
- 1 · Quando disparar: type the phrases from the ad message and press Enter (from 3 to 100 characters each, up to 10 phrases). The trigger fires if the customer’s first message contains any one of them; capital letters, accents, punctuation and emoji do not matter. Avoid single-word phrases, which may fire in conversations that did not come from the ad. Use Teste com a mensagem do anúncio to paste the message and see whether it fires;
- 2 · O que fazer: Continuar com a IA (sends the content and the AI continues the service knowing about the campaign; uses 1 session and only works in Auto Atendimento mode), Enviar e passar para o atendente or Transferir direto para o atendente (sends nothing). With Continuar com a IA, tell it in O que a IA precisa saber sobre esta campanha the promotional price, the expiry date and who can take part (up to 1,000 characters);
- 3 · O que enviar: build the content in the order it will be sent (drag to reorder, up to 20 items): Texto (up to 500 characters), Imagem ou vídeo (JPG, PNG or MP4 with audio; image up to 5 MB, video up to 16 MB), Documento (PDF, Word, Excel, PowerPoint, TXT or CSV) and Áudio (record in the browser or upload MP3, AAC, OGG, OPUS, M4A or AMR);
- Até quando vale: Sem data de término or Termina em a date (valid until 11:59 pm, Brasília time).
Click Salvar gatilho.
Step 18: Test in the simulator and ask the assistant
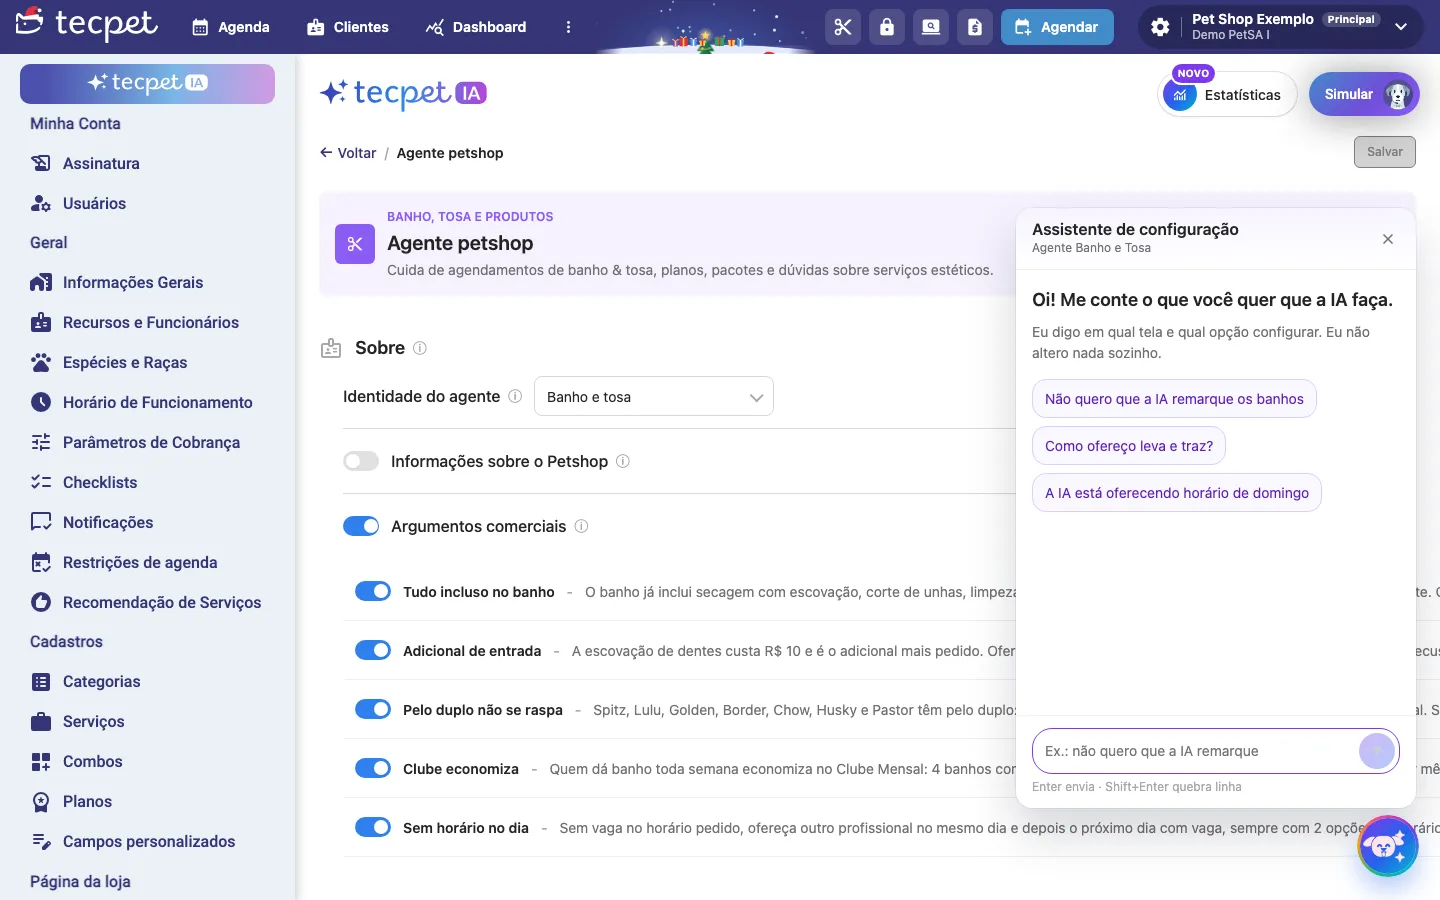
Section titled “Step 18: Test in the simulator and ask the assistant”- Simular (button in the top right corner): opens a test conversation so you can talk to the AI as if you were the customer, without using WhatsApp. Use a test customer: whatever the AI books in the simulation goes into the schedule;
- Assistente de configuração (the little dog in the bottom right corner, on every New AI screen): tell it what you want the AI to do, for example “não quero que a IA remarque os banhos” (I don’t want the AI to reschedule baths), and it shows which screen and which option to change, with the current value and a button to open the right screen. It only guides, it never changes anything on its own, and it has a daily limit of questions.
Step 19: Follow the AI Statistics
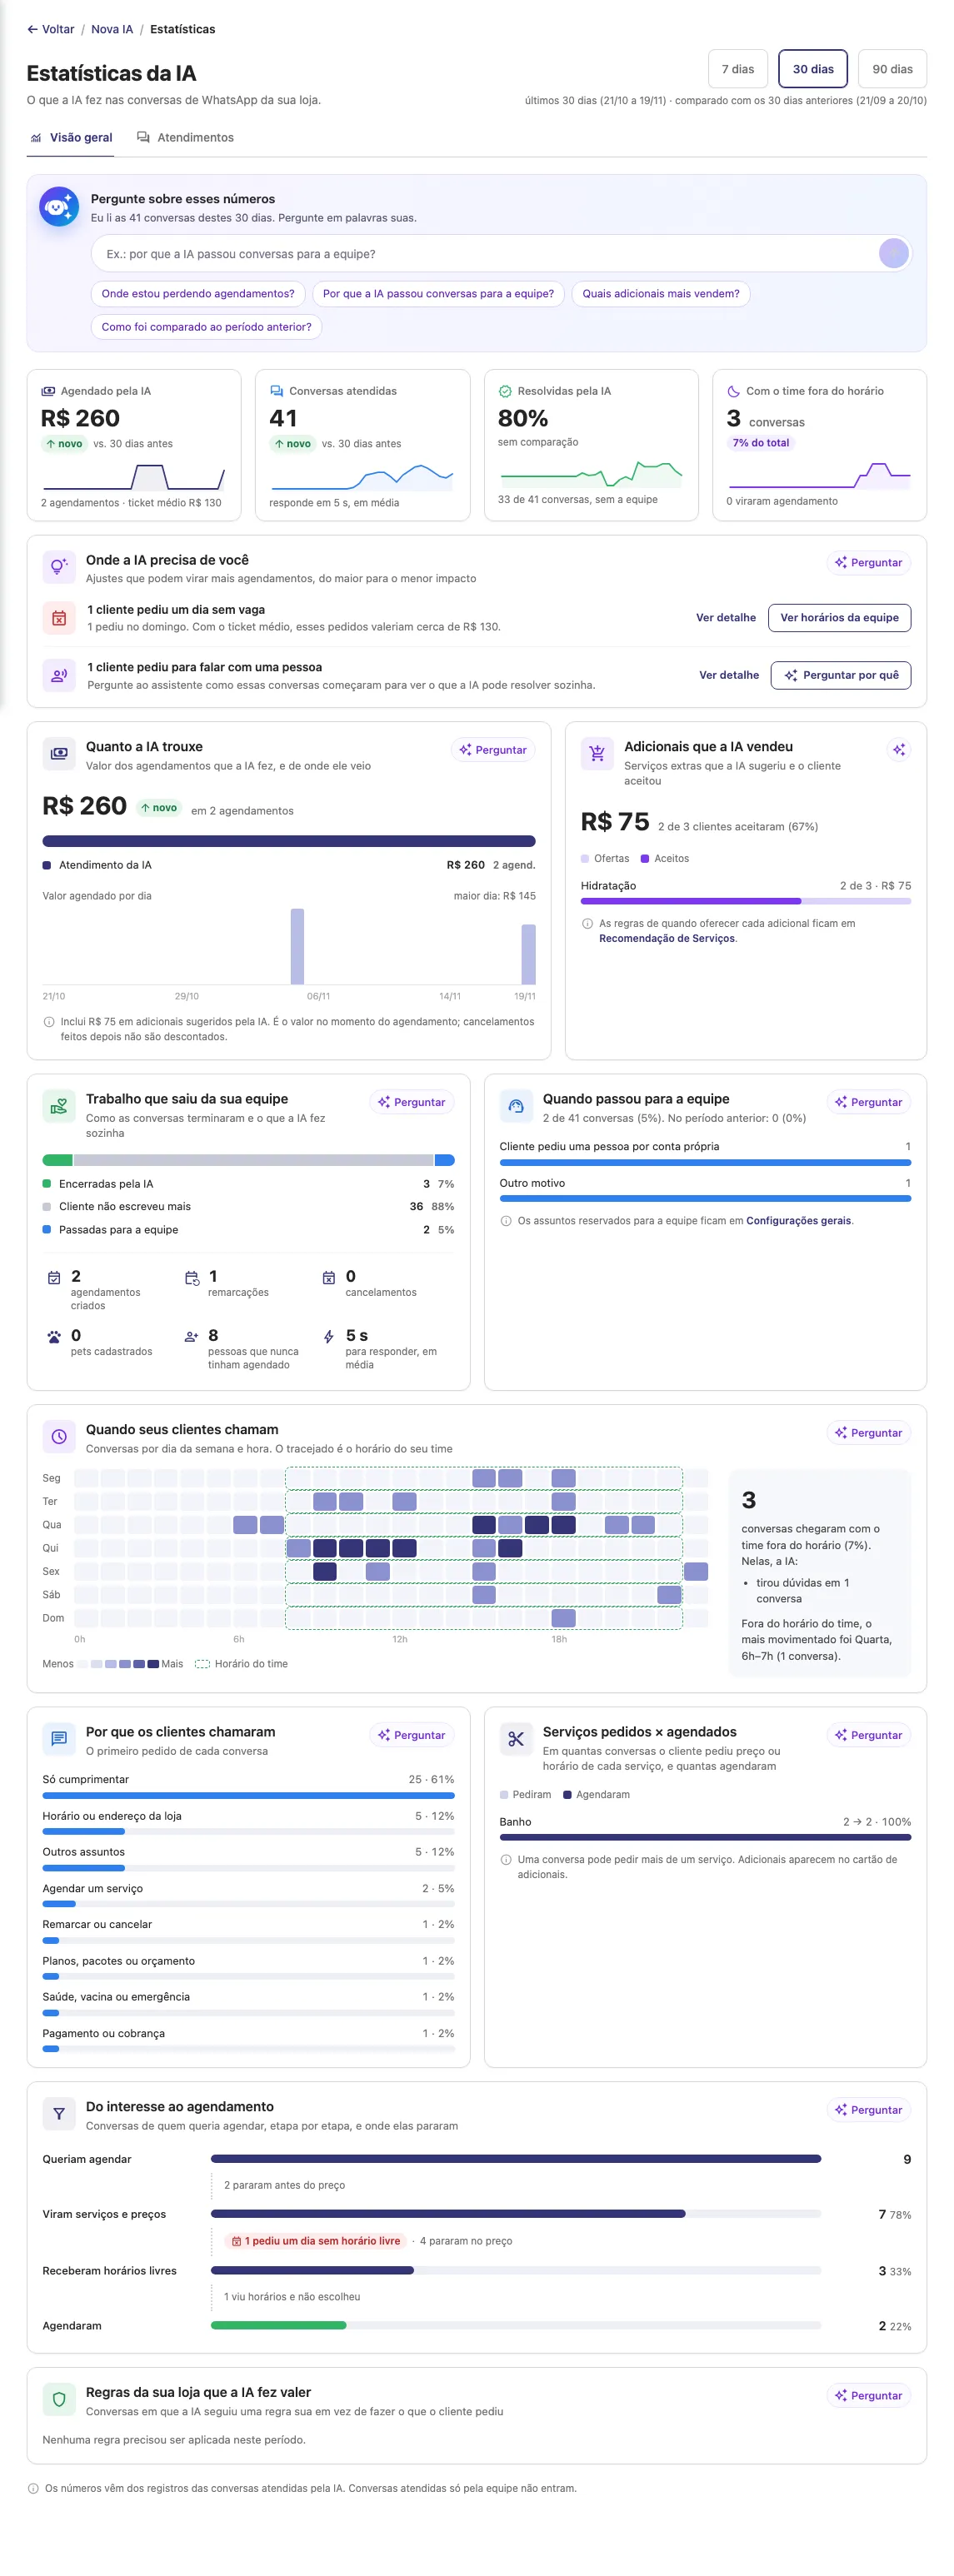
Section titled “Step 19: Follow the AI Statistics”Click Estatísticas (top right corner). The Estatísticas da IA screen shows what the AI did in the shop’s WhatsApp conversations over 7 dias, 30 dias (default) or 90 dias, compared with the previous period.
Visão geral (overview)
- Pergunte sobre esses números: write a question in your own words (e.g. Onde estou perdendo agendamentos?) and the AI answers by reading the conversations of the period;
- Resumo do período: Agendado pela IA (value and average ticket), Conversas atendidas, Resolvidas pela IA (without needing the team) and Com o time fora do horário;
- Onde a IA precisa de você: adjustments that can turn into more bookings, from highest to lowest impact, with a button to go straight to the setting;
- And the cards Quanto a IA trouxe, Adicionais que a IA vendeu (linked to Recomendação de Serviços), Trabalho que saiu da sua equipe, Quando passou para a equipe, Quando seus clientes chamam, Por que os clientes chamaram, Serviços pedidos × agendados, Do interesse ao agendamento and Regras da sua loja que a IA fez valer.
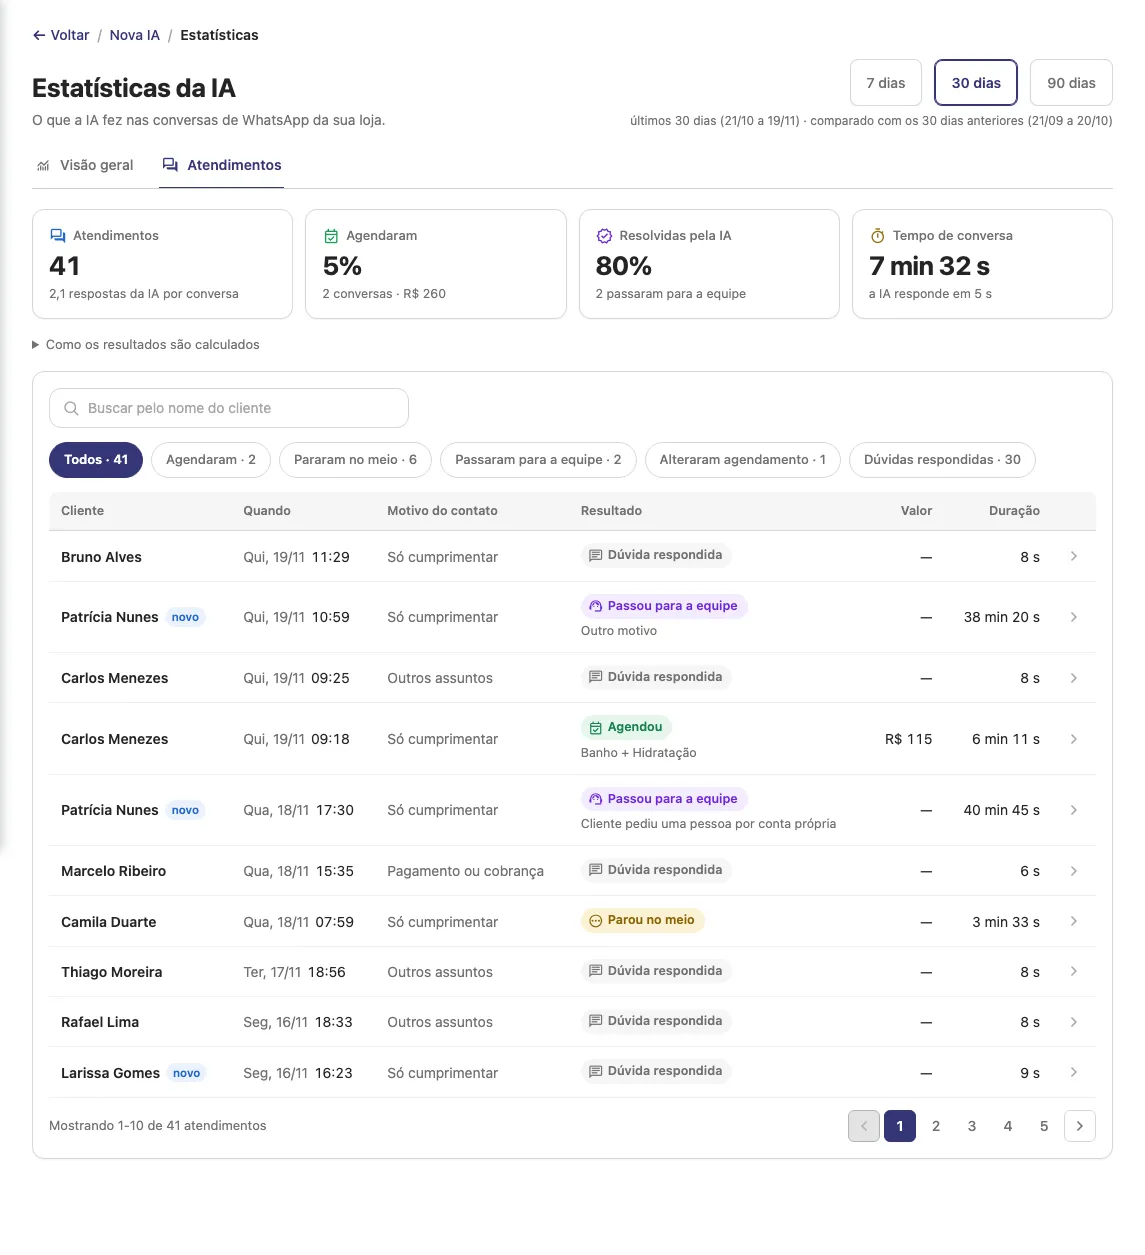
Atendimentos: the list of every conversation handled by the AI, with search by customer name and filters (Agendaram, Pararam no meio, Passaram para a equipe, Alteraram agendamento, Dúvidas respondidas, Em andamento). Click a row to see the summary, how far the customer got (Contato, Serviços, Preço, Horários, Agendou), the timeline and Ver conversa. Only conversations handled by the AI are included.
How to edit or undo later
Section titled “How to edit or undo later”Go back to Configurações → tecpet IA at any time. From the home screen, use Editar on the cards or Clique para configurar on the agents; on each screen, the Voltar link takes you back to the home screen.
- To pause the whole AI, choose the Desligado mode (takes effect right away);
- To stop one agent, turn off Agente ativo on its screen (the Recepcionista cannot be turned off);
- To pause an argument, rule, offer, topic or trigger without deleting it, use the on/off button on its row. Deleting cannot be undone;
- Changes made on a screen and not saved are lost when you leave: check Salvar first.
See also: Chatbot and AI: overview · AI conversations and credits · Connect WhatsApp to the official API (Meta).