
Connect an AI assistant to tecpet (Claude, ChatGPT and Gemini)
The API pública (public API) lets the AI assistant you already use talk directly to your shop in tecpet. Once connected, you ask in plain language (“how many appointments did I have in October?”, “what times do I have tomorrow for Mel’s bath?”) and the assistant looks up the answer in your shop’s schedule, clients, pets and finances, right away. The connection uses an open standard called MCP and lives in Configurações → Sistema → API (Settings → System → API), in the Assistentes de IA (AI assistants) section. You don’t need to generate a key or write any code: the assistant itself opens the tecpet login and you choose what it can see and do. To connect a website or a management system (rather than an AI), see Generate the public API key.
Can I just ask an AI how my shop is doing? #

Stop hunting for numbers in reports
Ask in plain language and get the answer with your shop's real data.
“Whoever asks and gets the answer right away decides faster.”
Day to day, finding out how much came in this month, how many baths are booked tomorrow or which client disappeared means opening a screen, filtering, exporting and adding things up. When the answer takes a while, the decision waits and the opportunity passes.
With the public API, the AI assistant you already use (Claude, ChatGPT, Gemini) starts querying tecpet on the spot. You ask the way you would ask a person and it answers with your shop's schedule, clients, pets and finances. If you allow it, it also books, reschedules and registers, always confirming with you first.
Before you start: the API pública (public API) module
Section titled “Before you start: the API pública (public API) module”The connection only works when your shop has the API pública module subscribed. Without it, the API screen shows an ad with a sample conversation and the Contratar a API pública (Subscribe to the public API) button, which takes you to the module subscription. Once subscribed, the screen shows the Assistentes de IA section.
You will also need an account with an assistant that accepts custom connectors. That depends on the plan you have with Claude, ChatGPT or Gemini, not on tecpet.
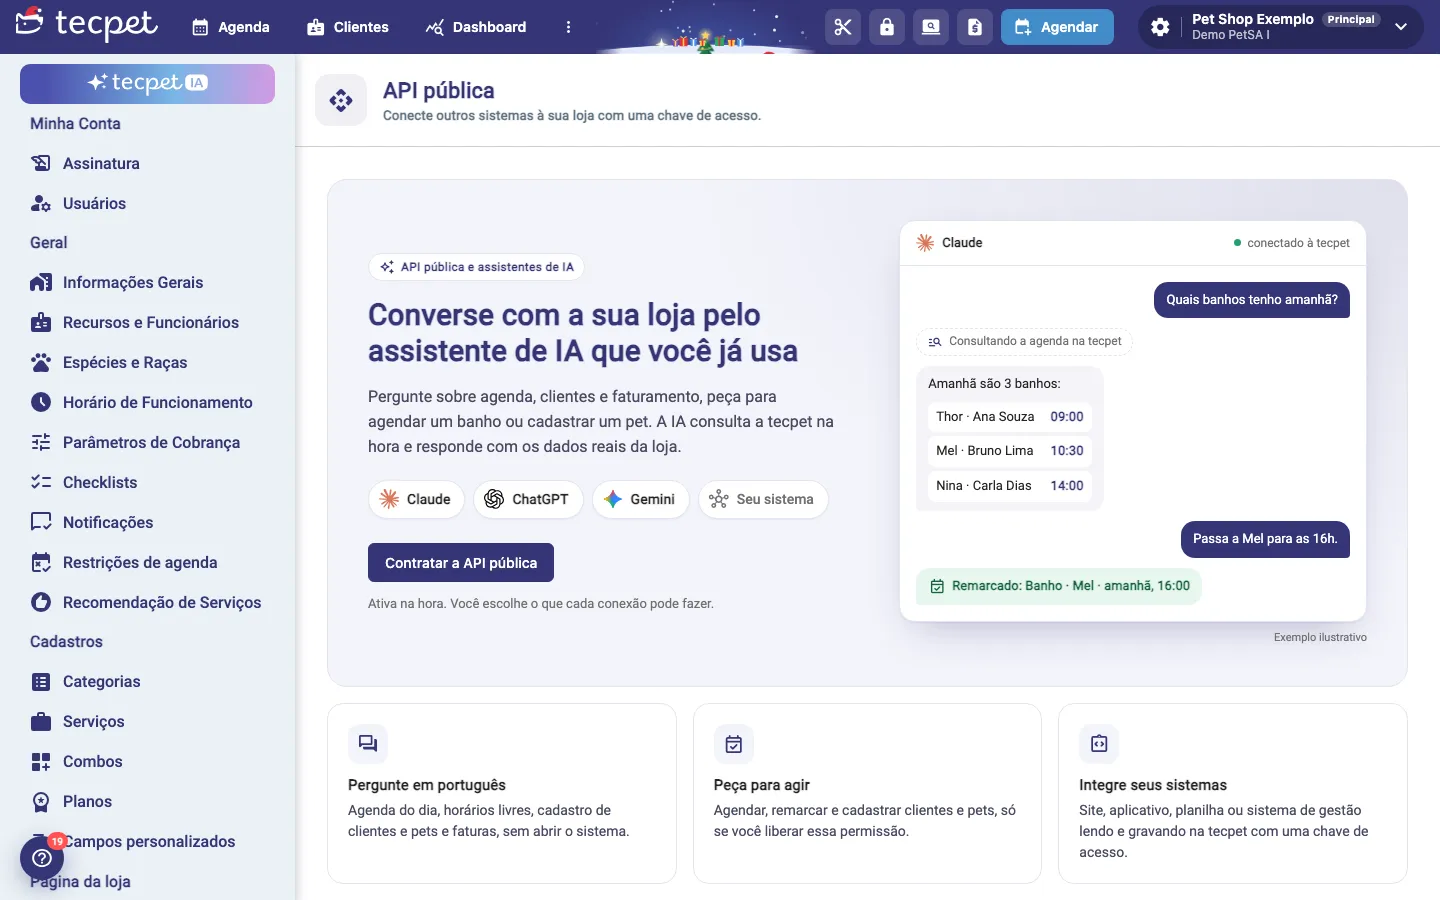
Step 1: Open the API screen and copy the address
Section titled “Step 1: Open the API screen and copy the address”Go to Configurações (Settings; it will ask for the administrator password) and, in the side menu, open Sistema → API (System → API). Scroll down to Assistentes de IA.
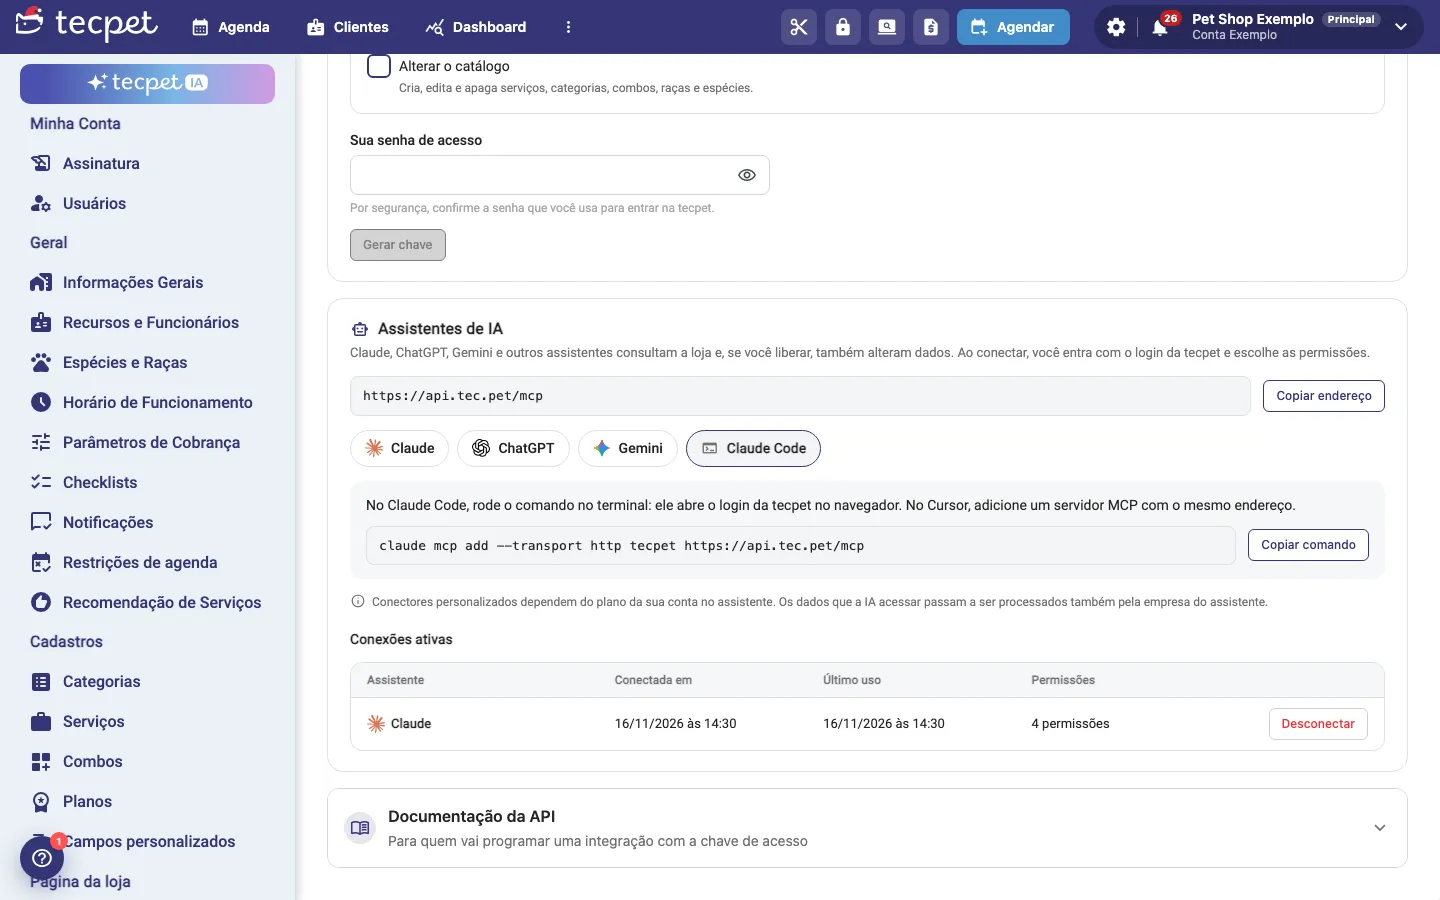
At the top of the block is the tecpet server address: https://api.tec.pet/mcp. Click Copiar endereço (Copy address). This is the address you paste into the assistant.
Right below there is one tab for each assistant (Claude, ChatGPT, Gemini and Claude Code), each with its own step by step. The next steps cover each tab.
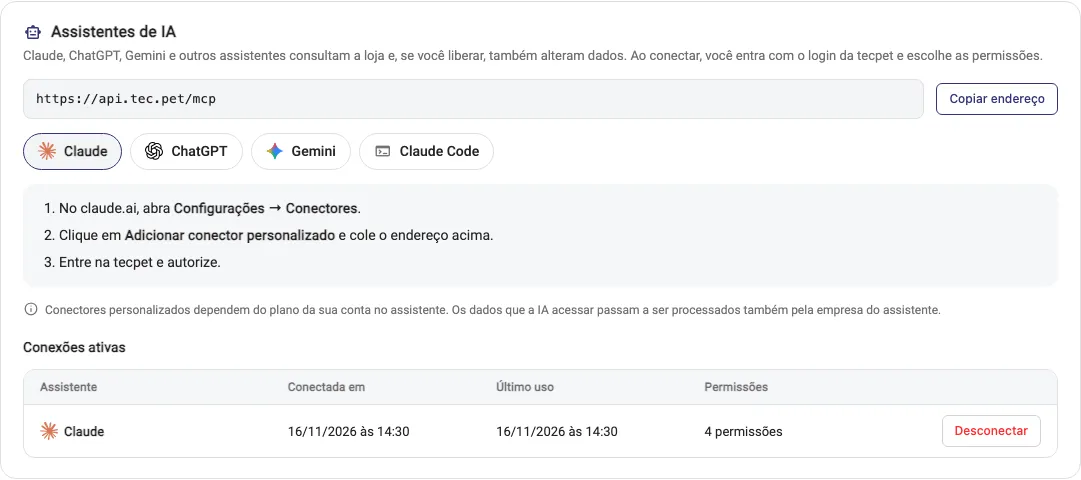
Step 2: Add tecpet to your assistant
Section titled “Step 2: Add tecpet to your assistant”Follow the path for the assistant you use:
- Claude (claude.ai): open Configurações → Conectores (Settings → Connectors), click Adicionar conector personalizado (Add custom connector) and paste the address. Then click to connect: Claude opens the tecpet login.
- ChatGPT: open Configurações → Conectores (Settings → Connectors; in some accounts the name is Apps, with modo desenvolvedor (developer mode) turned on) and create a connector with the address. Then connect: ChatGPT opens the tecpet login.
- Gemini (Gemini CLI): in the terminal, run the command shown in the Gemini tab (Copiar comando (Copy command) button):
gemini mcp add --transport http tecpet https://api.tec.pet/mcp. It opens the tecpet login in the browser. - Claude Code: in the terminal, run
claude mcp add --transport http tecpet https://api.tec.pet/mcp(Copiar comando button in the Claude Code tab). In Cursor, add an MCP server with the same address.
Menu names may change a little as each assistant updates its app. What doesn’t change is the tecpet address.
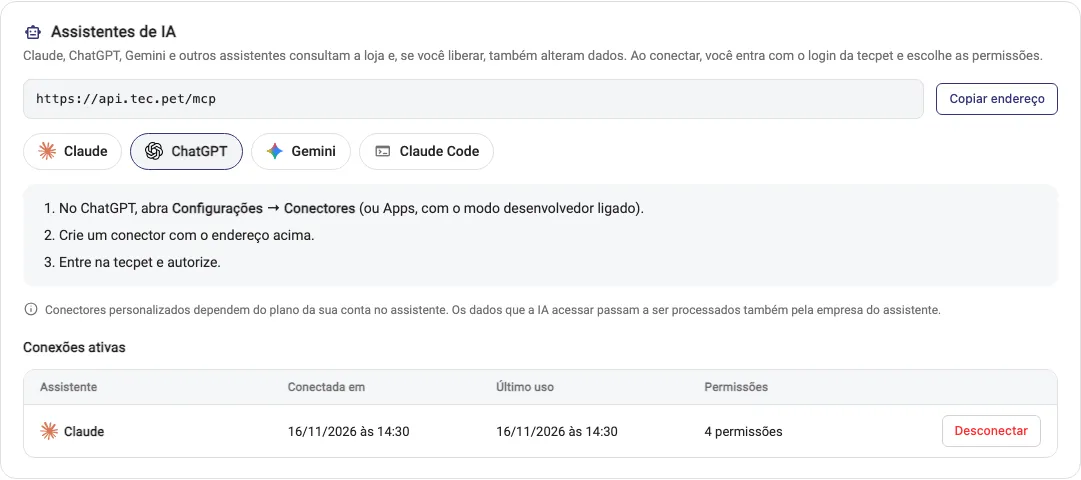
Gemini and Claude Code commands
Section titled “Gemini and Claude Code commands”The Gemini and Claude Code tabs show the ready-made command, with the Copiar comando (Copy command) button. Just paste it in the terminal and follow the login that opens in the browser.
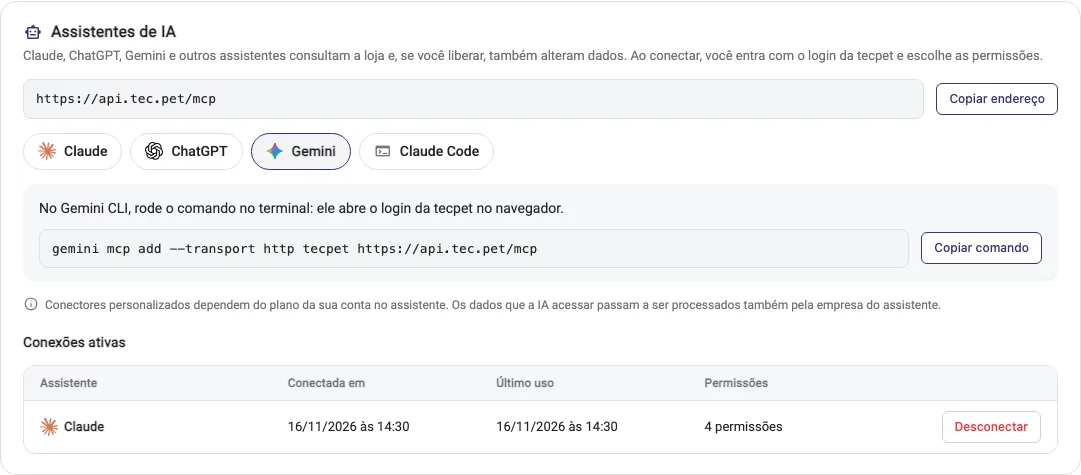
Step 3: Sign in to tecpet and review the access request
Section titled “Step 3: Sign in to tecpet and review the access request”When the assistant opens tecpet, you sign in with your usual username and password and land on the Autorizar conexão (Authorize connection) screen. It shows:
- Who is asking: the assistant’s name and the shop, for example “Claude” quer acessar a loja Pet Shop Exemplo (“Claude” wants to access the shop Pet Shop Exemplo);
- Where the request comes from: when it is an app running on your computer (Claude Code, Gemini CLI), you see the warning “Só autorize se foi você quem iniciou a conexão agora” (Only authorize if you were the one who started the connection just now);
- Vai poder consultar (Will be able to look up): the list of what the assistant will read. By default only the four lookup permissions are checked and the screen says “Não vai poder alterar nada” (It will not be able to change anything);
- Where you go back to: the assistant’s address after you authorize.
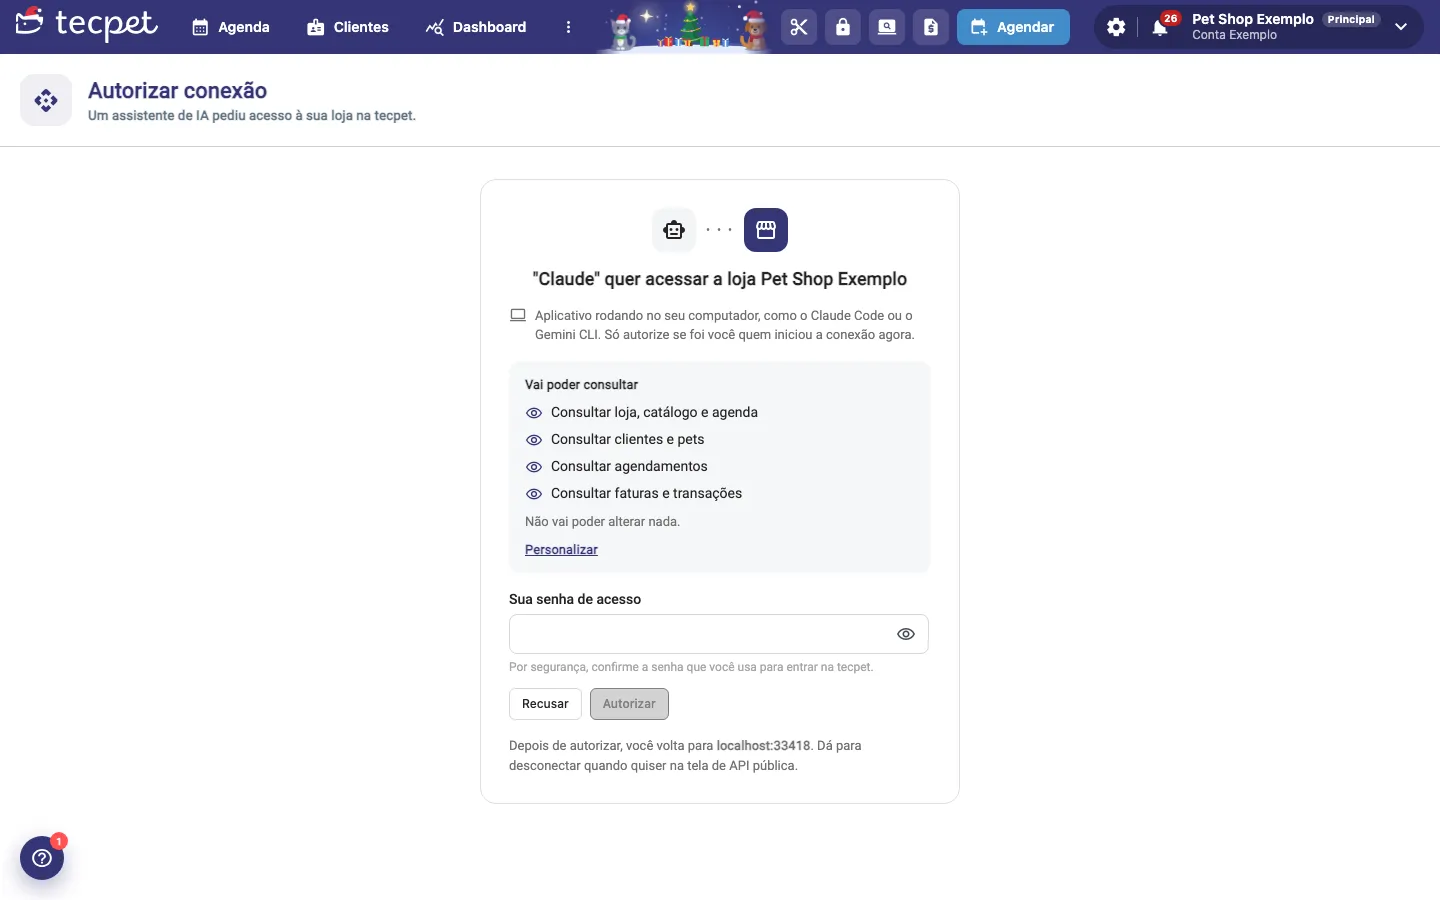
Step 4: Choose what the assistant can do
Section titled “Step 4: Choose what the assistant can do”Click Personalizar (Customize) to change the permissions. The question is O que o assistente vai poder fazer? (What will the assistant be able to do?), with three options:
- Só consultar (recomendado) (Look up only, recommended): reads shop, catalog, clients, schedule and finances. Changes nothing;
- Consultar e agendar (Look up and book): everything above, plus registering clients and pets and creating appointments;
- Personalizar (Customize): you check permission by permission.
The available permissions are:
- Consultar loja, catálogo e agenda (Look up shop, catalog and schedule): shop data, services, prices, combos, breeds, species, staff and available times (checked by default);
- Consultar clientes e pets (Look up clients and pets): client and pet records, client summary and pet plans (checked by default);
- Consultar agendamentos (Look up appointments): list and details of appointments and price calculation (checked by default);
- Consultar faturas e transações (Look up invoices and transactions): the shop’s invoices and financial transactions (checked by default);
- Cadastrar e editar clientes e pets (Register and edit clients and pets): creates and changes clients and pets;
- Criar e alterar agendamentos (Create and change appointments): creates, reschedules, swaps services and changes the status of appointments;
- Alterar o catálogo (Change the catalog): creates, edits and deletes services, categories, combos, breeds and species.
The assistant only sees the actions for the permissions you granted. With Só consultar, it doesn’t even see the actions to create or change anything.
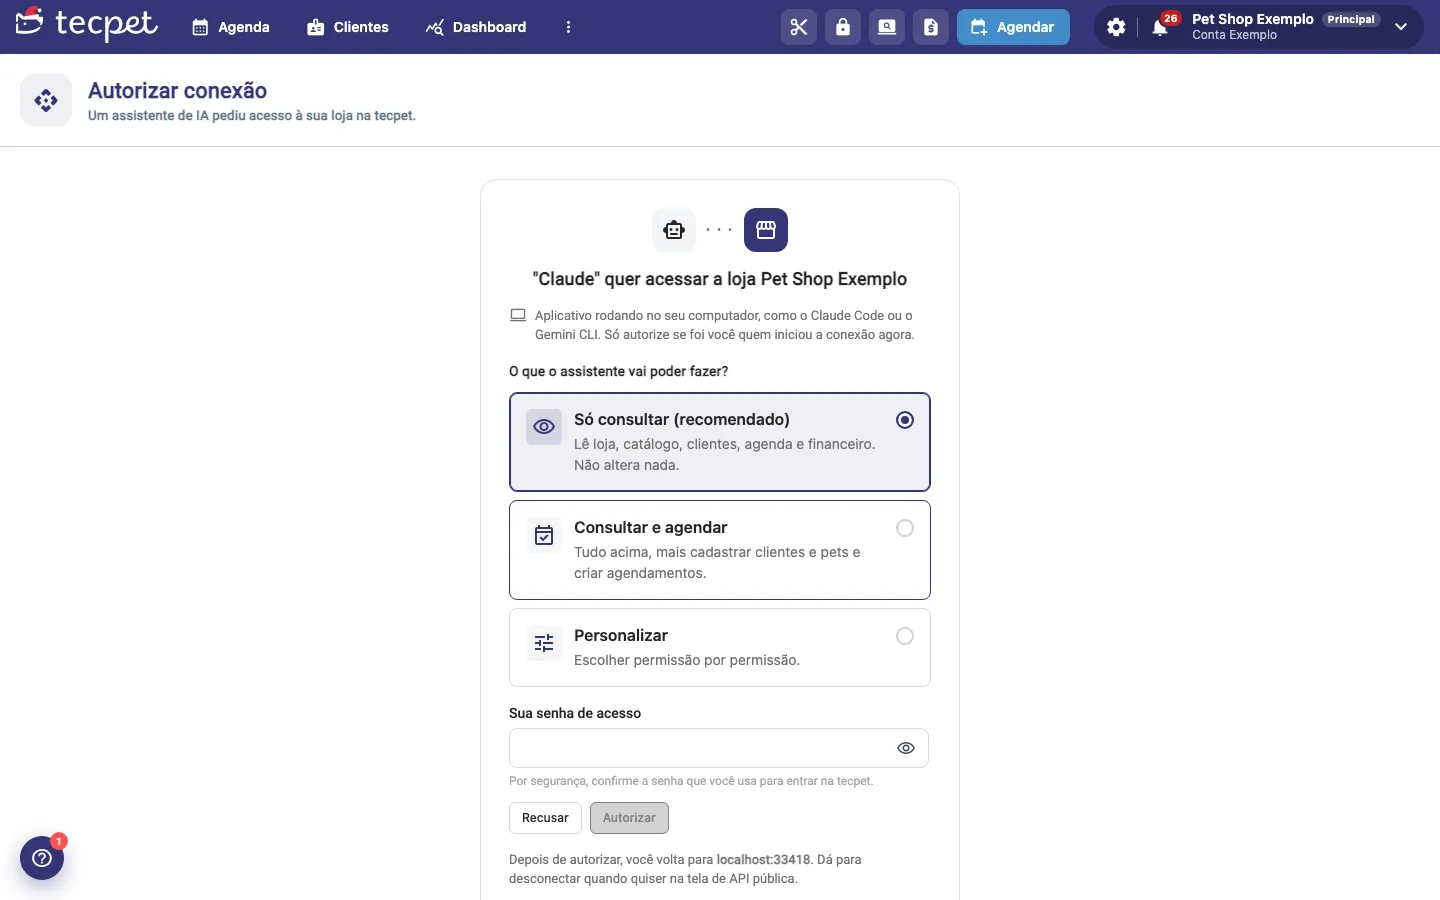
Step 5: Confirm with your password and authorize
Section titled “Step 5: Confirm with your password and authorize”Type your Sua senha de acesso (Your access password, the same one you use to sign in to tecpet) and click Autorizar (Authorize). tecpet sends you back to the assistant, which is already connected. If you don’t recognize the request, click Recusar (Decline): nothing is granted.
Each connection only works for the shop you were signed in to when you authorized. To connect another shop in your network, sign in to it and repeat the authorization.
Step 6: Talk to your shop
Section titled “Step 6: Talk to your shop”Now just ask in the assistant. Some examples of what it can answer or do:
- Totals and history (up to 12 months): how much the shop received, by day, week or month and by payment method; how much it sold, with average ticket, amount paid and amount outstanding; how many appointments and clients served, by status, origin or segment, and the busiest days and times;
- Schedule: appointments for a period or a client, details of an appointment, free times for a pet and a service, daycare spots for the day and the price of an appointment before creating it;
- Clients and pets: find a client by phone, see the record, the summary (pets, latest and upcoming appointments, financial status) and the pet’s plans and packages with the remaining balance;
- Catalog: services and combos with the price for a specific pet, staff, species, breeds, sizes and coat types;
- Finances: invoices and payments received in a period;
- Actions (only with the permission granted): register and edit a client and pet, create and reschedule an appointment, change the services and change the status (confirm, cancel, receive payment, start, finish, deliver).
To book, the assistant follows the same path as your front desk: it finds the client, the pet and the services that apply to them, looks up free times and creates the appointment at the chosen time. It is instructed to confirm with you before creating or changing any data. Dates and times are Brasília time.
See and disconnect assistants
Section titled “See and disconnect assistants”Connected assistants appear in Conexões ativas (Active connections), at the end of the Assistentes de IA block, with the Assistente (Assistant), Conectada em (Connected on), Último uso (Last used) and how many Permissões (Permissions) it has. The summary also appears at the top of the screen, for example 1 IA conectada (1 AI connected).
To cut off an assistant’s access, click Desconectar (Disconnect) on its row. Access ends immediately. To change an assistant’s permissions, disconnect and connect again, choosing the new permissions.
Limits and privacy
Section titled “Limits and privacy”- The assistant only sees the shop that authorized the connection and only does what the permissions allow;
- The questions the assistant sends to tecpet count toward the shop’s usage limit (1,000 per hour). If it goes over, the assistant gets a notice to try again in a few minutes;
- Long lists come summarized (up to 50 items at a time). For totals, the assistant uses the payments, sales and appointments summaries, which already come added up;
- The data the assistant accesses also becomes processed by its own company (Anthropic, OpenAI, Google), according to each one’s terms.