
Set up the VHSYS integration (ERP tecpet)
VHSYS is tecpet’s most complete integration and the only two-way one: what happens in tecpet (customers, appointments, sales, receipts) is reflected in the ERP, and part of what happens in the ERP (customer records, counter sales, receivable write-downs and reversals) comes back to tecpet. It’s what turns an appointment into a Service Order, a product sale into a Sales Order, a receipt into a written-down receivable and what issues the service invoice (NFS-e). All of it lives inside the Integrations screen, under Settings, there’s no separate ERP screen anymore. There you check whether the integration is Enabled, read what it does and open the ERP settings, which hold the category, the bank account and the tax data tecpet uses to build the Service Order and the invoice over there. And in each customer record, the Integration section shows whether that customer is synced, when it last synced and the full history.
Step 1: Open the Integrations screen
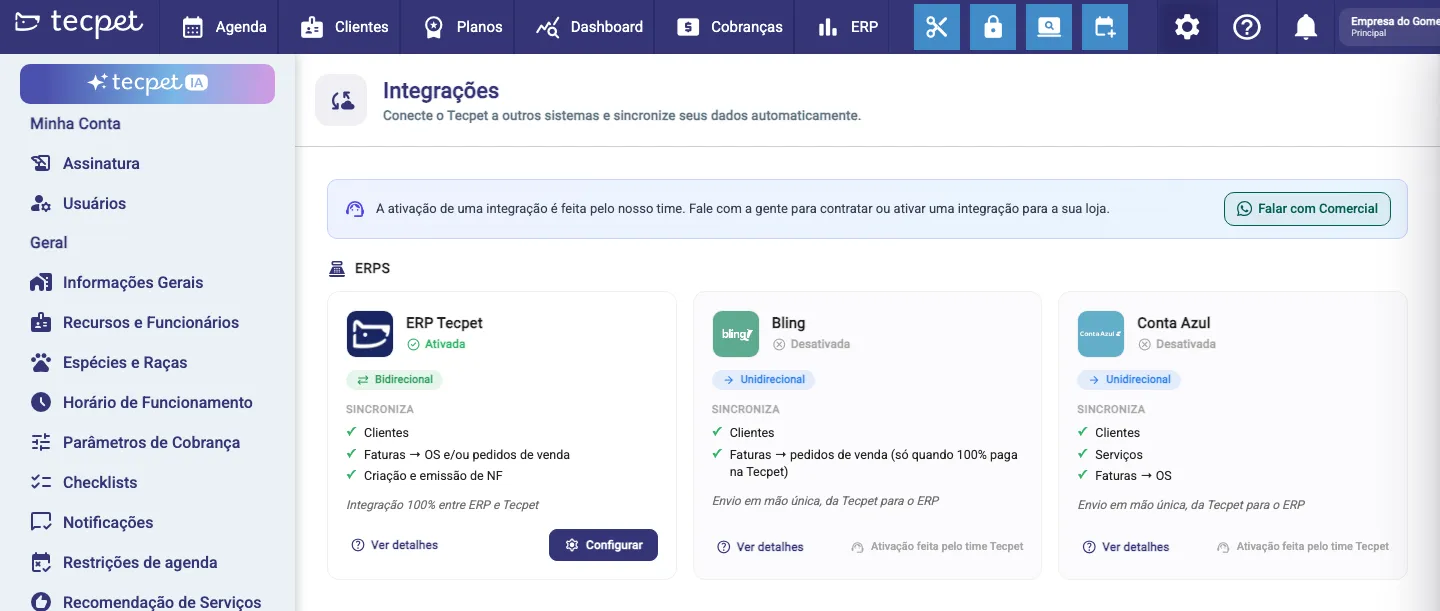
Section titled “Step 1: Open the Integrations screen”Go to Settings (it will ask for the administrator password) and, in the side menu, to System → Integrations. The screen opens with the title Integrations and the subtitle “Connect tecpet to other systems and sync your data automatically.”.
Right below there’s a blue notice: “Enabling an integration is done by our team. Talk to us to purchase or enable an integration for your shop.”, with the green Talk to Sales button. That’s how you request activation, no integration is switched on by you from the panel.
The systems are grouped under the ERPs category, always in the same order: Enabled ones first, then ERP tecpet and finally the rest in alphabetical order.
While the list loads, you see “Loading integrations…”. If the connection fails, the screen shows “We couldn’t load your integrations. Check your connection and try again.” with the Try again button.
Step 2: Find the VHSYS card (it may be called “ERP tecpet”)
Section titled “Step 2: Find the VHSYS card (it may be called “ERP tecpet”)”The VHSYS card shows up with one of two names, depending on how your shop signed up:
- ERP tecpet (dark blue, with the tecpet logo), this is the case for the vast majority of shops, when the ERP comes inside the tecpet package;
- Vhsys (orange, with the VHSYS logo), when the shop uses a VHSYS account contracted separately.
They are the same integration, with exactly the same behaviour: only the name and the logo change on screen. In this article we use “ERP tecpet” because that’s what most shops see.
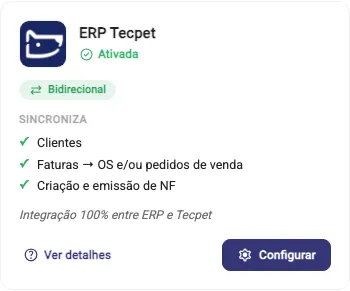
The card sums up the whole integration:
- The name, with the Enabled (green) or Disabled (grey) badge;
- The green Two-way badge, data travels in both directions (Bling, by comparison, shows One-way);
- The Syncs block, with three items: Customers, Invoices → service orders and/or sales orders and Invoice creation and issuing;
- The note in italics “100% integration between the ERP and tecpet”;
- In the footer, See details and the purple Configure button.
Step 3: Check in “See details” what goes and what doesn’t
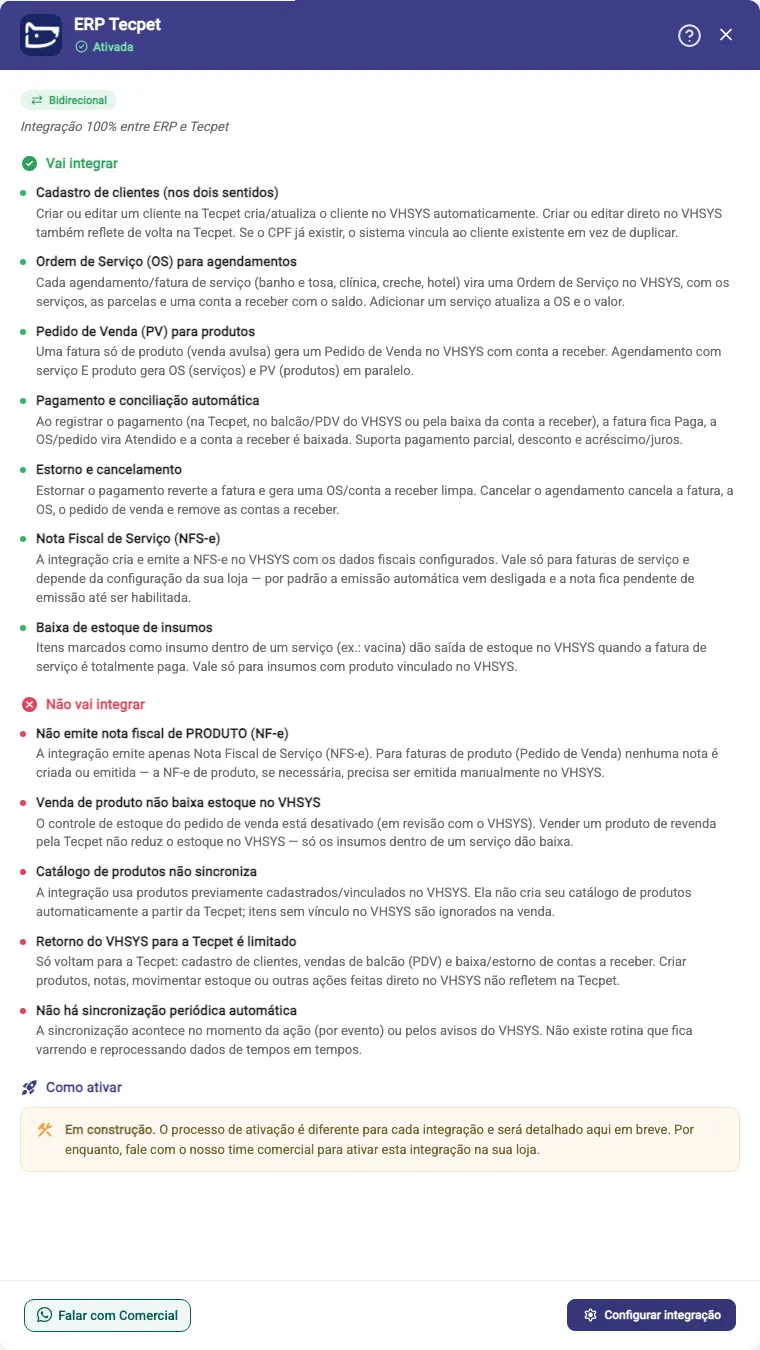
Section titled “Step 3: Check in “See details” what goes and what doesn’t”Click See details (or anywhere on the card) to open the details window. It repeats the name, the status and the Two-way badge at the top and brings three blocks. Scroll the window to see everything.
Will integrate (in green), the seven things the integration really does:
- Customer records (both ways): creating or editing a customer in tecpet creates/updates the customer in the ERP, and creating/editing straight in the ERP reflects back into tecpet. If the Tax ID already exists there, the system links to the existing customer instead of duplicating it;
- Service Order (OS) for appointments: each service appointment/invoice (grooming, clinic, day care, hotel) becomes a Service Order in the ERP, with the services, the instalments and a receivable for the balance. Adding a service updates the Service Order and its amount;
- Sales Order (PV) for products: an invoice with products only (a walk-in sale) generates a Sales Order with a receivable. An appointment with a service and a product generates a Service Order (services) and a Sales Order (products) in parallel;
- Payment and automatic reconciliation: when you register the payment (in tecpet, at the ERP counter/POS or by writing down the receivable), the invoice becomes Paid, the order becomes Served (Atendido) and the receivable is written down. It supports partial payment, discount and surcharge/interest;
- Reversal and cancellation: reversing the payment rolls the invoice back and generates a clean Service Order/receivable. Cancelling the appointment cancels the invoice, the Service Order, the Sales Order and removes the receivables;
- Service invoice (NFS-e): the integration creates and issues the NFS-e in the ERP with the tax data you configured. It applies only to service invoices and depends on your shop’s setup: automatic issuing is off by default and the invoice stays pending until it’s turned on;
- Stock write-down for supplies: items flagged as supplies inside a service (e.g. a vaccine) reduce stock in the ERP when the service invoice is fully paid. Only for supplies linked to a product in the ERP.
Won’t integrate (in red), the five limits:
- It doesn’t issue PRODUCT invoices (NF-e): the integration only issues NFS-e (service). For product invoices (Sales Order) no invoice is created or issued; the NF-e, if needed, must be issued manually inside the ERP;
- A product sale doesn’t reduce stock in the ERP: sales-order stock control is switched off (under review with VHSYS). Selling a resale product through tecpet does not reduce the ERP’s stock, only supplies inside a service do;
- The product catalogue doesn’t sync: the integration uses products already registered/linked in the ERP; it doesn’t build your catalogue automatically from tecpet, and unlinked items are ignored in the sale;
- What comes back from the ERP to tecpet is limited: only these return to tecpet: customer records, counter sales (POS) and receivable write-downs/reversals. Creating products, issuing invoices or moving stock straight in the ERP doesn’t reflect in tecpet;
- There’s no periodic automatic sync: syncing happens at the moment of the action (event-driven) or through the ERP’s notifications. There’s no routine sweeping and reprocessing data every so often.
At the end there’s the How to enable block, currently with the “Under construction.” notice: the process differs per integration, so for now activation goes through the sales team. The footer has Talk to Sales and Configure integration.
Step 4: Open the ERP settings
Section titled “Step 4: Open the ERP settings”Click Configure on the card or Configure integration in the details window footer. The ERP tecpet settings window opens (in a shop with its own VHSYS account, the title reads Vhsys settings). While the data loads, you see “Loading data…”.
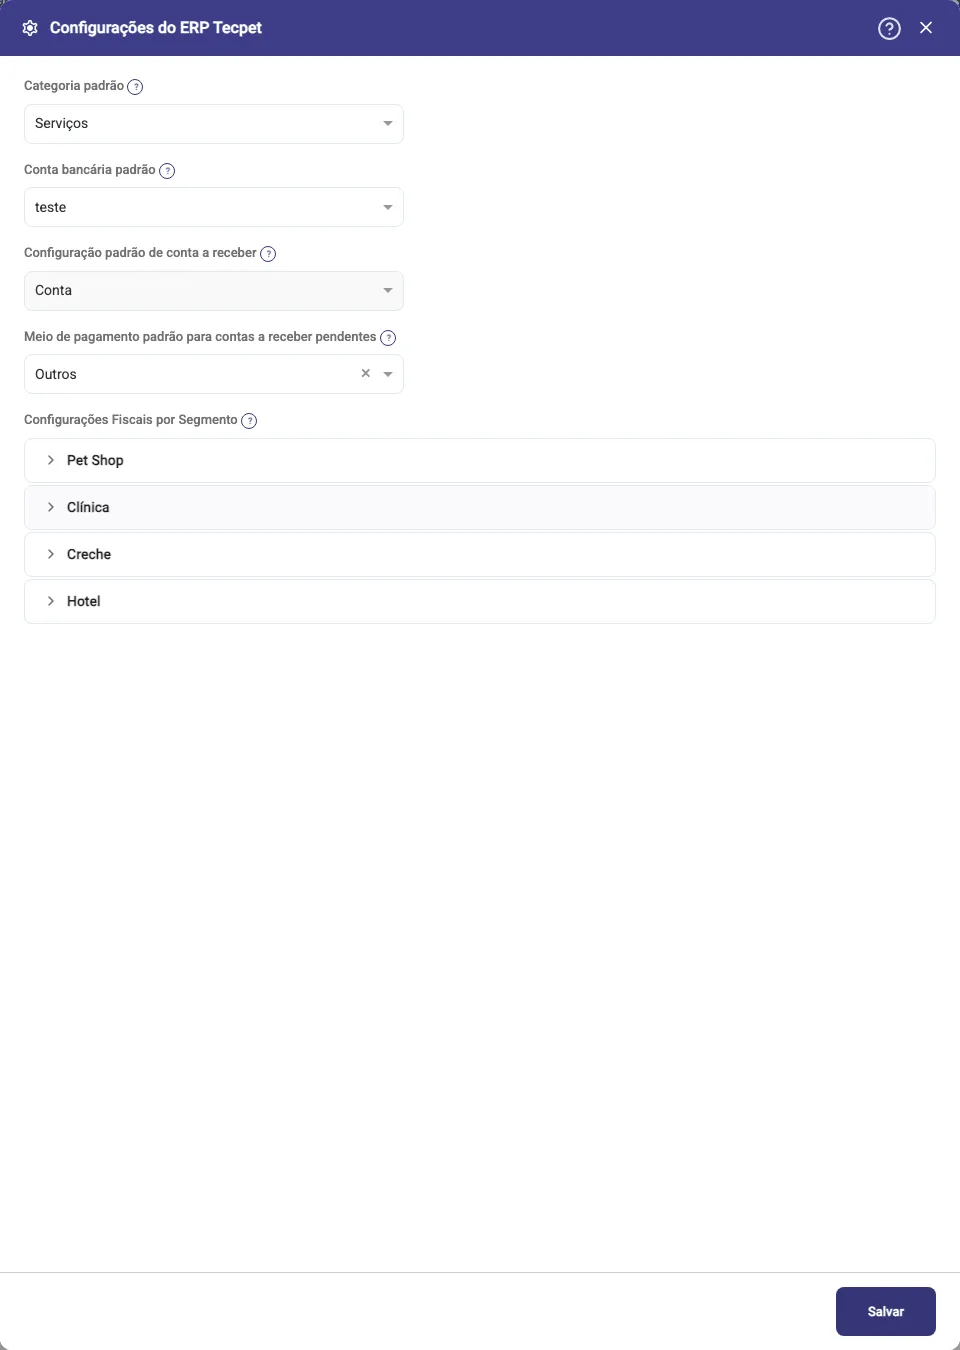
The window has four general fields and, below them, the Tax settings by segment. Each field has a ? button next to its name, hover it to see the official explanation. The Save button sits in the footer.
Step 5: Fill in the general fields
Section titled “Step 5: Fill in the general fields”There are four fields, in this order:
- Default category *, the category, inside the ERP, where the services performed on the calendar are posted. The ? explanation suggests: “Suggestion: Services”. The list brings the categories that already exist in your ERP;
- Default bank account *, the account used for open receivables (not yet paid). The list brings the accounts registered in your ERP;
- Default receivable setting: how the receivable is created (the default value is Conta). Only change this if you use the integrated account and want to issue bank slips; in that case, first make sure the bank account in the ERP is set up to accept them. This field stays disabled until a valid bank account is selected above;
- Default payment method for pending receivables: the payment method pending receivables are created with in the ERP; it makes writing them down straight from the receivables list easier. The field is searchable and can be left empty (the hint text is “None (default)”). The options are VHSYS’s own: Cash, PIX, Cheque, Barter, Credit card, Debit card, Bank slip, Transfer, Wire (Ted), Identified deposit, Current-account deposit, Trade note, Invoiced, To invoice, Direct debit, Lottery outlet, Bank, DDA, Online payment, BNDES, Other, Discounted trade note, Discounted cheque, Meal voucher, Restaurant voucher, Gift voucher and Fuel voucher.
The fields marked * are required to save: without a Default category and a Default bank account, the window shows the red notice “Fill in all the fields on the screen to continue” and nothing is saved.
Step 6: Set the tax data per segment
Section titled “Step 6: Set the tax data per segment”The Tax settings by segment block (the ? explanation: “Fill in the data for creating Service Orders and invoices in the ERP”) brings four accordions, all closed when the window opens, always in this order: Pet Shop, Clinic, Day care and Hotel. Click the name to open and close it.
With a segment open, the Copy from reference invoice button appears on the right: it opens the Copy tax data from reference invoice window, where you enter the reference invoice ID * (an invoice that already came out correctly in the ERP) and click Copy. tecpet fills that segment’s tax fields from it and confirms with “Data filled in, Tax fields filled in from the reference invoice.”. It’s the fastest and safest way to avoid a wrong code.
Filling it in by hand, each segment has:
- Description: the text describing that segment’s service on the Service Order and on the invoice;
- Service code: the service’s code inside the ERP;
- Cost centre ID: the cost centre the entry goes into;
- RPS series: the RPS series used when issuing;
- Nature ID: the nature of the operation;
- Tax regime ID: the tax regime;
- Activity ID: the activity;
- Tax rate: the service-tax rate applied;
- % COFINS, % PIS, % CSLL, % IR and % INSS: the percentage of each tax (the on-screen default is 0.00);
- The Withhold COFINS, Withhold PIS, Withhold CSLL, Withhold IR and Withhold INSS boxes, tick them when the matching tax is withheld on the invoice.
Fill in only the segments your shop offers. If the shop doesn’t do day care or hotel, leave those accordions empty.
Step 7: Save
Section titled “Step 7: Save”Scroll to the window footer and click Save.
If it worked: the notice “Settings updated, ERP settings updated successfully!” appears and the window closes on its own. If it failed: “We couldn’t update the ERP settings!” appears and the window stays open with what you typed, fix it and try again.
In shops that sell ERP products, a Sync products button also appears to the left of Save: it pulls the ERP’s product list into tecpet and, while running, shows “Syncing…”. When it finishes, it reports how many products were synced (and how many failed, if any).
Step 8: Follow the sync through the icon on the customer record
Section titled “Step 8: Follow the sync through the icon on the customer record”Open Customers, go into a customer’s profile and stay on the General information tab. Next to the name, at the top, there’s a coloured cloud icon with that customer’s integration status. Hover it to see the text:
- Green cloud with a check: “Integrated with the ERP”: the customer is synced;
- Green cloud with arrows: “Syncing with the ERP”: the send is in progress;
- Red crossed-out cloud: “Integration with the ERP failed”: the ERP rejected the record;
- Grey cloud: “Not synced with the ERP yet”: that customer hasn’t been sent yet.

The icon only appears in shops with an active ERP integration. On the same line, in VHSYS shops that use the POS, there’s also the View pending items button, which lists what the customer has open in the ERP.
Step 9: Read the Integration section on the record
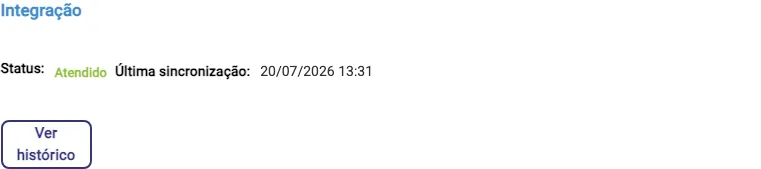
Section titled “Step 9: Read the Integration section on the record”Scroll the customer record to the bottom (after Blocked notifications). There you’ll find the Integration section, with:
- Status:: the badge with the sync situation;
- Last sync:: date and time of the last successful send;
- Source:: where the last change came from: tecpet or External system (only appears when a source is recorded);
- Failing for N attempt(s): a red bar that shows up when sending keeps failing;
- Failure reason:: the message the ERP itself returned, shown when the status is an error. It’s the most useful text on the screen: it usually says exactly which field is wrong;
- The View history button.
If the customer has never been sent, the section only shows “Not synced yet.”.
Step 10: Open the sync history
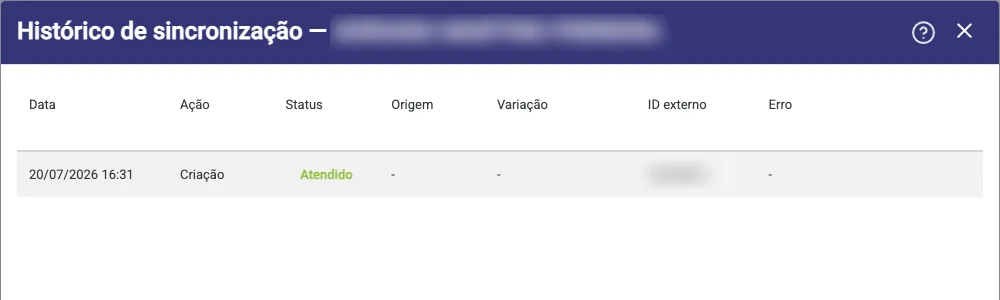
Section titled “Step 10: Open the sync history”Click View history to open the Sync history window, followed by the customer’s name. It’s the timeline of everything tecpet exchanged with the ERP for that customer, in seven columns:
- Date: day and time of the event;
- Action: Creation, Update or Removal;
- Status: the outcome, with the same ERP names explained in the previous step;
- Source: tecpet or External system (a dash when no source is recorded);
- Variation: the variation of the item involved, when there is one;
- External ID: the customer’s code inside the ERP. That’s the number support asks for when they need to find the record on the other side;
- Error: the message the ERP returned on that send (a dash when it worked).
The Close button sits in the footer. If nothing has been sent yet, the window shows “No sync history.”.
How to edit or undo later
Section titled “How to edit or undo later”- Change the ERP settings: go back through Settings → System → Integrations → Configure. The window reopens with everything already filled in; change what you need and click Save. There’s no history and no “undo” here, the last Save is what counts, so write down a code that was working before replacing it;
- Leave without saving: use the x at the top of the window; nothing you typed is applied;
- Fix a customer that failed: adjust the customer record according to the Failure reason and save, saving the customer triggers a new send, and the icon and the Integration section follow along;
- Fix an invoice that failed: reprocessing is done from the invoice, not from here (see What changes with the integration on);
- Disable the integration: not done from the panel, talk to the team via Talk to Sales.
When something doesn’t sync
Section titled “When something doesn’t sync”Before opening a ticket, check the most common causes, all visible on the screen itself:
- Divergent customer record: invalid Tax ID, duplicate or invalid phone, missing required data. The Failure reason in the Integration section usually says exactly which field it is;
- You expected something the integration doesn’t do: product invoice (NF-e), stock write-down for resale items or the product catalogue: check See details → Won’t integrate;
- Automatic invoice issuing is off: by default it’s off and the invoice stays pending; ask the team to turn it on;
- Incomplete tax setup for the segment: a segment without a service code, nature or tax regime won’t issue an invoice. Use Copy from reference invoice;
- Nothing has happened yet: syncing is event-driven; there’s no periodic routine. If nobody touched the customer or the invoice, nothing gets resent on its own.
If it persists, contact support and give them the customer’s External ID (from the history window), it’s what lets them find the record on the other side straight away.