
Using Pet Care day to day
Once configured, Pet Care is used inside the customer record: open the customer, click Pet Care in the side menu and pick the pet. That’s where the Pet Care history for that animal lives, weigh-ins, applications, prescriptions, exams, reports, terms and photos in a single timeline. This history feeds the customer’s Gallery tab, the Pending Activities block (the upcoming vaccine doses), the weight shown on the pet banner and the documents you print with the clinic’s header and footer. And now you can also delete a record entered by mistake, right from the list.
Step 1: Open the pet’s Pet Care
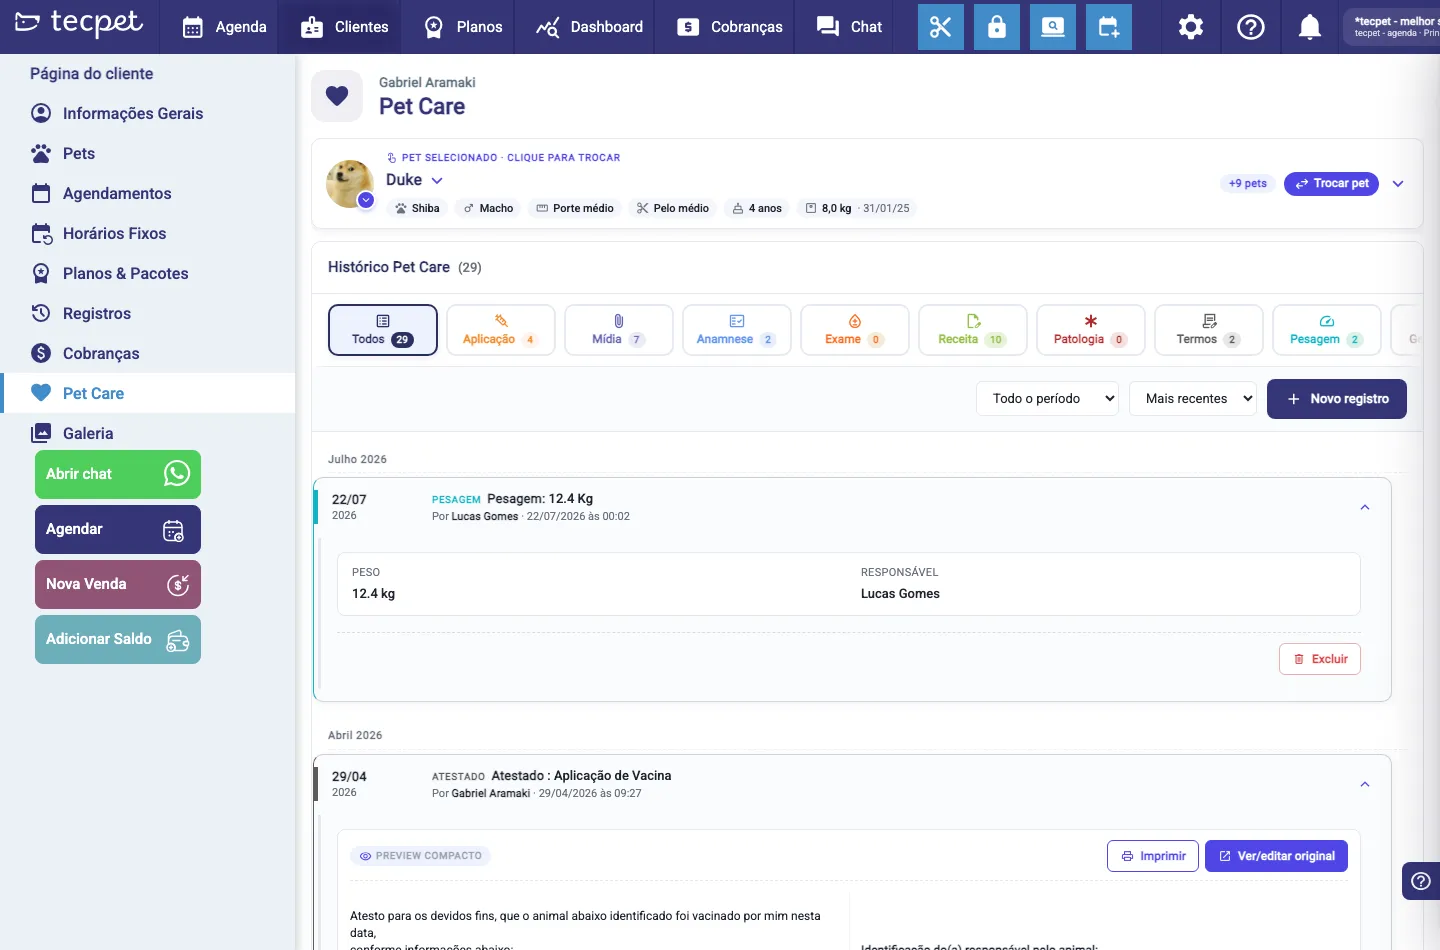
Section titled “Step 1: Open the pet’s Pet Care”Open the customer under Customers, go into their record and click Pet Care in the side menu (between Billing and Gallery). At the top you’ll see the SELECTED PET · CLICK TO SWITCH banner with the pet’s name and summary data: breed, sex, size, coat, age and the last recorded weight with the weigh-in date. If the customer has more than one pet, click Switch pet (or the pet counter next to it) and use the Search pet by name… field.
Right below comes the Pet Care history block, with the pet’s total number of records in parentheses.
Step 2: Log a new record
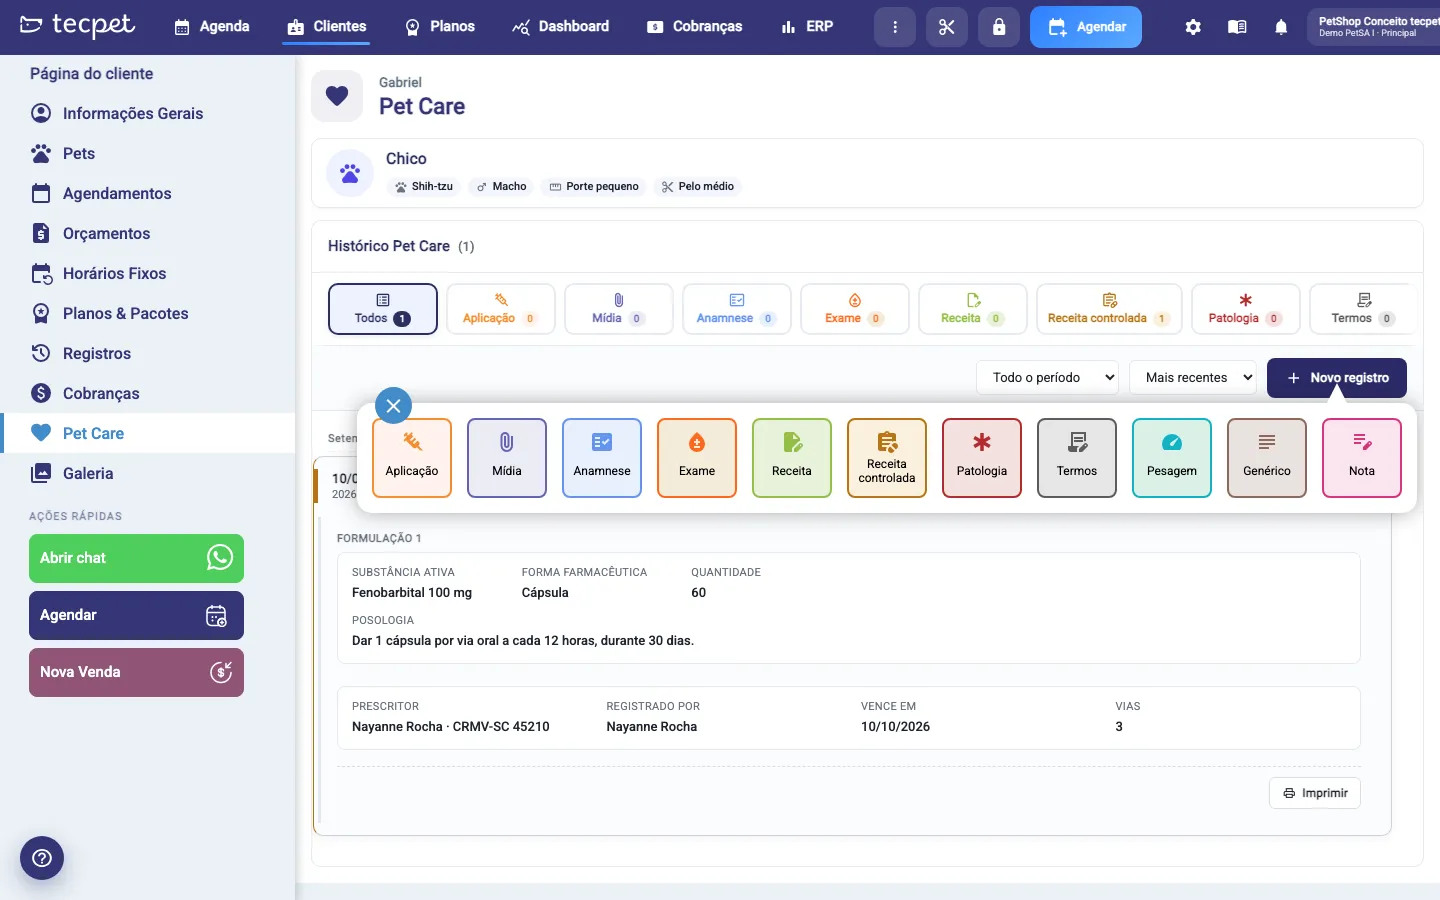
Section titled “Step 2: Log a new record”Click + New record, on the right above the list (the floating + button in the bottom-right corner does the same thing). The picker opens with the 9 record types, in this order:
- Application: vaccine, dewormer or antiparasitic, with doses, batch and manufacturer. See Applications and vaccines.
- Media: photos, videos or files, organized by the file categories.
- Anamnesis: initial assessment document.
- Exam: exam request or result.
- Prescription: prescription form.
- Pathology: report/diagnosis.
- Terms: liability, authorization and consent forms.
- Weighing: just the pet’s weight; it updates the weight shown on the pet banner.
- Generic: any free-form document that doesn’t fit the other types.
Document types (Anamnesis, Exam, Prescription, Pathology, Terms, Generic) start from a template and come pre-filled with the pet’s and the owner’s data. The Controlled prescription card is different: it has a fixed form, legal numbering and its own rules, explained in Issue a controlled prescription.
Step 3: Open a record’s details
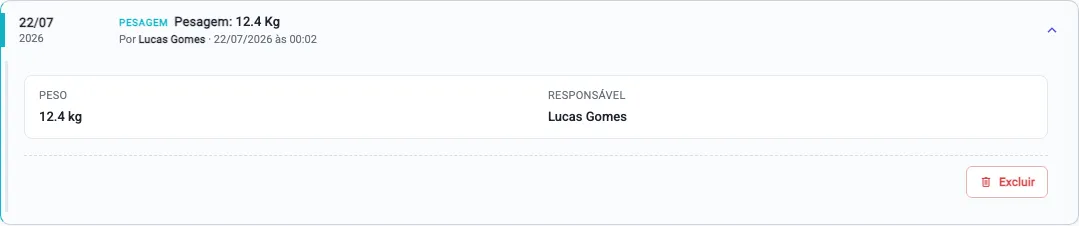
Section titled “Step 3: Open a record’s details”Records on the page come already expanded: each row shows its detail panel as soon as the list loads. The arrow on the right side is there to collapse and reopen the row (the tooltip toggles between More information and Less information).
Inside the open panel, below a dashed line, sits the Delete action (in red, bottom-right corner).
Step 4: Delete the record
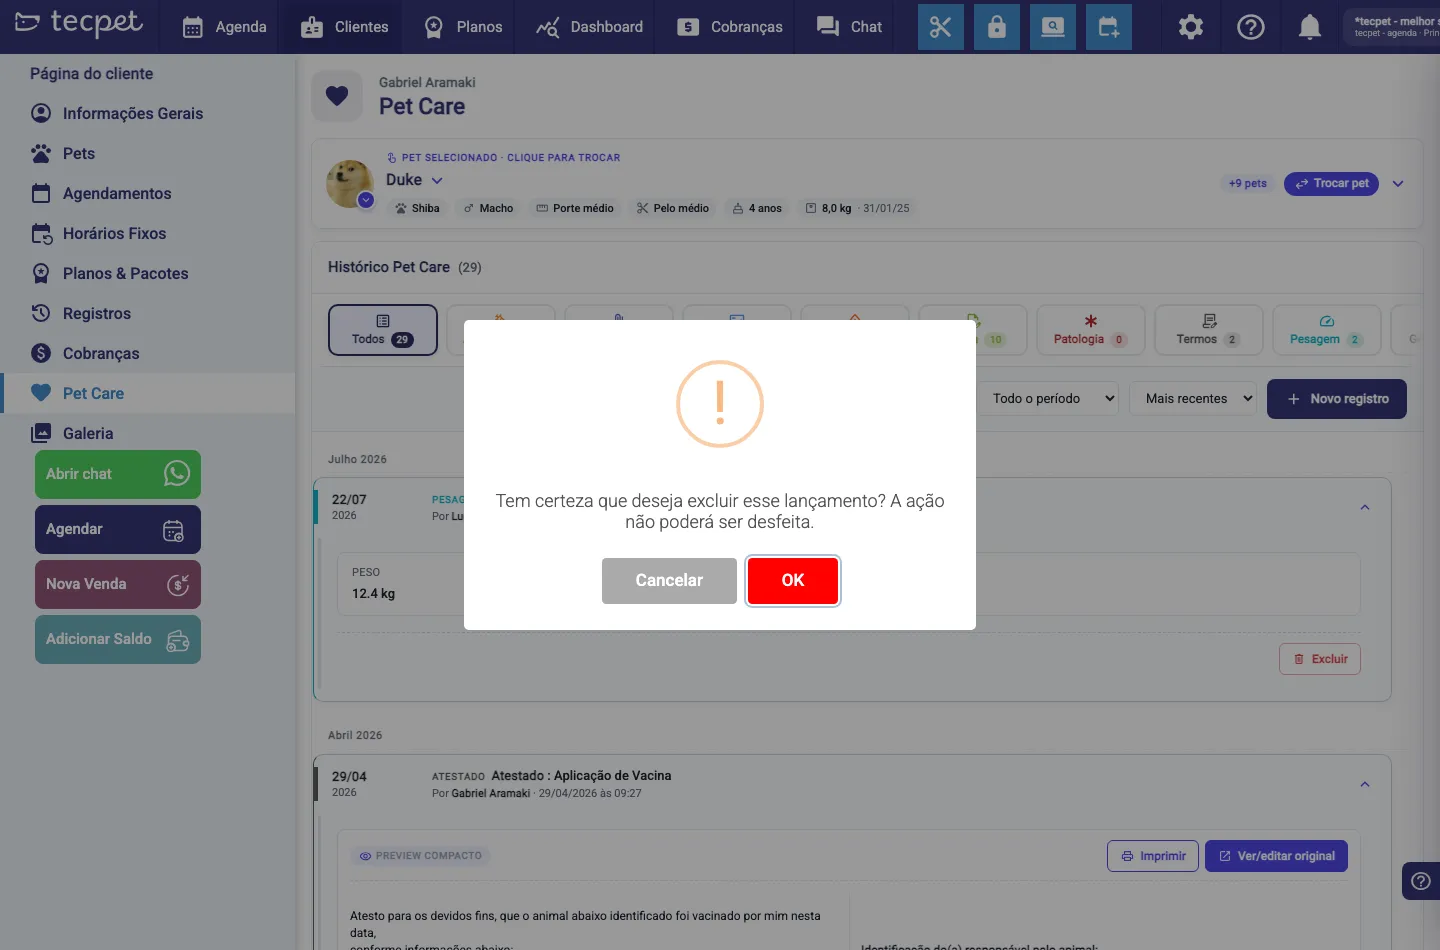
Section titled “Step 4: Delete the record”Click Delete. The system asks: “Are you sure you want to delete this record? This action cannot be undone.”, with the Cancel and OK buttons.
Step 5: Confirm who is deleting
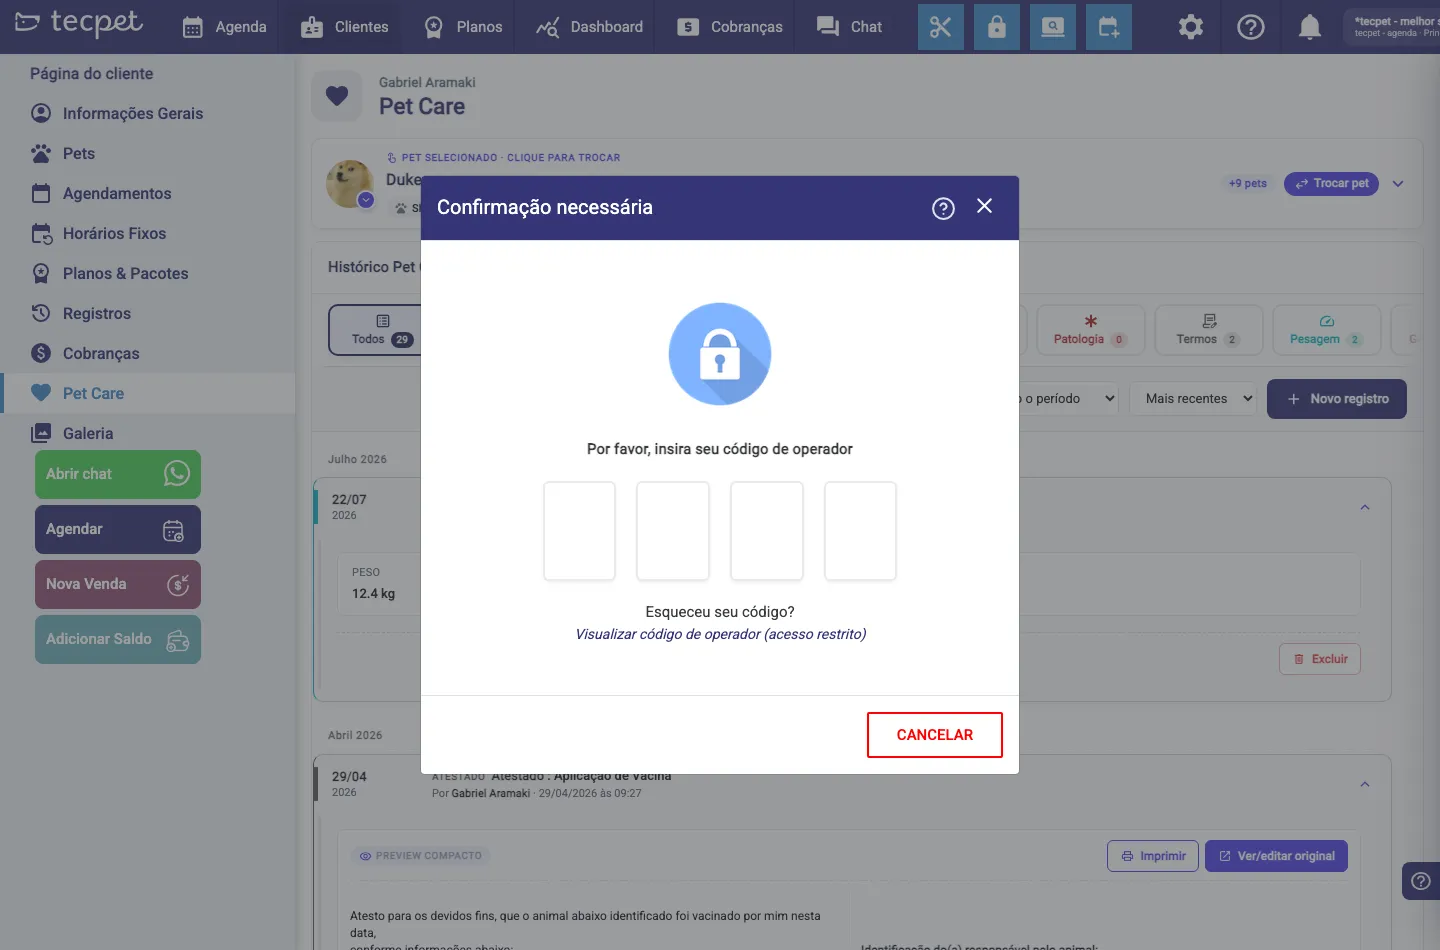
Section titled “Step 5: Confirm who is deleting”After OK, the system asks who is making the change, in the Confirmation required window:
- In the default setup, it shows “Please enter your operator code” with four boxes for the employee’s code. If nobody remembers the code, the Forgot your code? View operator code (restricted access) link shows the list (it asks for the administrator password). The codes live under Resources and Employees.
- In shops set up to skip the code, you get “Who is making the change?” instead, with the list of employees, just pick the name.
Typed the wrong code? The system warns “Invalid operator code.” and nothing is deleted. Closing the window or clicking CANCEL also cancels the deletion.
Step 6: Check the result
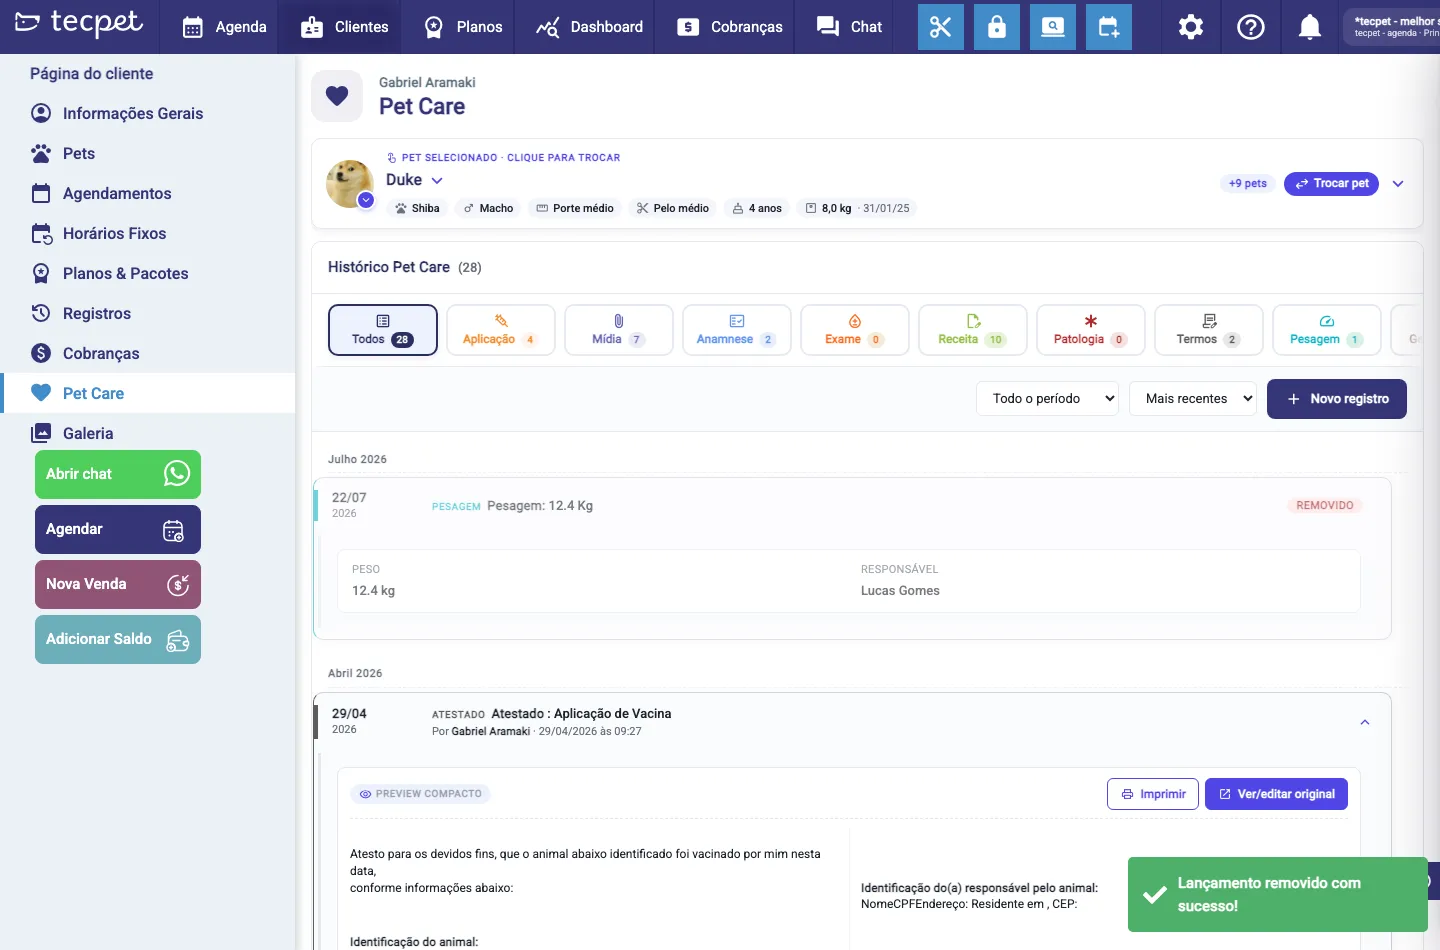
Section titled “Step 6: Check the result”With the right code, the green “Record removed successfully!” message appears and the list refreshes on its own. What changes in the timeline:
- The record still shows up, now greyed out and with the REMOVED badge, the history keeps the trace of what existed.
- The authorship line (By <employee> · date at time), the expand arrow and the Delete button all disappear. Clicking the row no longer opens anything.
- Details that were already visible (weight, person in charge…) stay readable on the grey row.
- The tab counters drop: a removed record is no longer counted under All nor under its own type.
What each history row shows
Section titled “What each history row shows”- Date: on the left, day/month with the year below. The list has month separators (July 2026, April 2026…).
- Type label: in capitals and in the type’s colour (WEIGHING, CERTIFICATE, PRESCRIPTION…).
- Title: the record’s summary (e.g. Weighing: 12.4 Kg).
- Authorship: By <employee> · dd/mm/yyyy at hh:mm. Only shown on active records.
- EDITED badge: the row is the latest version of a document that has already been edited.
- REMOVED badge: the record has been deleted.
- Arrow: opens and closes the detail panel. Only exists on active records.
What you see when you expand
Section titled “What you see when you expand”The panel changes according to the record type:
- Weighing: WEIGHT (e.g. 12.4 kg) and PERSON IN CHARGE (the employee who logged it).
- Application: PRODUCT, PROTOCOL, NOTE and PERSON IN CHARGE, plus one card per dose (1st dose, status SCHEDULED or APPLIED, Date, Batch and Manufacturer).
- Documents (Anamnesis, Exam, Prescription, Pathology, Terms, Generic), the COMPACT PREVIEW label with a preview of the text and the Print and View/edit original buttons. If the document has been edited, Expand/Hide Edit History (N) appears with each version (date, employee and a View button).
- Media: the attached photos, videos and files.
Filter the history
Section titled “Filter the history”Above the list sit the tabs by type, each with its record count: All, Application, Media, Anamnesis, Exam, Prescription, Controlled prescription, Pathology, Terms, Weighing, Generic and Note. The counters do not include removed records.
Next to them you choose:
- Period: All time, Last 30 days, Last 6 months or Last year.
- Sorting: Most recent or Oldest.
- Current visit only: only appears when you open Pet Care from an appointment; it shows just that visit’s records.
Pending Activities
Section titled “Pending Activities”When the pet has open application doses, the Pending Activities (N) block appears above the history, with the columns Activity, Type, Dose, Date, Status (e.g. Overdue), Reminder and Actions: with the Apply and Edit buttons. It’s where you keep track of who still owes the next dose. See Applications and vaccines.
Edits of the same document are grouped
Section titled “Edits of the same document are grouped”When the same document (a prescription, an exam, an anamnesis) is edited several times, the history only shows the latest version, with the EDITED badge, previous versions are grouped inside that document’s Edit History, keeping the timeline clean. Independent records, such as applications, weigh-ins and media, still appear each on its own date.
What deleting takes with it
Section titled “What deleting takes with it”Deleting isn’t just “disappearing from the list”, depending on the type, the system removes whatever was attached:
- Media: the files are actually deleted and leave the customer’s Gallery. The grey row shows no photos, and the deletion is recorded in the file trail.
- Application: the protocol’s doses and their reminders/notifications are deleted along with it. That application leaves Pending Activities and the owner stops receiving the next-dose reminder.
- Weighing and documents: the record leaves the active history and stops counting on the tabs.
When deleting isn’t allowed
Section titled “When deleting isn’t allowed”- Record from another shop in the chain: the system warns “Record created by another shop, you cannot edit/delete it!”. Each shop only touches what it logged itself.
- Unexpected failure: you get “Something went wrong, try again”; the record stays active, just repeat the operation.
- Already removed record: it has no arrow and no Delete button: there’s nothing left to delete.
Print and gallery
Section titled “Print and gallery”Documents can be printed straight from the expanded panel, with the clinic’s header and footer. Attached photos and videos also appear in the Gallery tab of the customer record, organized by the file categories you set up.
Send a document to the owner over WhatsApp
Section titled “Send a document to the owner over WhatsApp”In the expanded panel of a document, next to Print, there is a Send to owner button: one click sends the owner the link to that document over WhatsApp, with no need to print, save the file and attach it by hand.
- It works for Prescription, Exam, Terms, Pathology, Anamnesis and Generic. Weighing, application, note and controlled prescription have no link delivery; photos and videos already have their own Media delivery.
- The button only shows on an active record: a removed record cannot be sent.
- While sending, the button reads Sending… and is locked, so the same document does not go out twice on one click.
- The owner gets the message with the document link and an Open Link button. The link opens the same page the print produces and asks for no password, so treat it as a link that can be forwarded.
- The message text is yours: edit it in Settings → Notifications, on the Document delivery template. With the template switched off, the button warns you the message is disabled and nothing is sent.
Records created from an appointment
Section titled “Records created from an appointment”A Pet Care record can also be created from an appointment on the Calendar, staying linked to that visit, that’s when the Current visit only filter shows up. That way the pet’s health history follows the services performed.
How to edit or undo later
Section titled “How to edit or undo later”- Documents: open the row and click View/edit original. When you save, the system creates a new version: the timeline shows the current version with the EDITED badge, and the previous ones stay in the Edit History.
- Applications: use Edit on the dose (in the Pending Activities block or on the dose card) to fix the date, batch or manufacturer without losing the protocol.
- Weighing: there is no edit: to fix a wrong weight, delete the record and log the correct weigh-in.
- Deletion: there is no way back. The removed record stays visible in grey with the REMOVED badge, but it cannot be reopened, edited or restored. If it was deleted by mistake, the way out is to log the correct record again.