
Set up the Bling integration
The Bling integration sends what happens in tecpet over to your Bling: the customer becomes a contact and a fully paid invoice becomes a Sales Order. All of it now lives inside the Integrations screen, there’s no separate ERP screen anymore. That’s where you see whether the integration is Enabled, check what it does and open the Bling settings, which hold the codes tecpet uses to build the order over there (store, category, status, service codes and the payment methods). Filling these in correctly is what makes the order appear in Bling with the right service and the right payment method, and what prevents orders landing with no category or with the wrong payment method.
Step 1: Open the Integrations screen
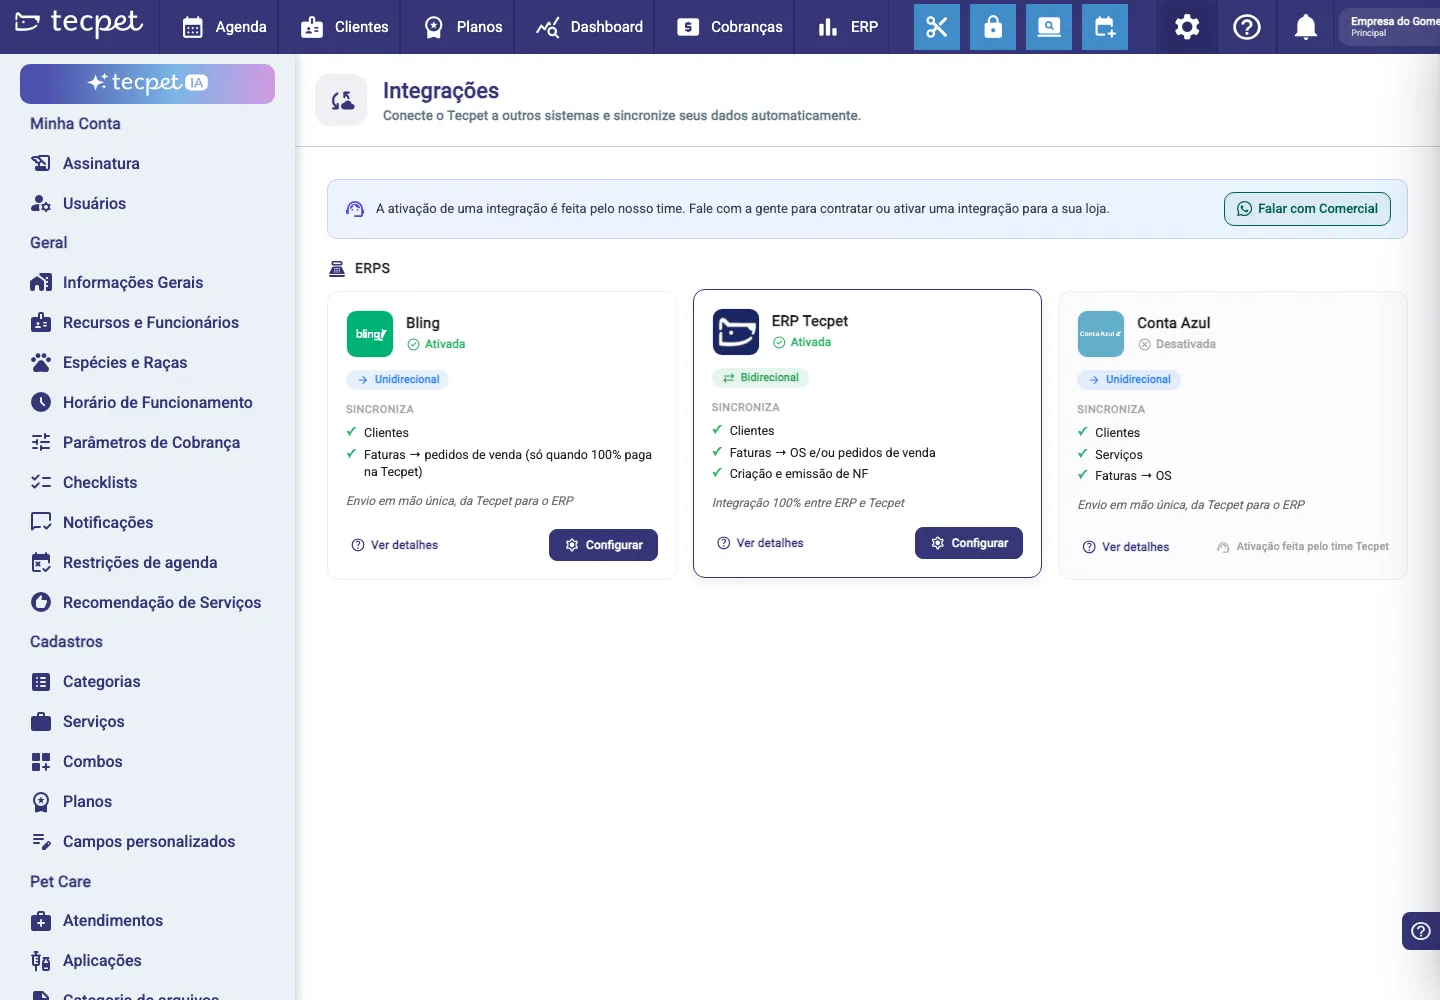
Section titled “Step 1: Open the Integrations screen”Go to Settings (it will ask for the administrator password) and, in the side menu, to System → Integrations. The screen opens with the title Integrations and the subtitle “Connect tecpet to other systems and sync your data automatically.”.
Right below there’s a blue notice: “Enabling an integration is done by our team. Talk to us to purchase or enable an integration for your shop.”, with the green Talk to Sales button, that’s how you request activation, because no integration is switched on by you from the panel.
The systems are grouped under the ERPs category. The order is always the same: Enabled ones first, then ERP tecpet, and finally the rest in alphabetical order.
While the list loads you see “Loading integrations…”. If the connection fails, the screen shows “We couldn’t load your integrations. Check your connection and try again.” with the Try again button.
Step 2: Understand the Bling card
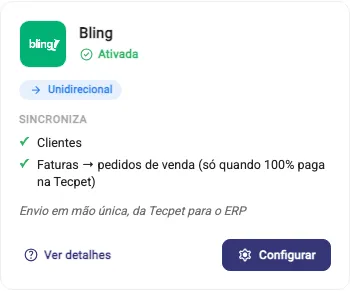
Section titled “Step 2: Understand the Bling card”The Bling card sums up the whole integration:
- Bling with the Enabled badge (green) or Disabled (grey);
- The blue One-way badge, data only travels from tecpet to Bling (ERP tecpet, by comparison, shows Two-way);
- The Syncs block, with two items: Customers and Invoices → sales orders (only when fully paid in tecpet);
- The italic note “One-way delivery, from tecpet to the ERP”;
- At the bottom, See details and Configure.
Step 3: Check in “See details” what goes and what doesn’t
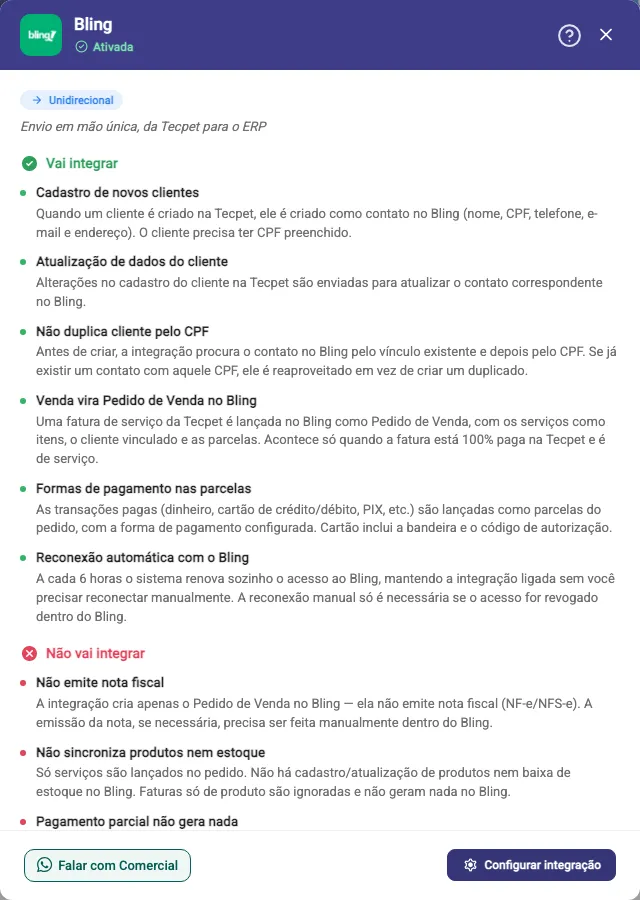
Section titled “Step 3: Check in “See details” what goes and what doesn’t”Click See details (or anywhere on the card) to open the Bling details window. It repeats the status and the direction at the top and brings three blocks.
Will integrate (green), the six things the integration actually does:
- New customer records: when a customer is created in tecpet, they’re created as a contact in Bling (name, Tax ID, phone, e-mail and address). The customer must have the Tax ID filled in;
- Customer data updates: changes to the customer record in tecpet update the matching contact in Bling;
- No duplicate customers by Tax ID: before creating, the integration looks for the contact in Bling by the existing link and then by Tax ID; if a contact with that Tax ID already exists, it’s reused;
- A sale becomes a Sales Order in Bling: a service invoice becomes a Sales Order, with the services as items, the customer linked and the installments. It only happens when the invoice is fully paid and is a service invoice;
- Payment methods on the installments: paid transactions (cash, credit/debit card, PIX and so on) become installments of the order, with the configured payment method. Card includes the brand and the authorization code;
- Automatic reconnection with Bling: every 6 hours the system renews access to Bling on its own. Reconnecting manually is only needed if access is revoked inside Bling.
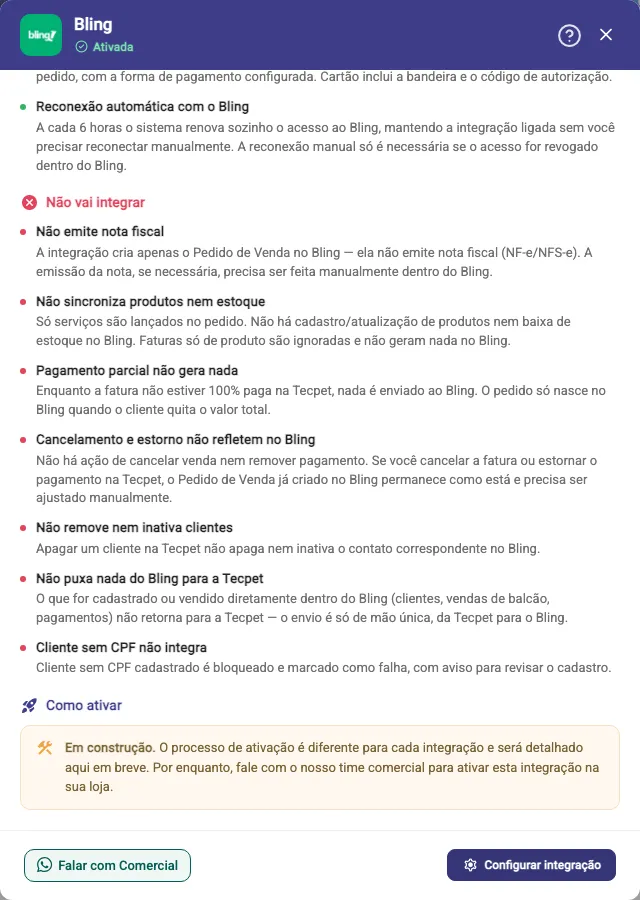
Won’t integrate (red), the seven limits; scroll the window to see them all:
- Doesn’t issue tax invoices: the integration only creates the Sales Order; the tax invoice must be issued manually inside Bling;
- Doesn’t sync products or stock: only services go into the order; product-only invoices are ignored;
- Partial payment generates nothing: while the invoice isn’t fully paid, nothing is sent;
- Cancellations and refunds don’t reflect in Bling: cancelling the invoice or refunding the payment in tecpet doesn’t touch the order already created;
- Doesn’t delete or deactivate customers: deleting a customer in tecpet doesn’t delete or deactivate the contact in Bling;
- Doesn’t pull anything from Bling into tecpet: whatever is registered or sold inside Bling (customers, counter sales, payments) doesn’t come back to tecpet;
- Customers without a Tax ID don’t integrate: the delivery is blocked and marked as failed, with a warning to review the record.
At the end there’s the How to enable block, currently with the “Under construction” notice: the process differs for each integration, so for now activation goes through the sales team. In the footer you get Talk to Sales and Configure integration.
Step 4: Open the Bling settings
Section titled “Step 4: Open the Bling settings”Click Configure on the Bling card or Configure integration in the footer of the details window. The Bling settings window opens (while the data loads you see “Loading data…”).
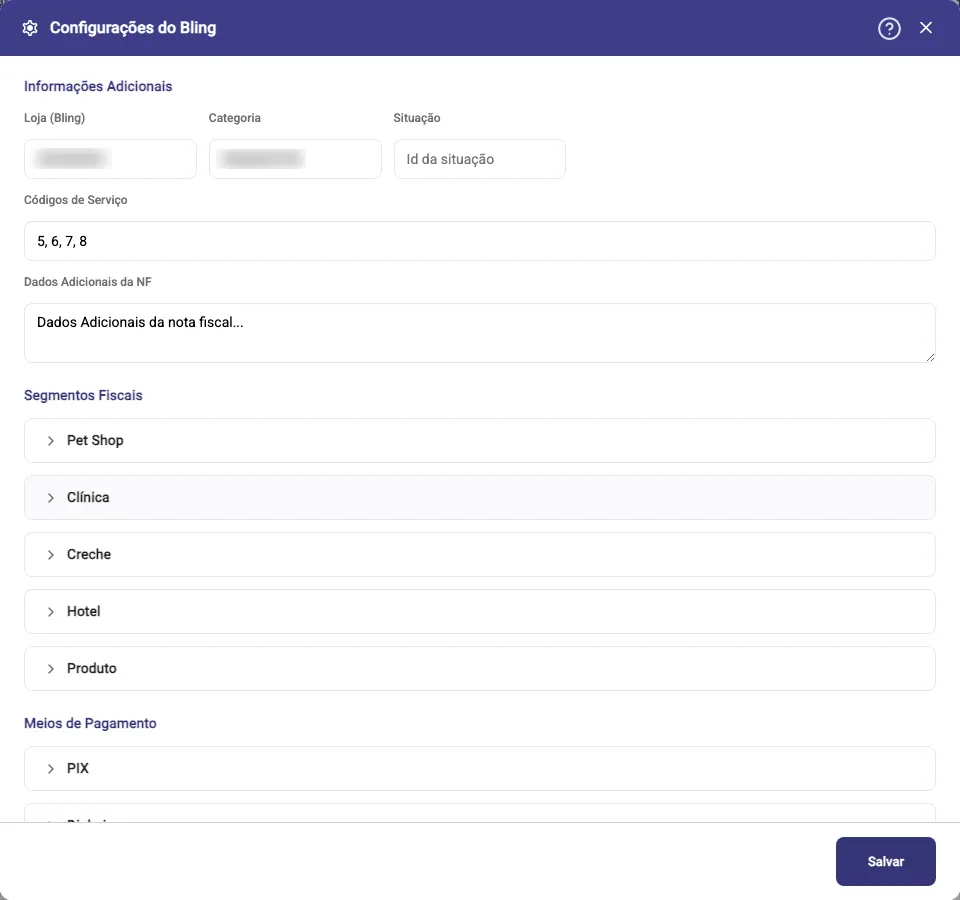
The window has three blocks, in this order: Additional Information, Tax Segments and Payment Methods. The Save button sits in the footer.
Step 5: Fill in the Additional Information
Section titled “Step 5: Fill in the Additional Information”This block is always open and has five fields. None is mandatory on the screen, but the first three are what steers the order inside Bling:
- Store (Bling): the identifier of the Bling store that should receive the orders (field hint: “Bling store id”). Useful when you have more than one store registered there;
- Category: the identifier of the category the order is booked under (“Category id”);
- Status: the identifier of the status the order is born with in Bling (“Status id”), matching the statuses registered in your Bling;
- Service Codes: the list of service codes, separated by commas (the on-screen hint is “Comma separated. E.g.: 5, 6, 7, 8”). On save, tecpet splits the text by the commas and stores one code per item, ignoring extra spaces;
- Invoice Additional Data: free text that comes out in the additional data field of the invoice (“Text that goes into the invoice’s additional data”). It’s the only long-text field in the block.
Step 6: Set up the Tax Segments
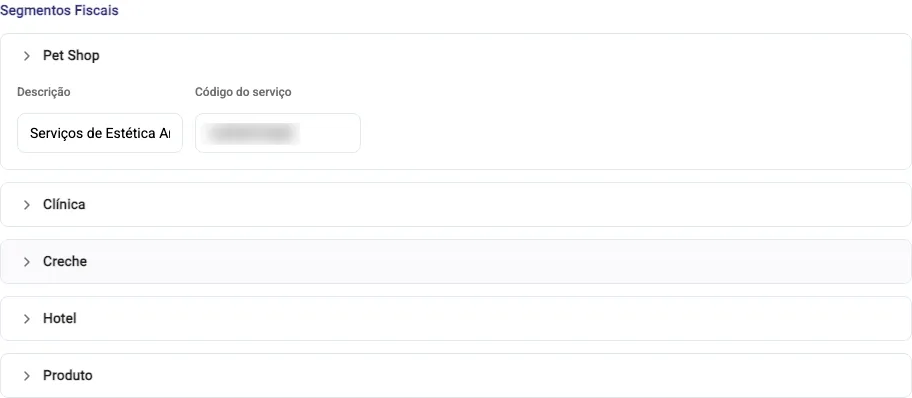
Section titled “Step 6: Set up the Tax Segments”The Tax Segments block brings five boxes, all collapsed when the window opens. Click the name to expand and collapse. The order is always: Pet Shop, Clinic, Day Care, Hotel and Product.
Each expanded segment shows two fields:
- Description: how the service of that segment is described on the Bling order (“Service description”);
- Service code: the matching code inside Bling (“Service code in Bling”).
Fill in only the segments your shop offers. If the shop doesn’t do day care or hotel, leave those boxes empty.
Step 7: Set up the Payment Methods
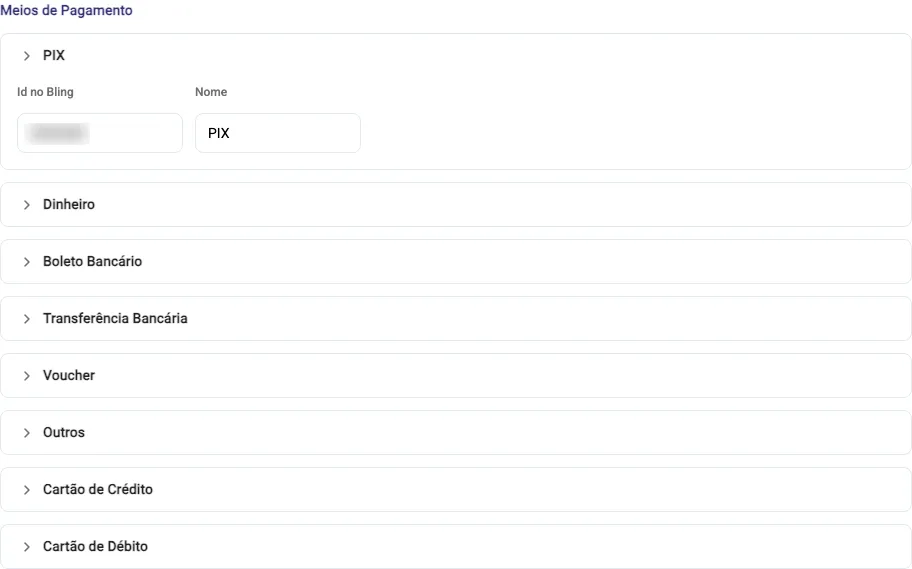
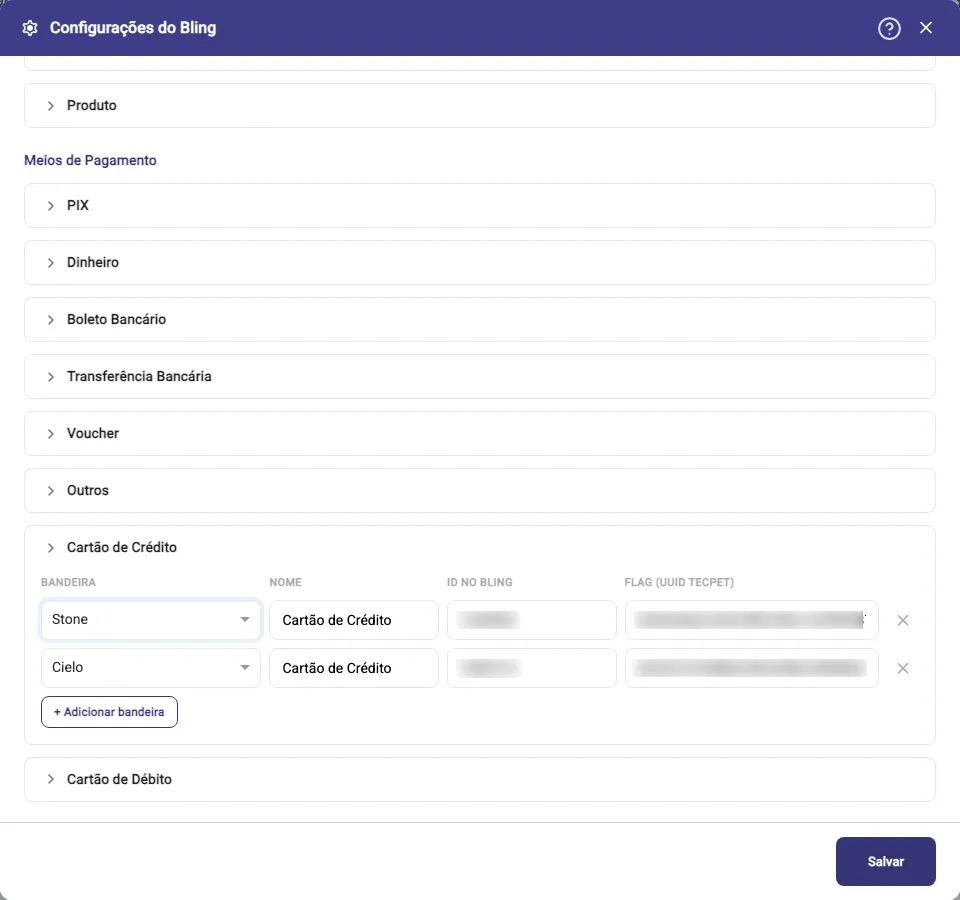
Section titled “Step 7: Set up the Payment Methods”The Payment Methods block has eight boxes, also collapsed by default and always in this order: PIX, Cash, Bank Slip, Bank Transfer, Voucher, Other, Credit Card and Debit Card.
The first six (the non-card ones) expand with two fields:
- Bling id: the identifier of that payment method inside Bling;
- Name: the name you want to see on the order’s installment (e.g. PIX).
This is what makes the order’s installment reach Bling with the right payment method. A method left blank = an unidentified installment over there.
Step 8: Register the card brands
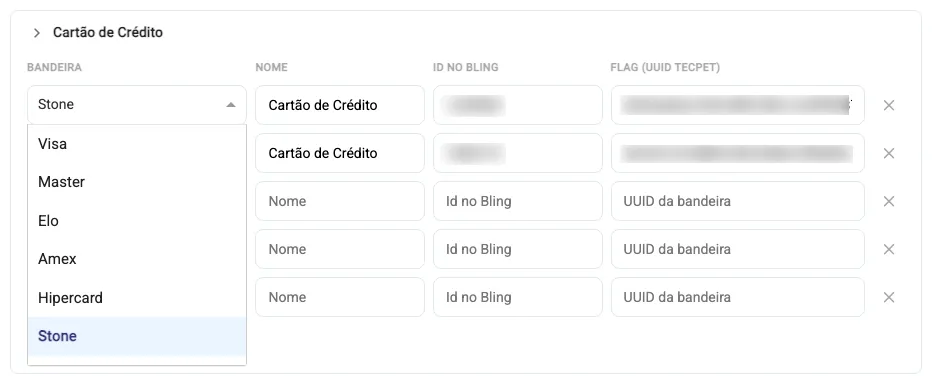
Section titled “Step 8: Register the card brands”Credit Card and Debit Card work differently: instead of two fields, they expand into a list with one row per brand, with the columns Brand, Name, Bling id and Flag (tecpet UUID).
On each row:
- Brand: the selector with the card brand;
- Name: the name that shows on the order’s installment (e.g. Credit Card);
- Bling id: the identifier of that payment method in Bling;
- Flag (tecpet UUID): the internal code tecpet uses to recognise the brand (on-screen hint: “Brand UUID”). If you don’t have that code at hand, ask support;
- The x at the end of the row removes the brand.
Use + Add brand to create a new row. While there’s none, the box only shows “No brand configured.” (the column header only appears from the first row onwards).
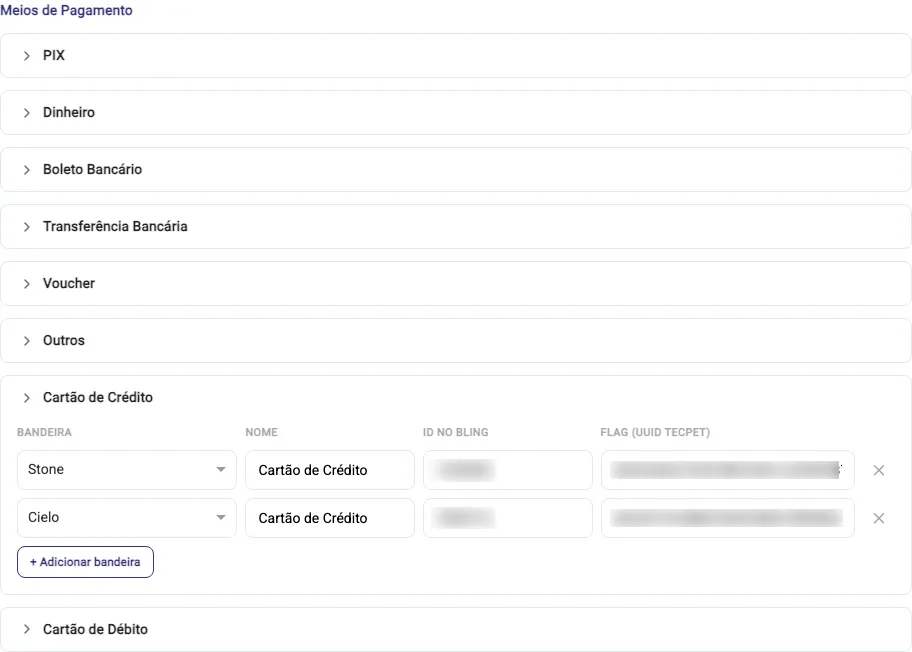
The Brand selector offers ten options, in this order: Visa, Master, Elo, Amex, Hipercard, Stone, Cielo, Vindi, Pagar.me and Other. If your brand isn’t listed, type the name and it’s accepted anyway (when the search finds nothing, the selector shows “No option”).
Step 9: Save
Section titled “Step 9: Save”Scroll to the footer of the window and click Save.
If it works: the notice “Settings updated, Bling settings updated successfully!” appears and the window closes on its own. If it fails: “We couldn’t update the Bling settings!” shows and the window stays open with what you typed, fix it and try again.
How to edit or undo later
Section titled “How to edit or undo later”Go back the same way, Settings → System → Integrations → Configure on the Bling card, and the window reopens with everything already filled in. From there:
- Change a code: erase the value, type the new one and click Save;
- Clear a field: erase the content and save, it goes back to empty;
- Remove a brand: click the x on the row and save;
- Leave without saving: use the x at the top of the window; nothing you typed is applied.
There’s no history and no “undo” on this screen: the last Save is what counts. Before erasing a code that was already working, write it down somewhere.
When the order doesn’t reach Bling
Section titled “When the order doesn’t reach Bling”Before opening a ticket, check the four most common causes, all of them expected behaviour of the integration:
- Customer without a Tax ID: the delivery is blocked; complete the customer record;
- The invoice isn’t fully paid: partial payment generates nothing; the order is only born once the customer settles the full amount;
- Product-only invoice: only services become an order; an invoice with no service is ignored;
- Access revoked inside Bling: tecpet reconnects on its own every 6 hours, but if the authorization was removed over there it needs reconnecting: contact support.
And remember: even with the order created, the tax invoice doesn’t go out by itself: issuing it is done manually inside Bling.