
Generate the public API key and integrate other systems
The public API chave de acesso (access key) links to your shop a system that you or your developer controls: a website, an app, an automated spreadsheet or a management system. With it, that system reads and, if you allow it, writes data in tecpet (clients, pets, catalog, schedule and finances) over the internet. Everything lives in Configurações → Sistema → API (Settings → System → API), which only appears when the API pública (public API) module is subscribed. If the idea is to talk to your shop through Claude, ChatGPT or Gemini, you don’t need a key: see Connect an AI assistant to tecpet.
Step 1: Open the API screen
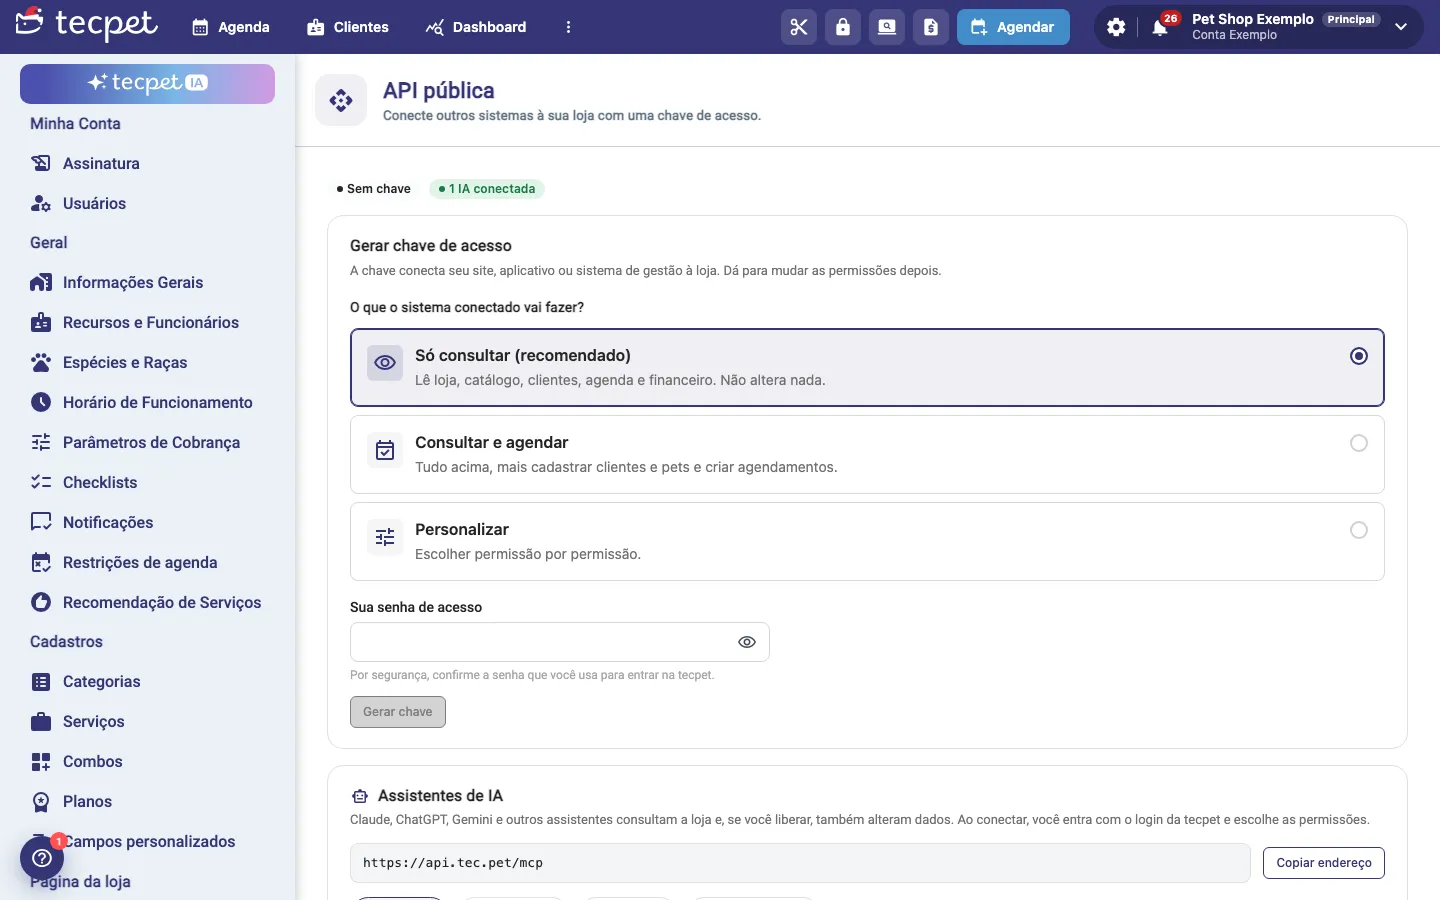
Section titled “Step 1: Open the API screen”Go to Configurações (Settings; it will ask for the administrator password) and, in the side menu, open Sistema → API (System → API). At the top, two badges summarize the situation: Sem chave (No key) or Chave ativa (Active key), and how many AIs are connected.
Without a key, the screen opens on the Gerar chave de acesso (Generate access key) card: “A chave conecta seu site, aplicativo ou sistema de gestão à loja. Dá para mudar as permissões depois.” (The key connects your website, app or management system to the shop. You can change the permissions later.)
Step 2: Choose what the system can do
Section titled “Step 2: Choose what the system can do”Under O que o sistema conectado vai fazer? (What will the connected system do?), choose an option:
- Só consultar (recomendado) (Look up only, recommended): reads shop, catalog, clients, schedule and finances. Changes nothing;
- Consultar e agendar (Look up and book): everything above, plus registering clients and pets and creating appointments;
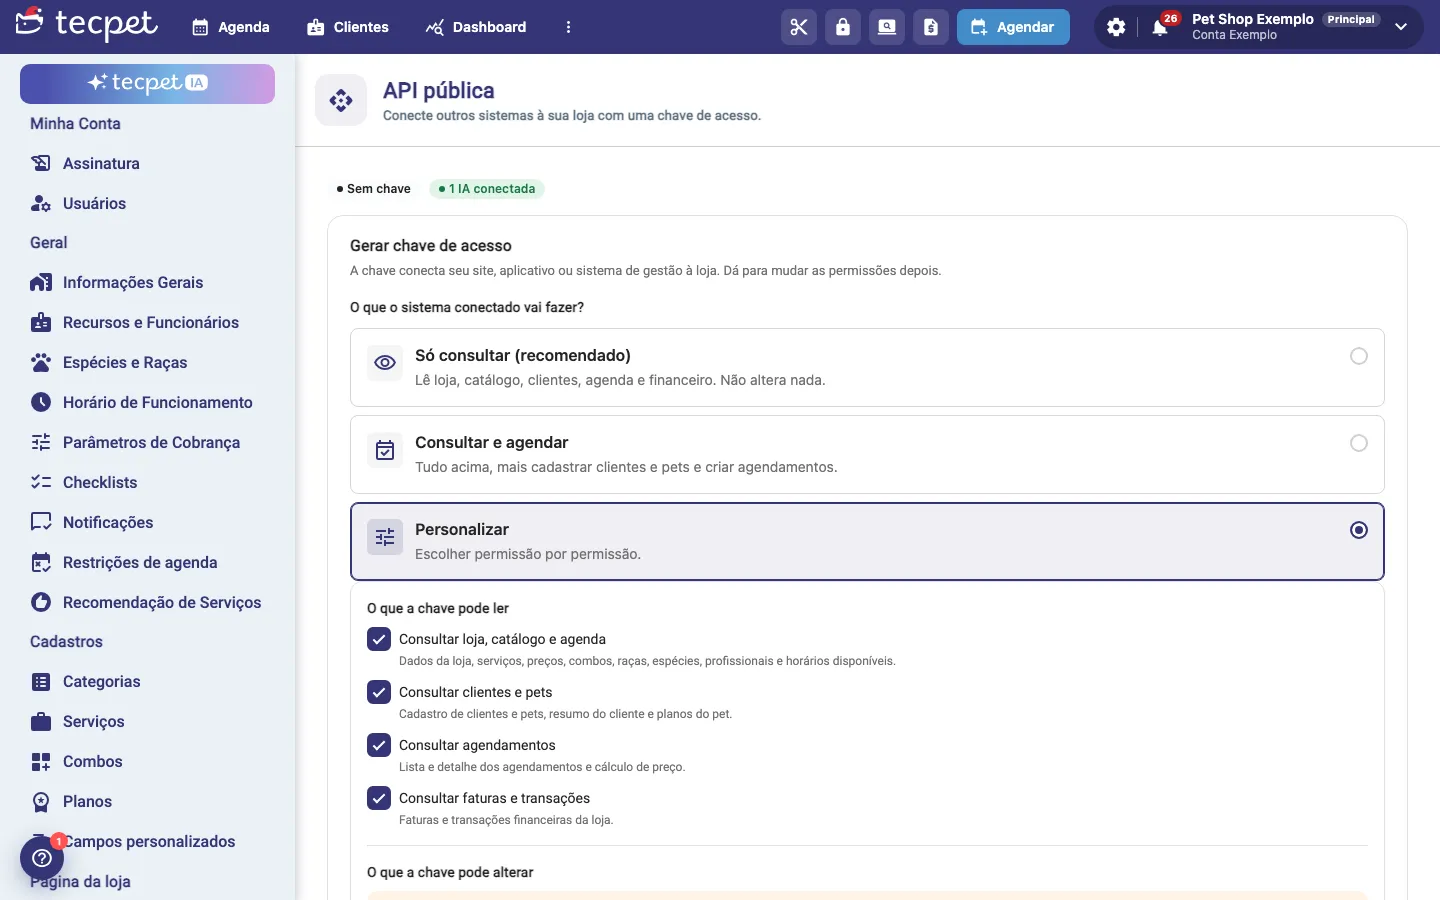
- Personalizar (Customize): opens the list so you can check permission by permission, split into O que a chave pode ler (What the key can read) and O que a chave pode alterar (What the key can change).
The permissions are:
- Consultar loja, catálogo e agenda (Look up shop, catalog and schedule): shop data, services, prices, combos, breeds, species, staff and available times;
- Consultar clientes e pets (Look up clients and pets): client and pet records, client summary and pet plans;
- Consultar agendamentos (Look up appointments): list and details of appointments and price calculation;
- Consultar faturas e transações (Look up invoices and transactions): the shop’s invoices and financial transactions;
- Cadastrar e editar clientes e pets (Register and edit clients and pets): creates and changes clients and pets;
- Criar e alterar agendamentos (Create and change appointments): creates, reschedules, swaps services and changes the status of appointments;
- Alterar o catálogo (Change the catalog): creates, edits and deletes services, categories, combos, breeds and species.
The four lookup ones come checked. The ones that change things come unchecked.
Step 3: Confirm your password and generate the key
Section titled “Step 3: Confirm your password and generate the key”Type your Sua senha de acesso (Your access password, the same one you use to sign in to tecpet) and click Gerar chave (Generate key).
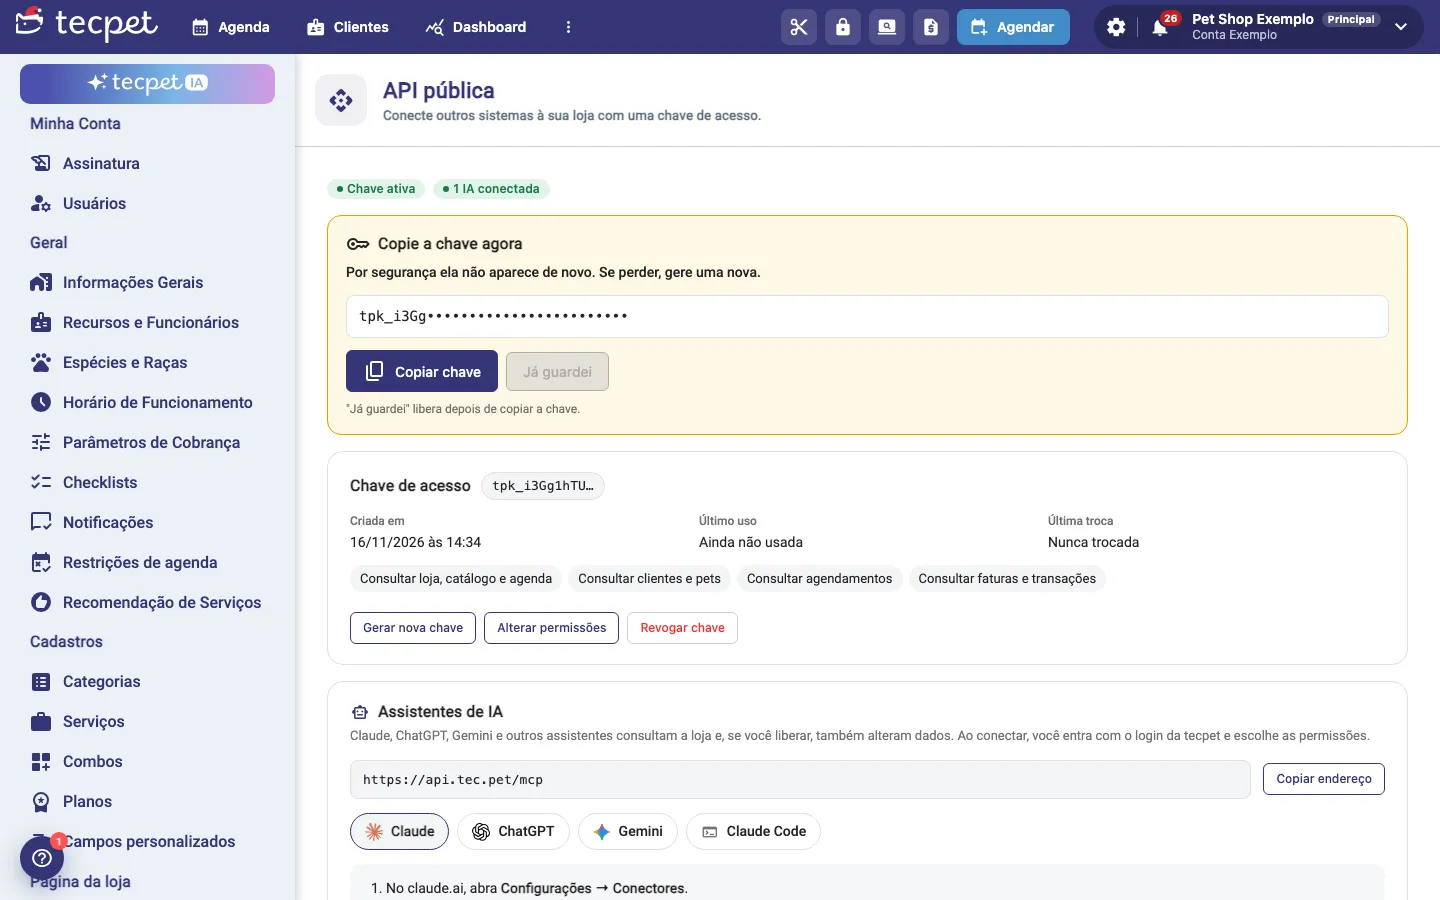
The yellow card Copie a chave agora (Copy the key now) appears: “Por segurança ela não aparece de novo. Se perder, gere uma nova.” (For security it doesn’t appear again. If you lose it, generate a new one.) Click Copiar chave (Copy key) and keep it somewhere safe (your company’s password manager, or directly in the settings of the system that will use the key). The Já guardei (I’ve saved it) button only unlocks after you copy. When you click it, the card disappears.
Step 4: Track and manage the key
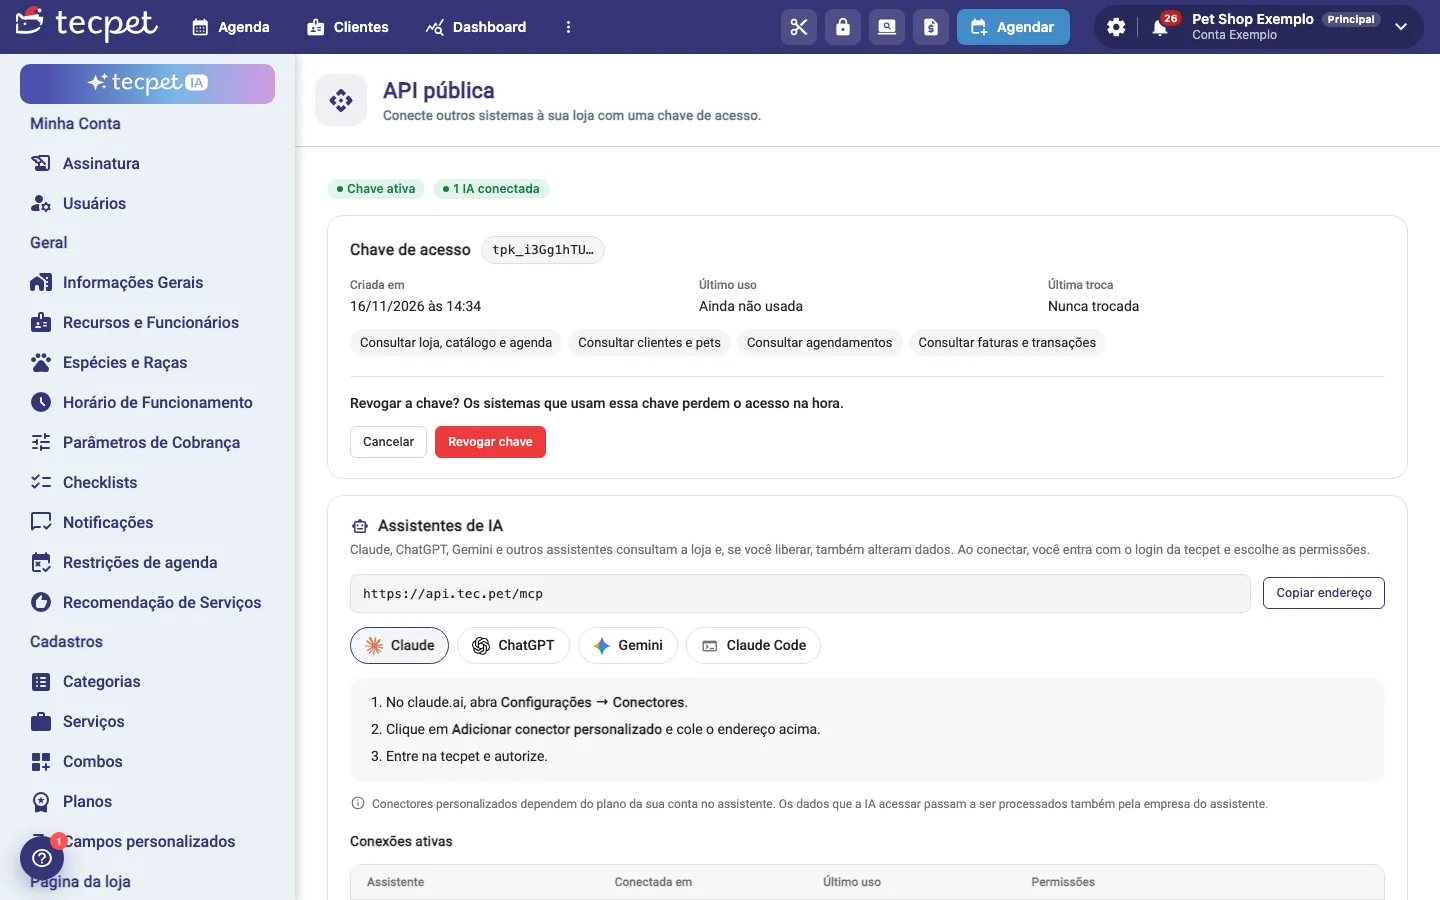
Section titled “Step 4: Track and manage the key”Once created, the screen shows the Chave de acesso (Access key) card with:
- The beginning of the key (e.g.
tpk_…), so you know which key is active without exposing the rest; - Criada em (Created on), Último uso (Last used) (or Ainda não usada, Not used yet) and Última troca (Last replaced) (or Nunca trocada, Never replaced);
- The permissions granted, as tags.
And three buttons:
- Gerar nova chave (Generate new key): creates a new key and the old one stops working. Use it when the key leaks or when someone who had access leaves the team. After that you need to update the key in the integrated system;
- Alterar permissões (Change permissions): changes what the key can do, without replacing the key;
- Revogar chave (Revoke key): turns the key off (see the next step).
Generating a new key and changing permissions ask for your password again.
Step 5: Revoke the key when you no longer use it
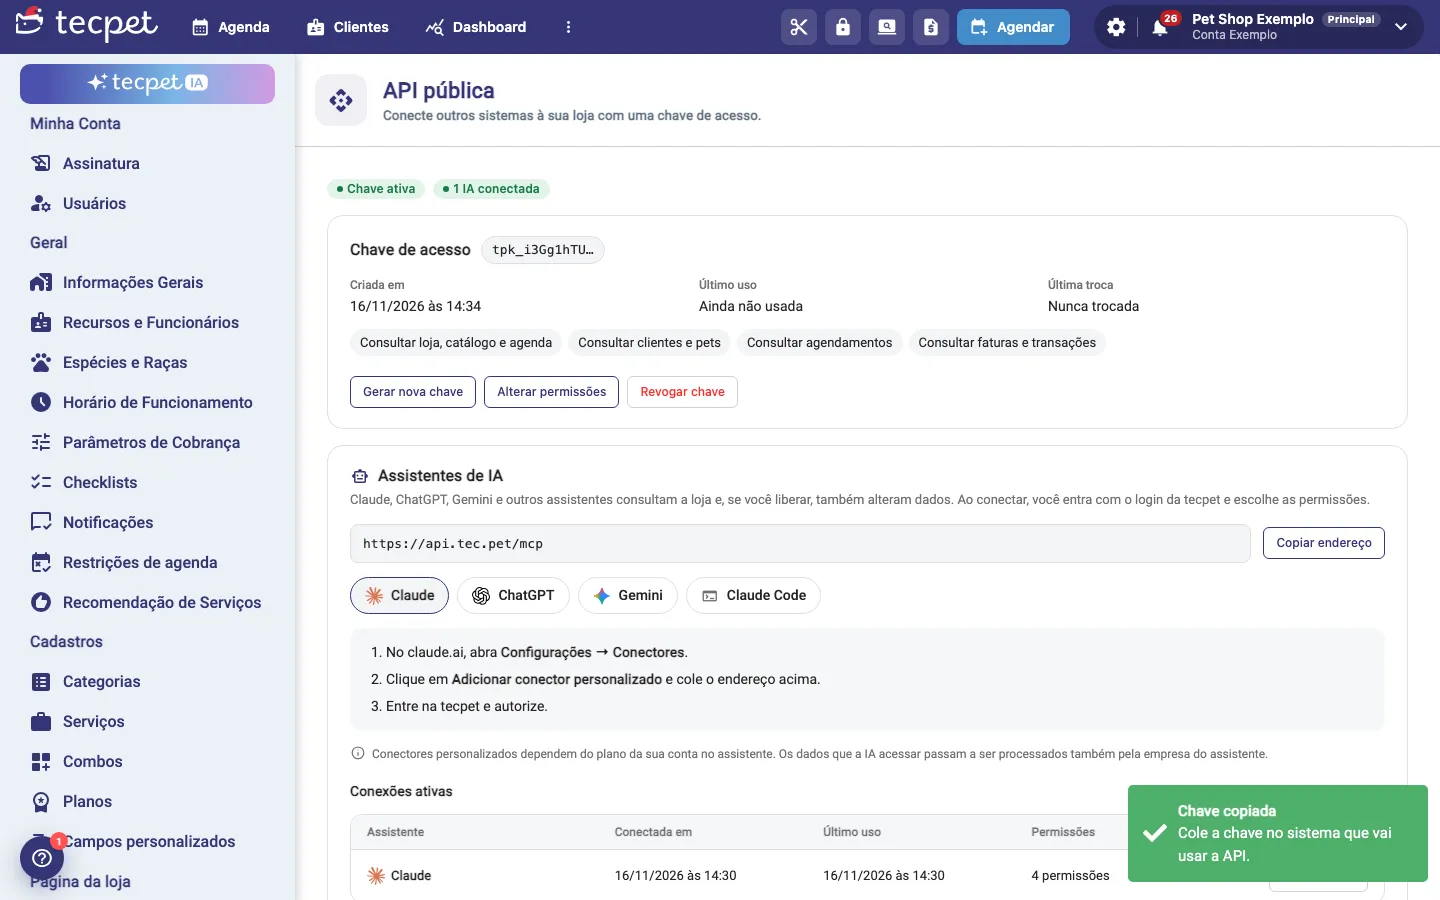
Section titled “Step 5: Revoke the key when you no longer use it”Click Revogar chave. The screen asks “Revogar a chave? Os sistemas que usam essa chave perdem o acesso na hora.” (Revoke the key? Systems that use this key lose access immediately.) Click Revogar chave again to confirm, or Cancelar (Cancel). After that, the screen goes back to Gerar chave de acesso. Revoking the key does not disconnect AI assistants: each one has its own connection and is disconnected in Conexões ativas (Active connections).
Step 6: Hand the details to whoever will program
Section titled “Step 6: Hand the details to whoever will program”At the bottom of the screen, open Documentação da API (API documentation) (Para quem vai programar uma integração com a chave de acesso, For whoever will program an integration with the access key). It shows what the developer needs:
- URL base (Base URL):
https://api.tec.pet/v1/; - Autenticação (Authentication): the
Authorization: Bearer <sua chave>header in every call; - Loja (Shop): the
x-shopheader is optional, because the key already identifies the shop; - Abrir a documentação completa (Open the full documentation): the interactive documentation of all routes, with the fields of each one.
Example call, looking up a client by phone:
curl "https://api.tec.pet/v1/client?phone=11999999999" \ -H "Authorization: Bearer SUA_CHAVE"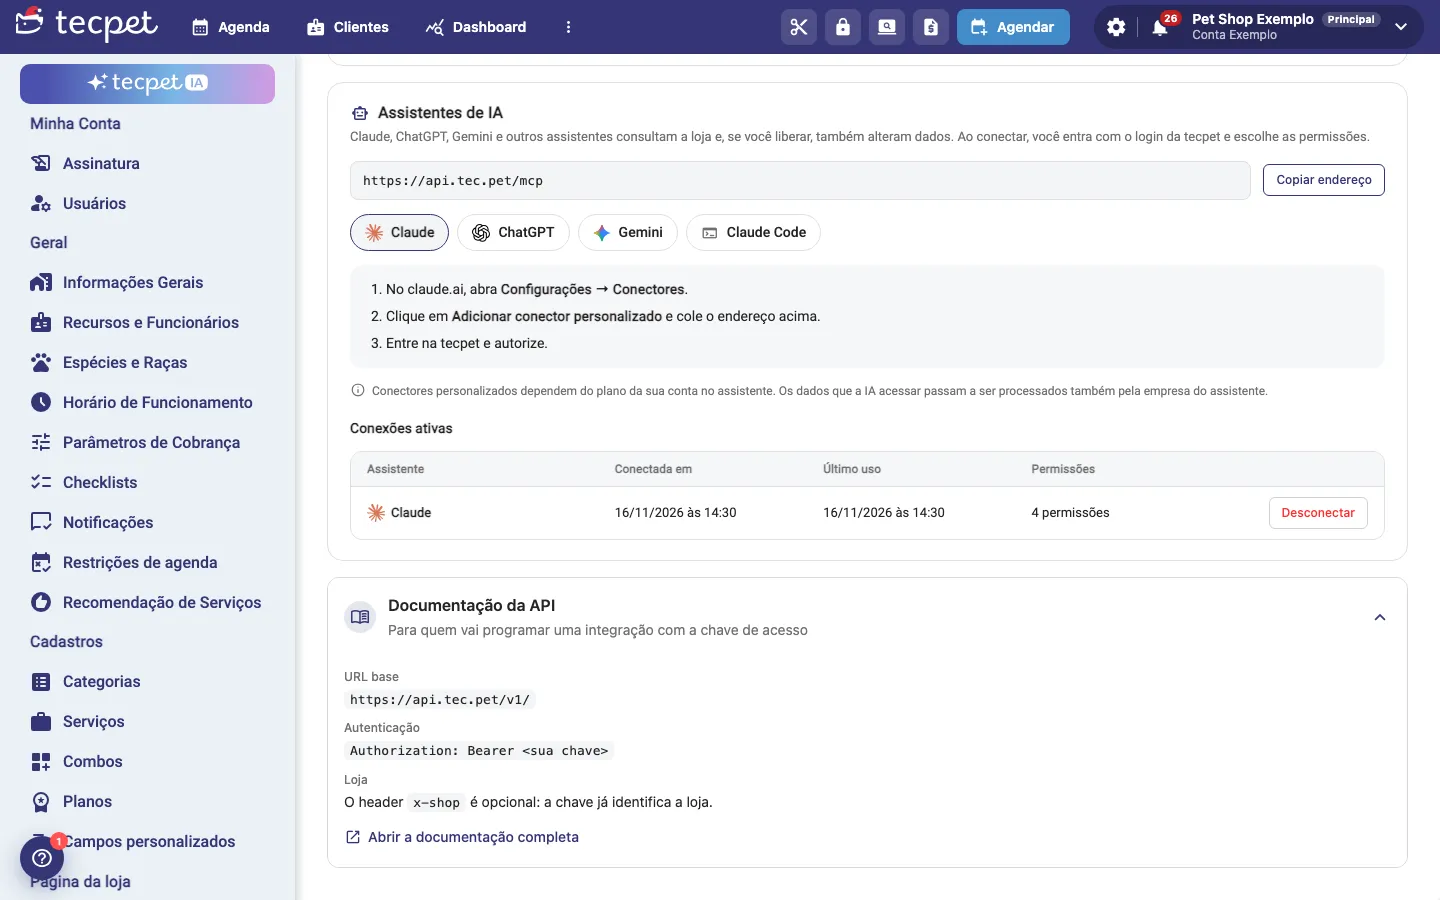
What you can do through the API
Section titled “What you can do through the API”The main routes, grouped by area (the full list and the fields are in the full documentation):
- Shop:
GET /v1/shop/configurations(segments, opening hours and booking rules); - Clients:
GET /v1/client(paginated search, by phone, external code or registration date),GET /v1/client/{id},GET /v1/client/{id}/summary,POST /v1/client,PUT /v1/client/{id}; - Pets:
GET /v1/pet,GET /v1/pet/{id},POST /v1/pet,PUT /v1/pet/{id},GET /v1/pet-plan(plans and packages with remaining balance); - Catalog:
GET /v1/service,GET /v1/service/pricing(price for a pet),GET /v1/combo/pricing,GET /v1/specie,GET /v1/breed,GET /v1/billingMethod(sizes and coat types),GET /v1/employee/list; - Schedule:
POST /v1/availableTimes(free times),POST /v1/service-capacity/by-day(daycare spots),POST /v1/booking/pricing,GET /v1/booking,GET /v1/booking/{id},POST /v1/booking,PUT /v1/booking/{id}/reschedule,PUT /v1/booking/{id}/changeStatus,PUT /v1/booking/{id}/changeServices; - Finances:
GET /v1/invoice,GET /v1/transaction(payments received by payment date); - Summaries (up to 12 months, by day, week or month):
GET /v1/analytics/payments,GET /v1/analytics/sales,GET /v1/analytics/bookings.
To create an appointment: look up the client and the pet, query the services with the pet’s price, ask for the times in availableTimes and send the returned timeId in POST /v1/booking. Appointments created through the API get the origin API pública.
Limits and common errors
Section titled “Limits and common errors”Each shop key can make up to 1,000 requests per hour. Beyond that, the response is 429 with the message “Limite de 1000 requisições por hora atingido para este token” (Limit of 1000 requests per hour reached for this token) and the Retry-After header telling how many seconds to wait.
- 401 Token não fornecido (Token not provided): the
Authorization: Bearerheader is missing; - 401 Token inválido (Invalid token) or Token expirado (Expired token): wrong key, replaced through Gerar nova chave, or revoked;
- 403: the shop doesn’t have the public API module, is blocked, or the key doesn’t have the permission for that route (grant it in Alterar permissões);
- 429: over the hourly limit, wait for the time in
Retry-After.