
Create AI pet images
In the customer’s Gallery you turn ordinary pet photos into a ready-to-send image, built by tecpet’s AI. There are two themes available today: Before & After (two photos side by side showing the bath-and-groom transformation) and June Festival (one pet photo inside a Brazilian June-festival scene). The image comes out with the pet’s name and your shop’s name already baked in, is saved automatically to the customer’s gallery and can be sent via WhatsApp in one click. Each generated image uses 1 AI credit: the same balance used by the automated service (see AI service and credits).
Can I stand out and be remembered with this? #
Show the result, not the price
The pet's before and after sells your grooming better than any price list.
“Whoever shows the result doesn't compete on price.”
You nailed the bath and the groom, the owner rushed in to pick the pet up and barely noticed. With no record, the work becomes just a number on the invoice, and between one visit and the next, the owner forgets your shop.
From two pet photos, the AI builds the before-and-after image with the pet's name and your shop's, and you send it straight on WhatsApp. A personalized treat that becomes the owner's post, shows the quality of your service and pulls the next appointment, with no design skills needed.
Step 1: Open the customer’s Gallery
Section titled “Step 1: Open the customer’s Gallery”In the Customers menu, open the customer and click Gallery in the record’s side menu, the same menu that holds General Information, Pets, Appointments, Records, Billing and Pet Care (see Customer profile).
At the top right of the screen, click the green button with the sample thumbnail and the text “Before and after pet photo”, flagged with the NEW badge.
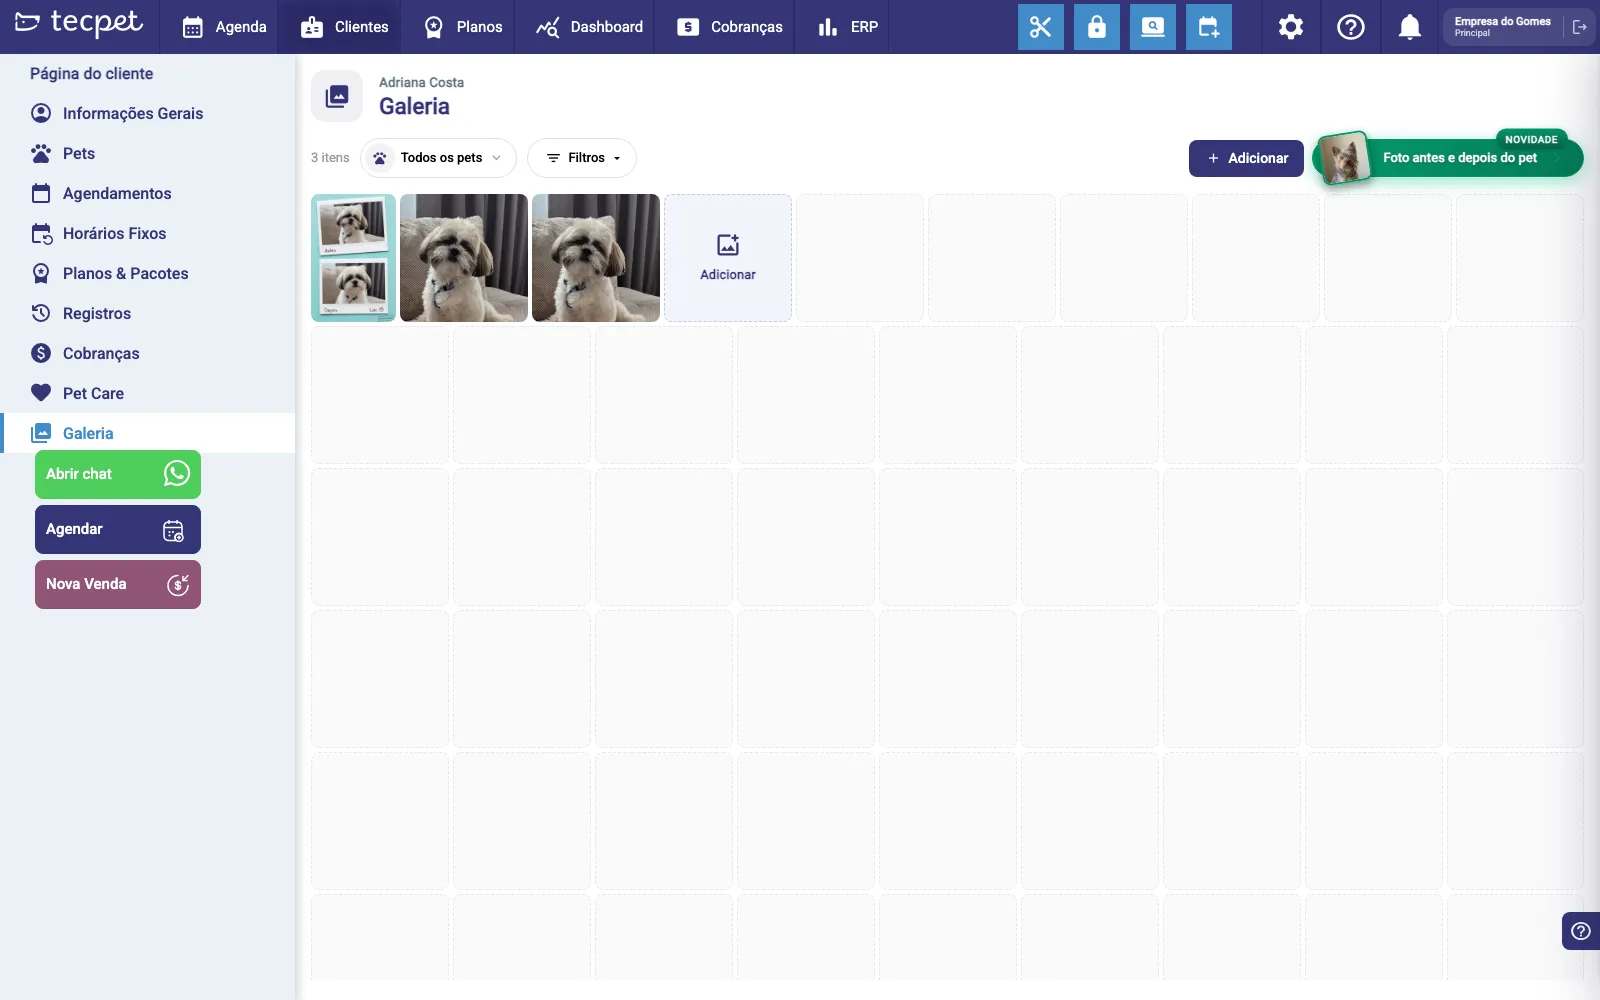
What else that header shows:
- item counter (e.g. 3 items) on the left;
- All pets: selector that filters the gallery by pet. Only shows when the customer has more than one pet;
- Filters: filters photos by period;
- + Add: uploads a photo to the gallery without generating any image. Only shows when the gallery already has at least one item (on an empty gallery, use the Add tile in the middle of the screen).
Step 2: Pick the theme, the pet and the two photos
Section titled “Step 2: Pick the theme, the pet and the two photos”The creation screen opens in three numbered columns: 1, Choose the pet’s photo, 2, Creating your image and 3, Your image is ready!. You work in column 1; the other two fill themselves in.
At the top sit the theme tabs and your credit balance:
- Before & After (green), comes selected by default;
- June Festival (orange);
- Christmas: shows the COMING SOON badge and cannot be clicked;
- on the right, “N AI credits / up to N images”, with the + button to top up and the X to close.
In column 1, with the Before & After tab active:
- Choose the pet: chips with each of the customer’s pets’ photo and name. Only shows when the customer has more than one pet; with a single pet, it comes pre-selected.
- Before photo: under Where does the photo come from?, pick Upload photo (the default) or From the gallery.
- After photo: same thing, in the second block.
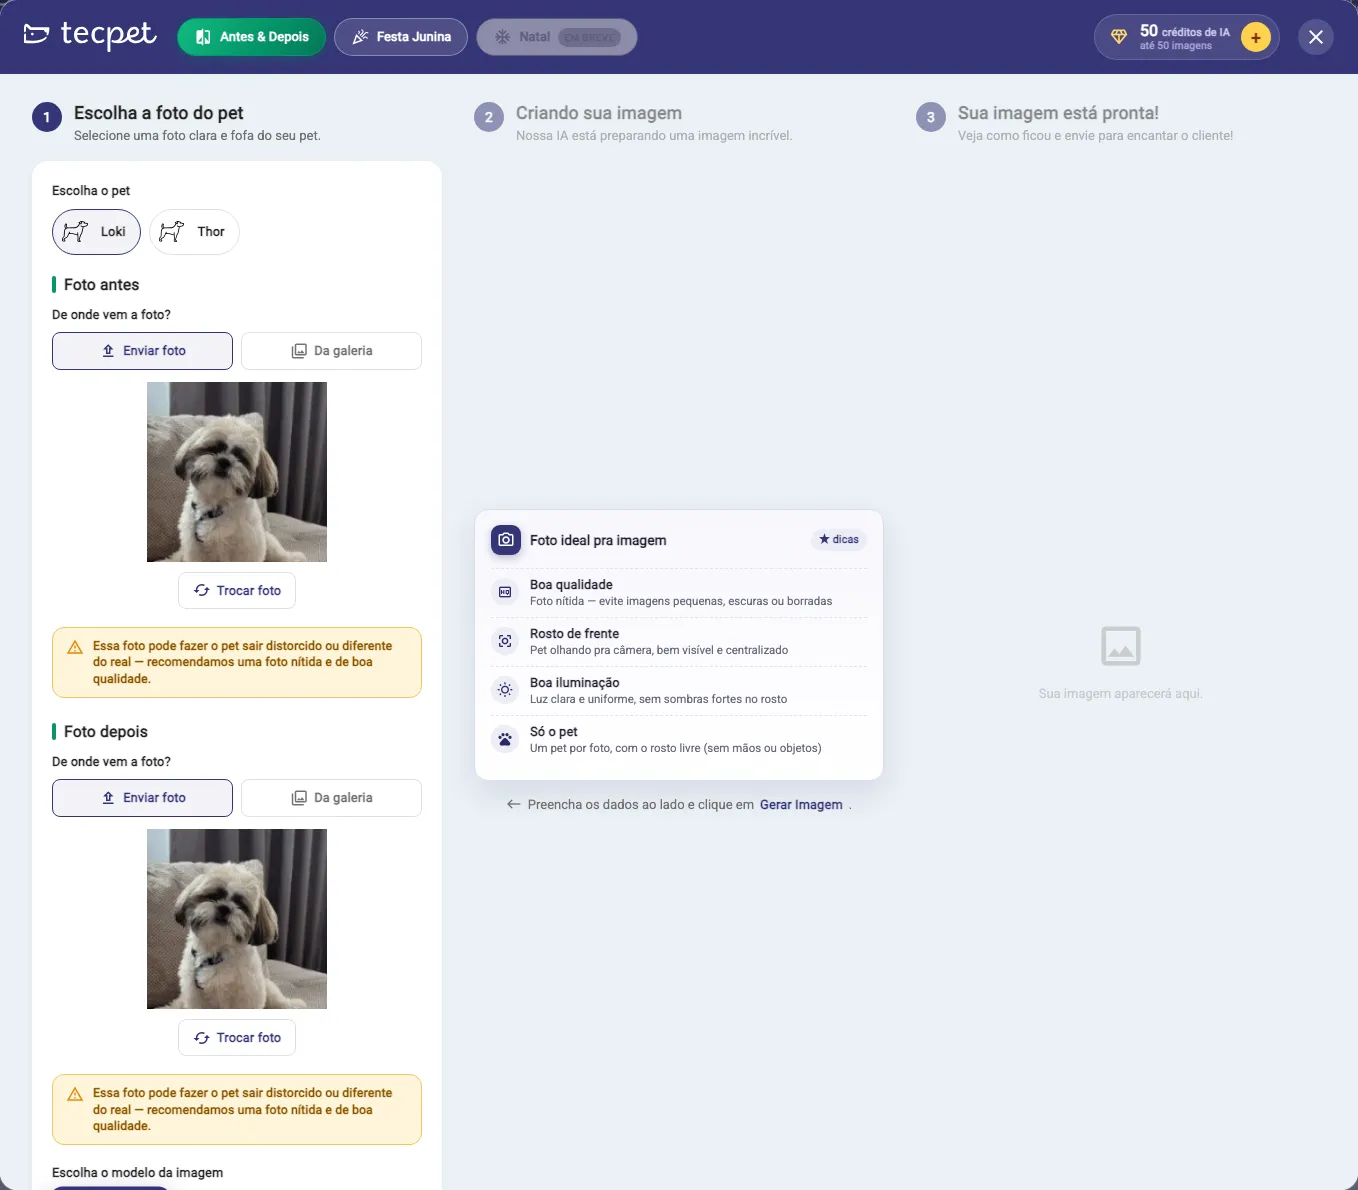
How each photo source works:
- Upload photo: the area reads “Drag or pick a photo, JPG or PNG”. Once chosen, the preview takes its place, with a Change photo button below.
- From the gallery: shows a strip of the photos already in that customer’s gallery; click one to select it. If there are none yet, it reads “No photos in this customer’s gallery.”.
Step 3: Pick the template and adjust the texts
Section titled “Step 3: Pick the template and adjust the texts”Scrolling column 1, you reach the Choose the image template block with six thumbnails. The first one, Instant photo, comes pre-selected. Each thumbnail has a magnifying-glass icon in the corner: click it to enlarge the preview: inside the enlarged preview you can browse between templates and pick the one you like.
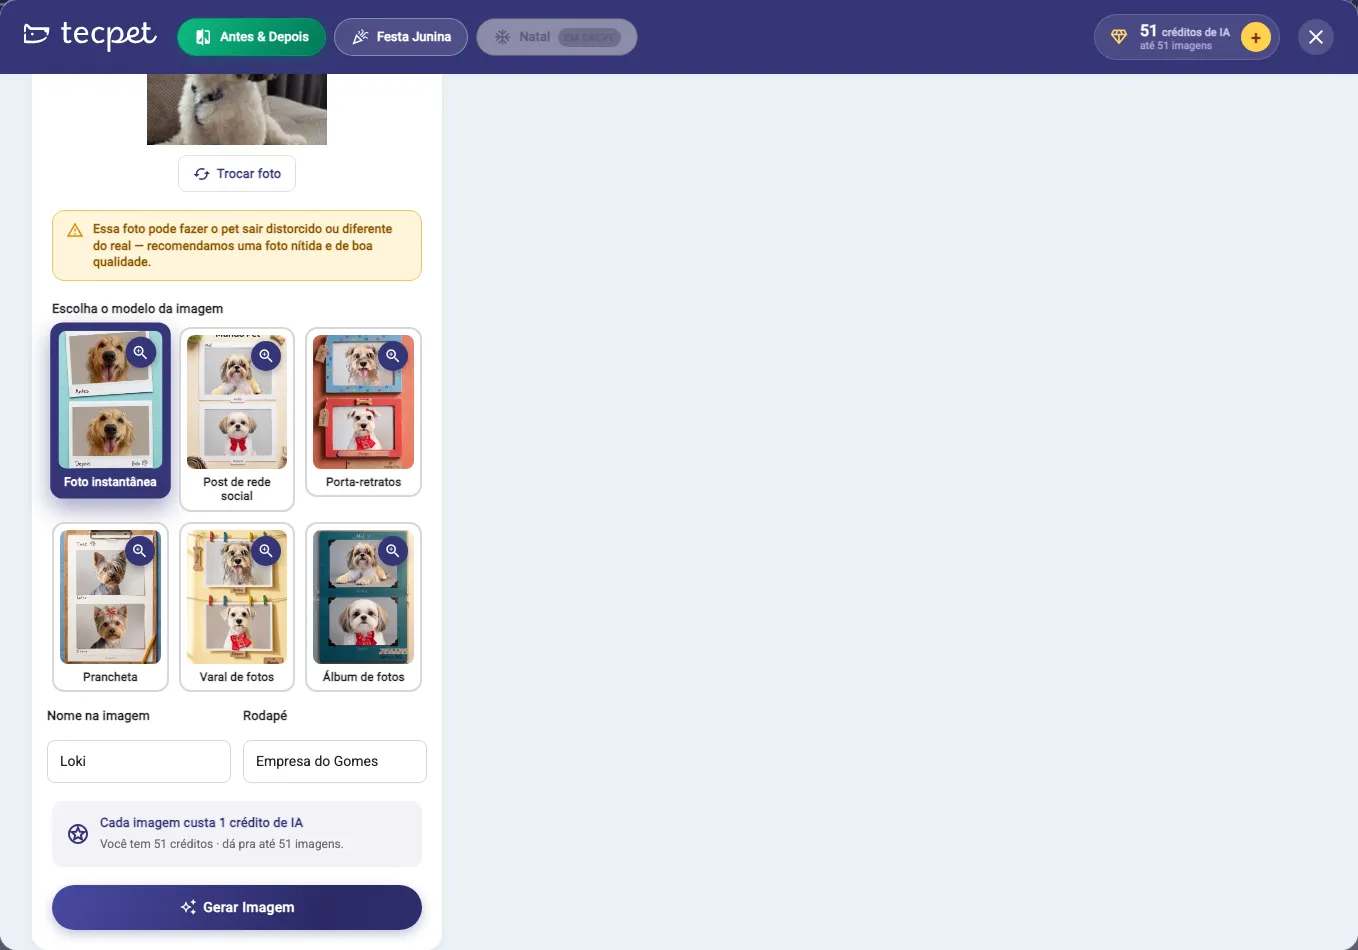
Right below are the two text fields and the cost summary:
- Name on the image and Footer: already filled in; adjust if you like.
- “Each image costs 1 AI credit, You have N credits · enough for up to N images.”
- Generate Image: the button stays disabled until you pick the pet, both photos, a template and fill in Name on the image.
Step 4: Generate the image
Section titled “Step 4: Generate the image”Click Generate Image. Column 2 takes over and shows “Creating image…”, “Just a moment ✨”, “This may take a few seconds.” and the checklist of stages ticking off:
- Analyzing the pet’s photo;
- Picking the best style;
- Building the before and after (on the June Festival tab: Applying the June Festival theme);
- Finishing your image.
In practice it takes 45 to 50 seconds. When it’s done, column 2 turns into “Image ready! 🎉, See the result on the side →” and the result appears in column 3.
Step 5: Send it to the customer
Section titled “Step 5: Send it to the customer”Column 3 shows the finished image. Click it (or the magnifying-glass icon) to enlarge. Below it you get:
- “What did you think of the image?”: a thumbs up and a thumbs down. Thumbs down opens a box “Tell us what didn’t turn out well (optional)” with a Send feedback button. This rating helps improve the templates and uses no credit.
- Send to the customer / Share via WhatsApp: green button that fires the image to the owner’s WhatsApp.
- “The image is already saved in the customer’s gallery.”: so even if you don’t send it right away, it’s stored.
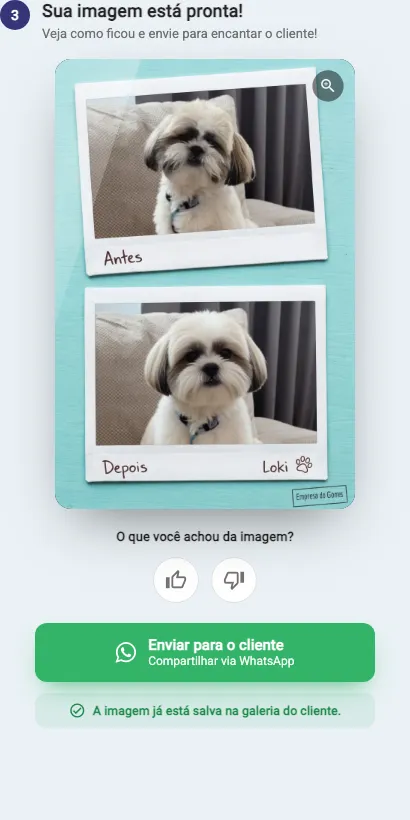
In the result above, both photos went in whole, with their original background, inside two polaroids labeled Before and After, with the pet’s name and the shop footer. The AI builds the scene around the photos, it does not crop or redraw the pet.
The June Festival theme
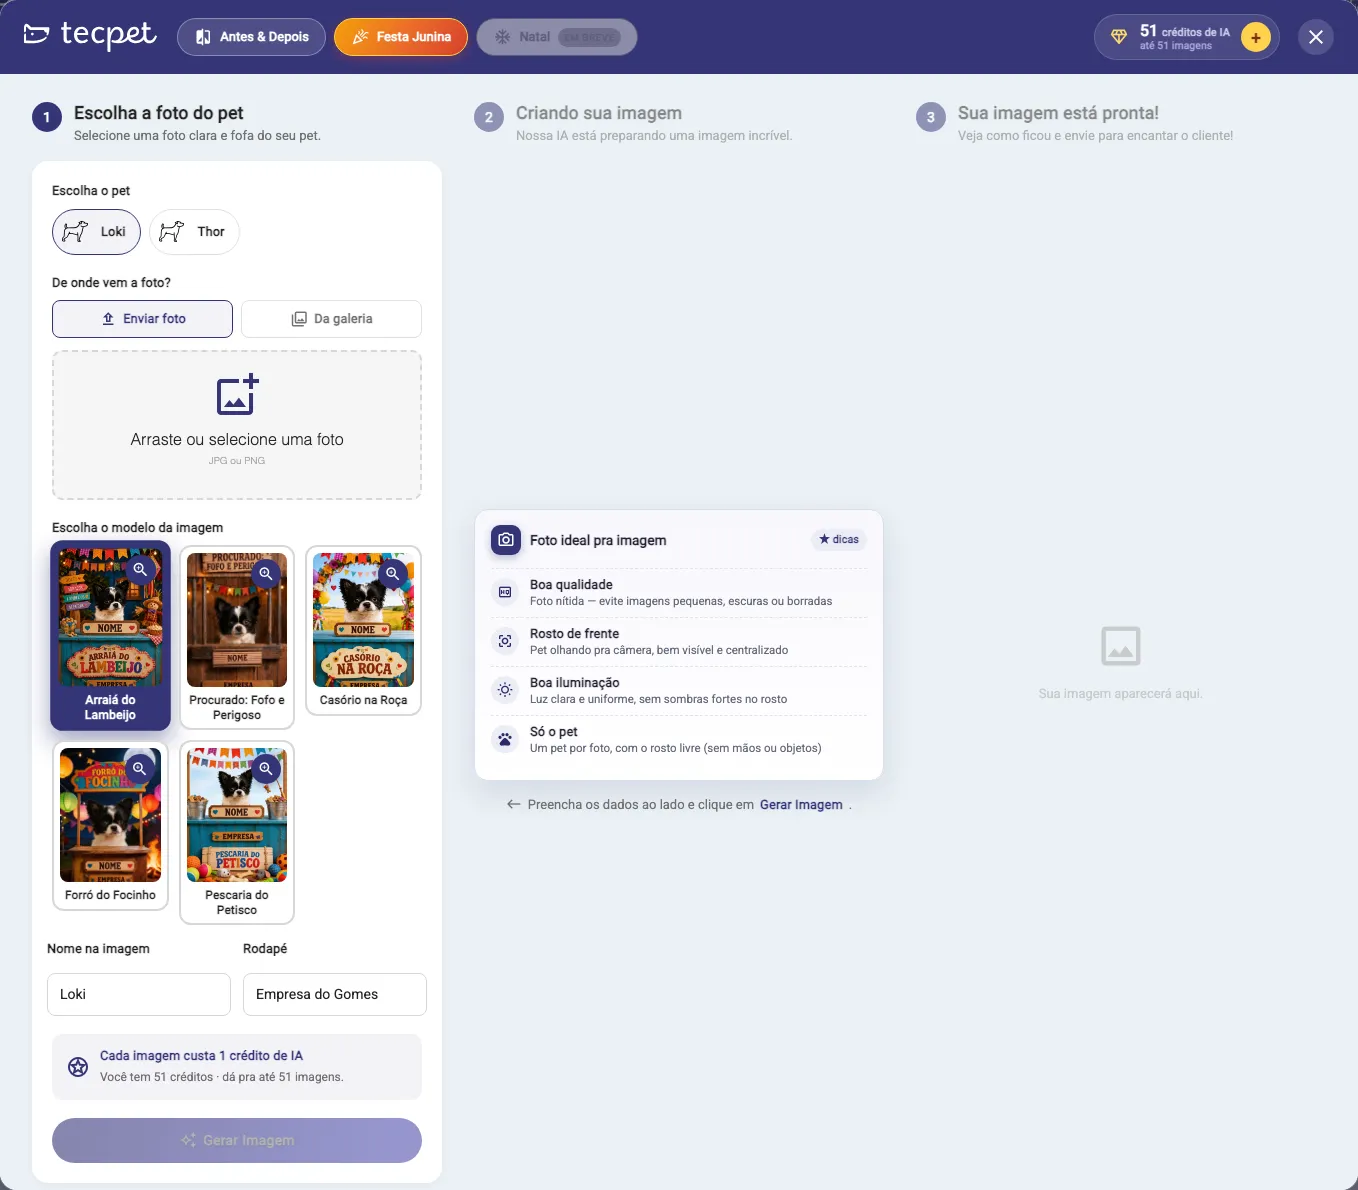
Section titled “The June Festival theme”Click the June Festival tab to switch themes. The screen is the same, with two differences:
- it takes a single photo: there is one Where does the photo come from? (with Upload photo / From the gallery), without the Before photo and After photo blocks;
- the templates are five June-festival scenes, in the order they appear: Lick & Kiss Hoedown, Wanted: Cute and Dangerous, Country Wedding, Snout Forró and Fishing for Treats.
The Name on the image and Footer fields, the 1 credit cost and the Generate Image button work the same (here the button stays disabled until there’s a photo).
The fields, one by one
Section titled “The fields, one by one”| Field | What it does |
|---|---|
| Theme tabs | Before & After (default, two photos), June Festival (one photo) and Christmas (COMING SOON, disabled). |
| Choose the pet | Sets which pet the image is about, its name fills the Name on the image field and its gallery is the one browsed. Only shows with more than one pet. |
| Where does the photo come from? * | Upload photo (JPG or PNG, drag or pick) or From the gallery (photos already saved in the customer’s gallery). In Before & After there is one of these blocks for the Before photo and another for the After photo: both are required. |
| Choose the image template * | Before & After: Instant photo (pre-selected), Social media post, Picture frames, Clipboard, Photo clothesline and Photo album. June Festival: Lick & Kiss Hoedown, Wanted: Cute and Dangerous, Country Wedding, Snout Forró and Fishing for Treats. The magnifying glass enlarges the preview. |
| Name on the image * | Text printed on the art next to the photo. Comes with the pet’s name; up to 20 characters. |
| Footer | The art’s signature. Comes with your shop’s name; up to 30 characters. Whatever you type here is remembered for next time. |
| AI credits | Shows the balance and how many images you can still generate. The + opens the top-up page in another tab. |
Ideal photo and quality warning
Section titled “Ideal photo and quality warning”While nothing has been generated, column 2 shows the “Ideal photo for the image” card with the four recommendations:
- Good quality: sharp photo; avoid small, dark or blurry images;
- Face forward: pet looking at the camera, clearly visible and centered;
- Good lighting: clear, even light, no hard shadows on the face;
- Just the pet: one pet per photo, face clear (no hands or objects).
When you select a photo, a yellow warning may appear: “This photo may make the pet come out distorted or different from the real one, we recommend a sharp, good-quality photo.”
What happens to the photos afterwards
Section titled “What happens to the photos afterwards”- The generated image goes automatically into the customer’s gallery.
- The photos you uploaded through Upload photo also become pet media and stay in the gallery. In the example above, the gallery went from empty to 3 items: the created image plus the two photos used.
- So next time you can use From the gallery and reuse those same photos, with no new upload.
Redoing, swapping or deleting later
Section titled “Redoing, swapping or deleting later”- Redo with another template: go back to the Gallery, open the creation screen again, pick the same photos under From the gallery and select another template. Each new generation uses another 1 credit.
- Resend the image: the image stays in the customer’s gallery and can be opened and shared from there whenever you want, with no credit spent.
- Fix the name or the footer: a finished art can’t be edited, adjust the fields and generate again.
- Delete: open the photo in the customer’s Gallery and delete it there; this goes for both the generated image and the uploaded photos.