
Create a campaign
The Nova campanha (new campaign) wizard takes you from goal to sending in 5 steps: Objetivo (goal), Público (audience), Mensagem (message), Ritmo e custo (pace and cost) and Revisão (review). On the right, the Prévia ao vivo (live preview) recalculates on every change how many customers are in, the estimated return range, their average ticket and the expected conversion, and the Como o cliente vê (how the customer sees it) box shows the message exactly as it will arrive on WhatsApp. Everything is saved as a draft automatically, so you can stop and come back later. If you do not know the feature yet, first read What Campaigns are.
Step 1: Open the wizard and choose how to build the audience
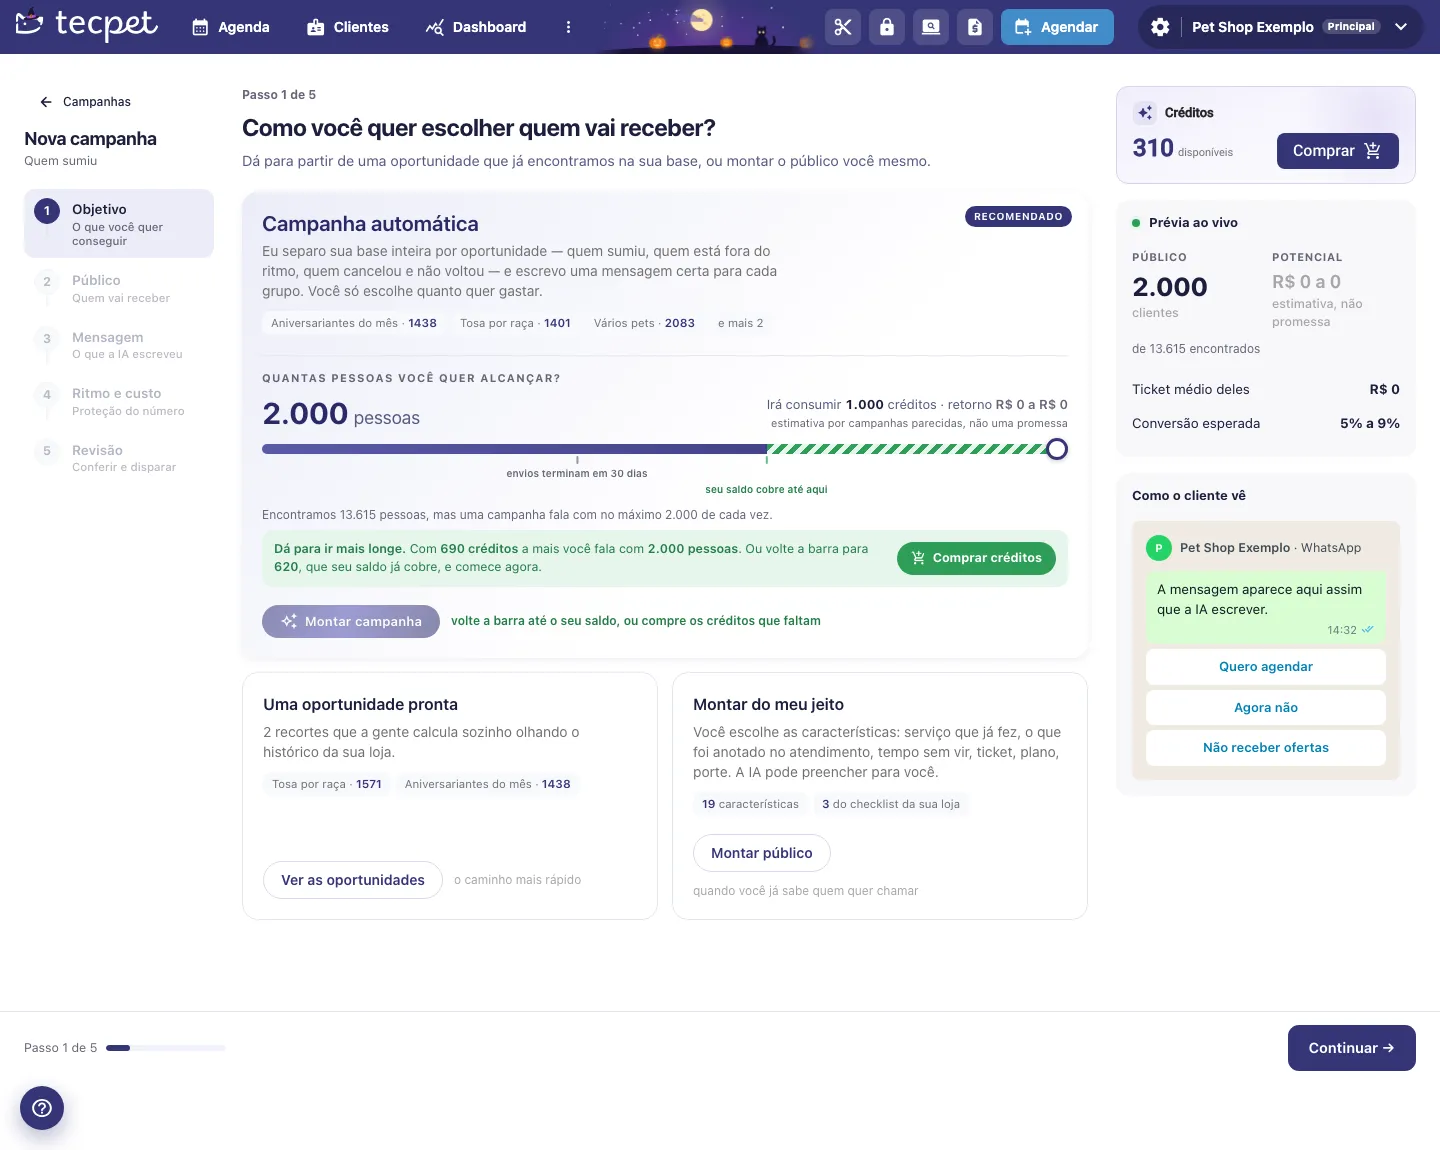
Section titled “Step 1: Open the wizard and choose how to build the audience”In ⋮ > Campanhas, click Nova campanha inteligente (or Preparar, on an opportunity in the Onde esse dinheiro está section, which opens with the audience already chosen). The first step asks Como você quer escolher quem vai receber? (how do you want to choose who receives it), with three paths:
- Campanha automática (automatic campaign, recommended): tecpet splits your whole base by opportunity and writes the right message for each group. You only choose on the Quantas pessoas você quer alcançar? bar and click Montar campanha. The Público, Mensagem and Ritmo steps are marked Feito por nós (done by us), and you check everything in the Review;
- Uma oportunidade pronta (a ready-made opportunity): click Ver as oportunidades to choose one of the groups tecpet already calculated;
- Montar do meu jeito (build my own way): click Montar público to choose yourself the traits of who receives it.
The automatic campaign bar shows how many credits the choice will use, the seu saldo cobre até aqui (your balance covers up to here) mark and the envios terminam em 30 dias (sending ends in 30 days) mark. If the balance does not cover it, move the bar back to the mark or click Comprar créditos.
If you chose a ready-made opportunity
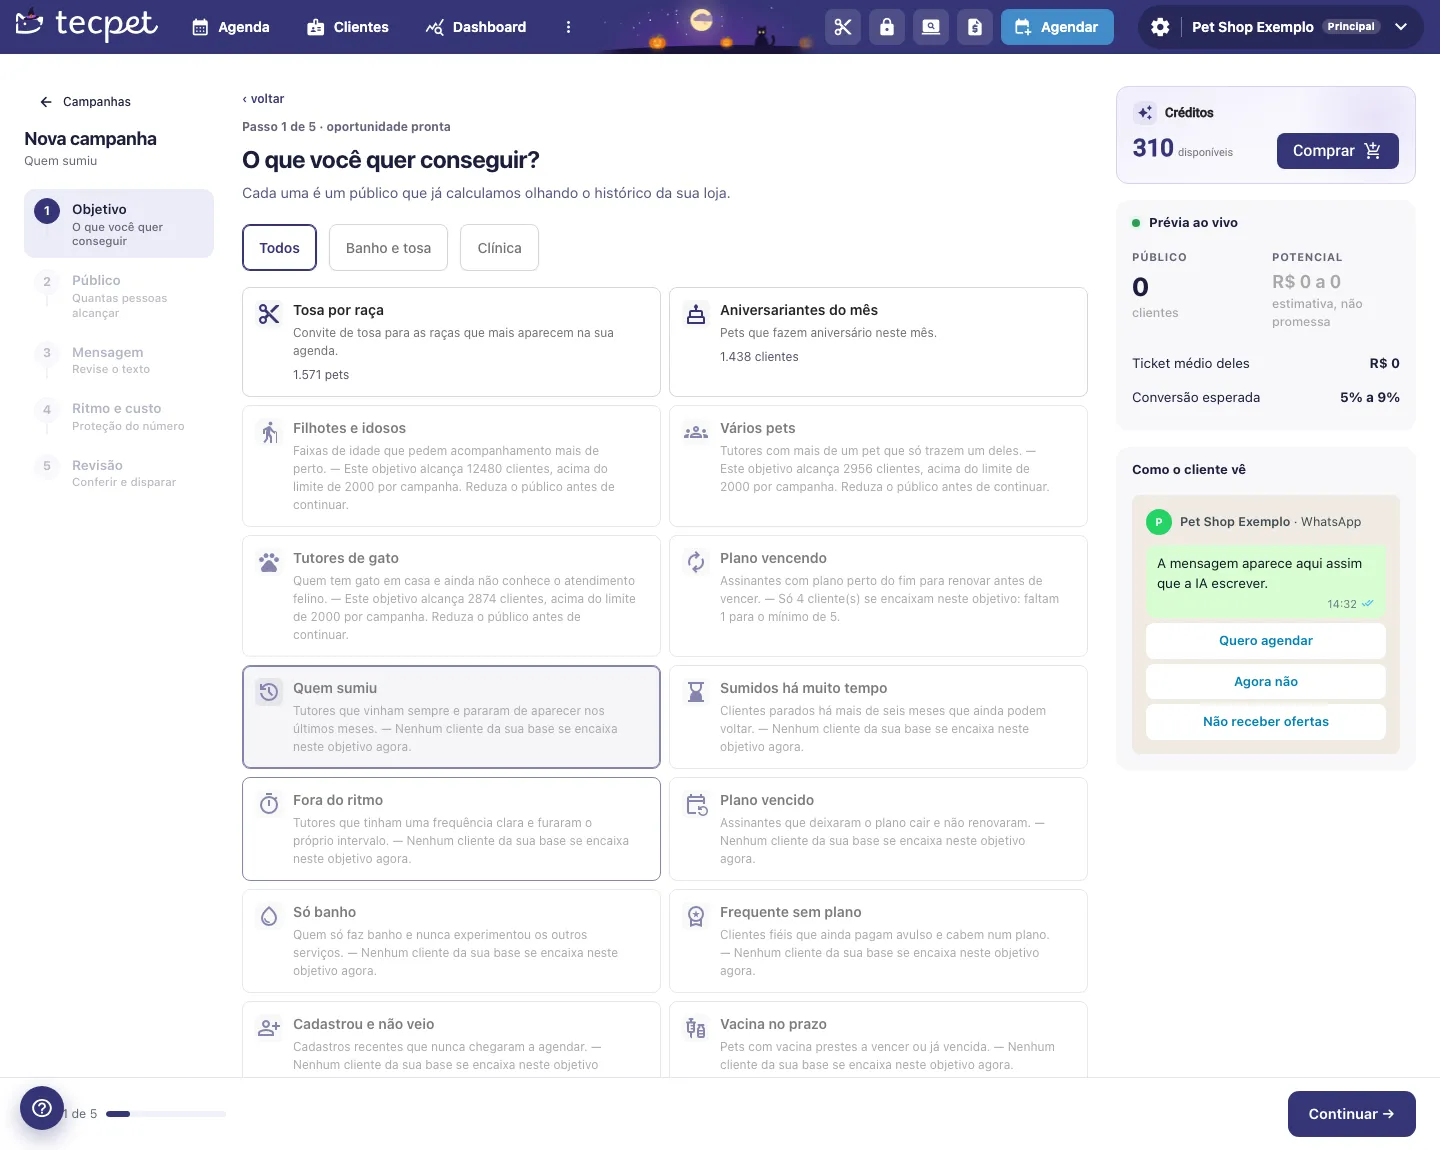
Section titled “If you chose a ready-made opportunity”The O que você quer conseguir? screen shows the goals as cards, split into the Todos, Banho e tosa, Clínica and Creche tabs (the last two only for stores with those segments). Each card has a sentence about the group and how many customers (or pets, in Tosa por raça) are in. Click the card to choose it and then Continuar.
A card is disabled when the group does not fit right now, with the reason written: no customer fits, fewer than 5 customers (the minimum) or more than 2,000 (the maximum per campaign). The full list of goals is in What Campaigns are.
If you chose to build your own way
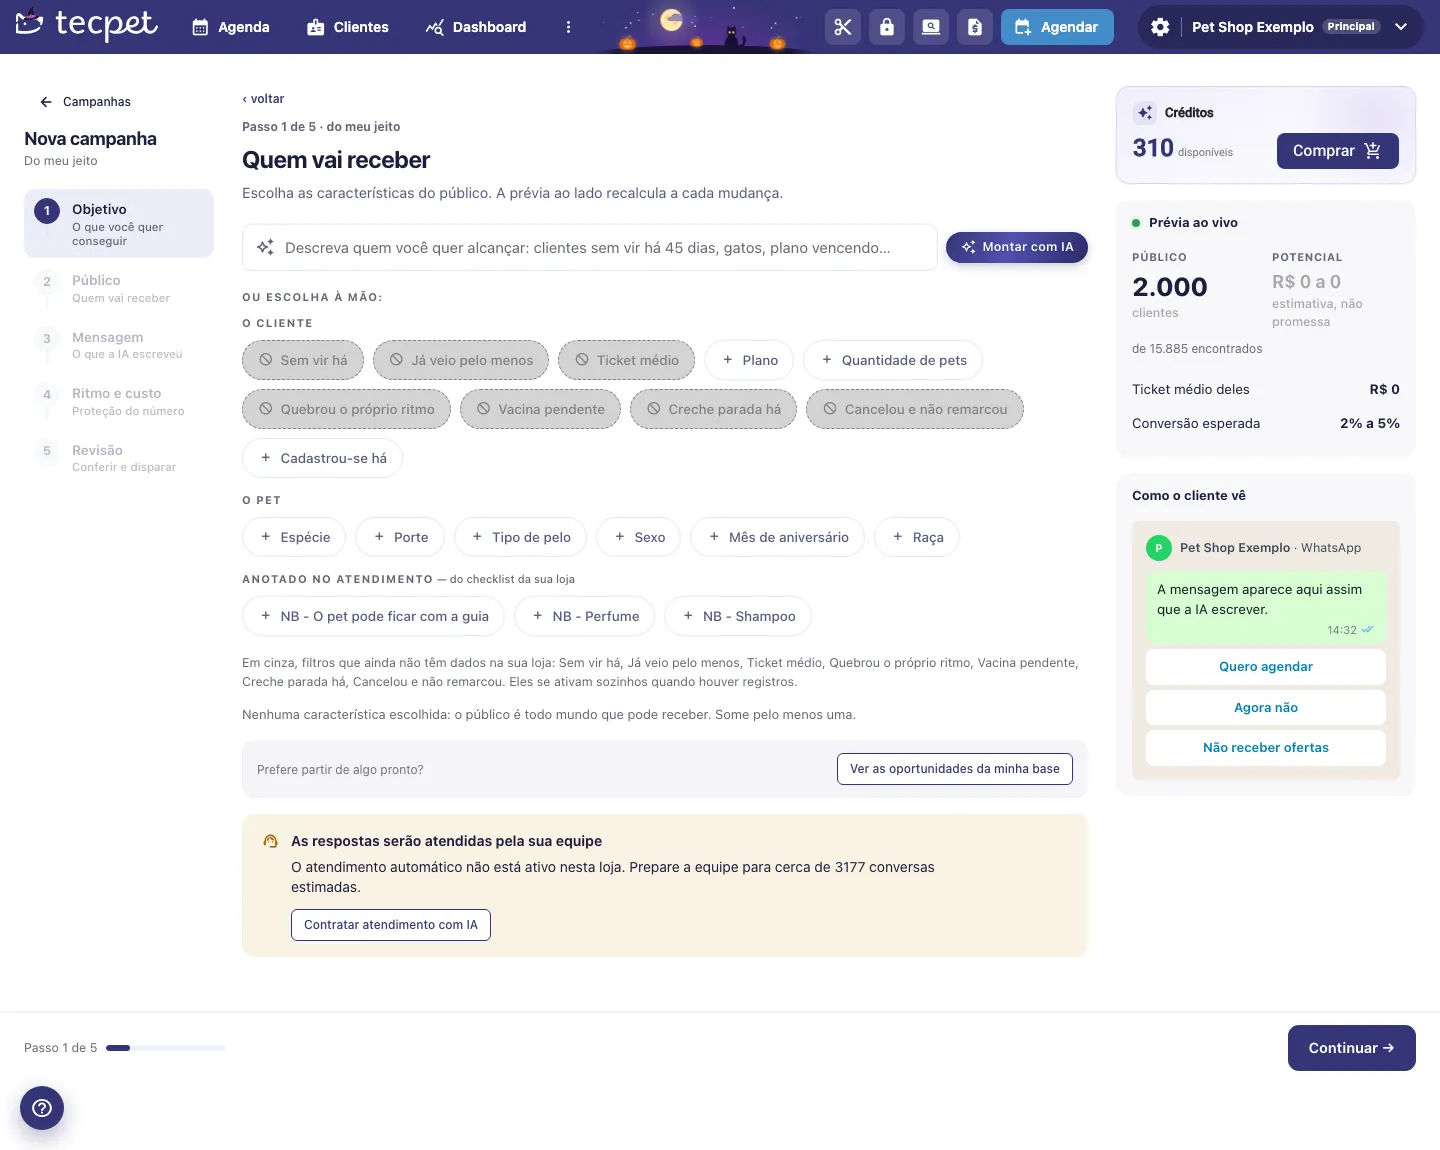
Section titled “If you chose to build your own way”On the Quem vai receber (who receives it) screen, you have two ways to build the audience:
- Descreva quem você quer alcançar and click Montar com IA: write in plain words (for example, “customers who have not come for 45 days and have a cat”) and the AI marks the traits for you;
- Ou escolha à mão (or choose by hand), clicking the traits, grouped like this:
- O cliente (the customer): Sem vir há, Já veio pelo menos, Ticket médio, Plano, Quantidade de pets, Quebrou o próprio ritmo, Vacina pendente, Creche parada há, Cancelou e não remarcou and Cadastrou-se há;
- O pet: Espécie, Porte, Tipo de pelo, Sexo, Mês de aniversário and Raça;
- O que ele já fez (what they have done): services the customer has or has never had, chosen in a tree by category (with the Qualquer serviço de option for a whole category);
- Anotado no atendimento (noted during service): the items of your store’s checklist;
- Campos que a sua loja criou (fields your store created): your custom fields.
Gray traits have no data in your store yet and turn on by themselves when there are records. With no trait chosen, the audience is everyone who can receive it. If you prefer to start from something ready, use Ver as oportunidades da minha base.
The service notice
Section titled “The service notice”Below the paths the notice As respostas serão atendidas pela sua equipe (replies will be handled by your team) may appear. It means the store does not have the AI service on, so whoever replies will wait for someone on the team. The notice estimates how many chats the team should get. With the AI, the reply is handled right away and sending costs half the credits.
Step 2: Adjust the audience
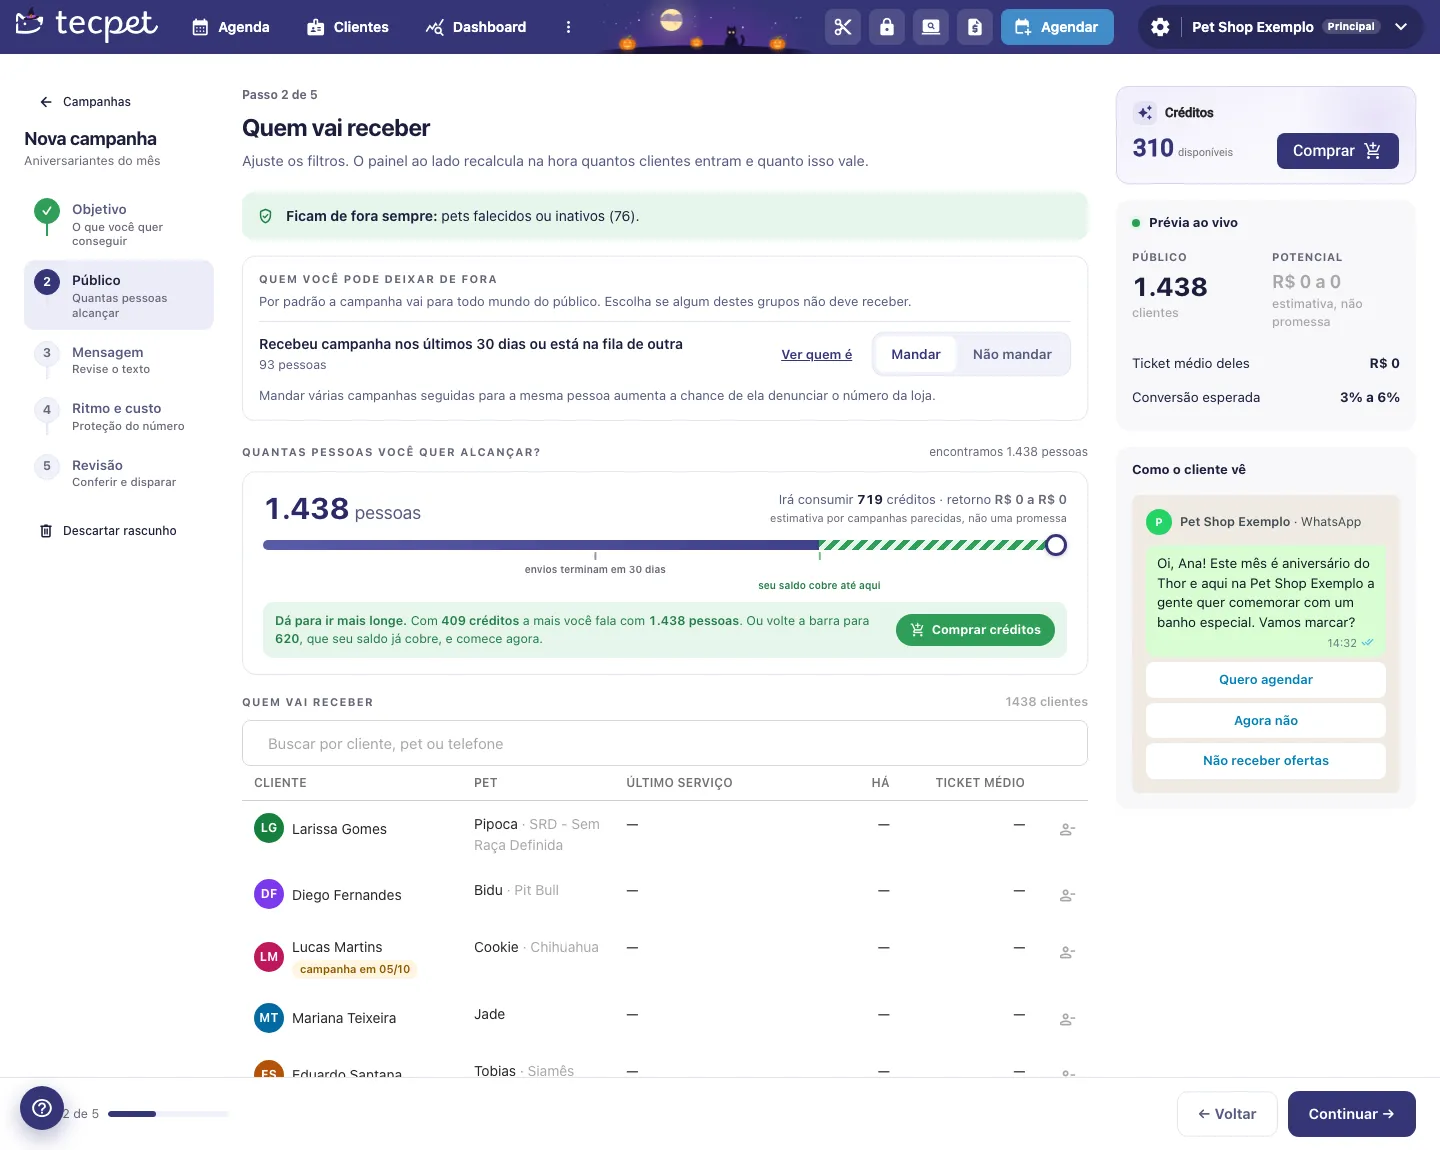
Section titled “Step 2: Adjust the audience”Click Continuar. In the Quem vai receber step, adjust who is in. The fields change according to the goal:
- Sem agendar há pelo menos (goals for those who vanished): 30, 45, 60, 75, 90, 105 or 120 days;
- Mas que vieram nos últimos (goals for those who vanished): 6, 12 or 24 months;
- Raças (Tosa por raça): suggested by the AI from your grooming catalog. With none marked, long-haired pets are in;
- Planos que vencem em até (plans): 7, 14 or 30 days, and Incluir vencidos sem renovação: Sim, até 30 dias or Não.
Then come the blocks valid for every goal:
- Ficam de fora sempre (always left out): those who asked to leave, records without a valid phone, repeated numbers and deceased or inactive pets, with the count of each group;
- Quem você pode deixar de fora (who you can leave out): by default the campaign goes to everyone in the audience. For each group, choose Mandar (send) or Não mandar (do not send): Recebeu campanha nos últimos 30 dias ou está na fila de outra, Já tem horário marcado and Está conversando com o atendimento agora. Ver quem é shows the people in each group;
- Quantas pessoas você quer alcançar?: the bar sets the campaign size and shows how many credits it will use and the estimated return;
- Quem vai receber: the exact list, in priority order, with Cliente, Pet, Último serviço, Há (time since the last visit) and Ticket médio. Use the Buscar por cliente, pet ou telefone search and the remove icon to take someone out: the next in line takes the place and the total stays the same as the bar. Tags like campanha em 05/10 or horário em flag who is in another campaign or already has a booking.
The audience must have 5 to 2,000 people to continue.
Step 3: Write the message
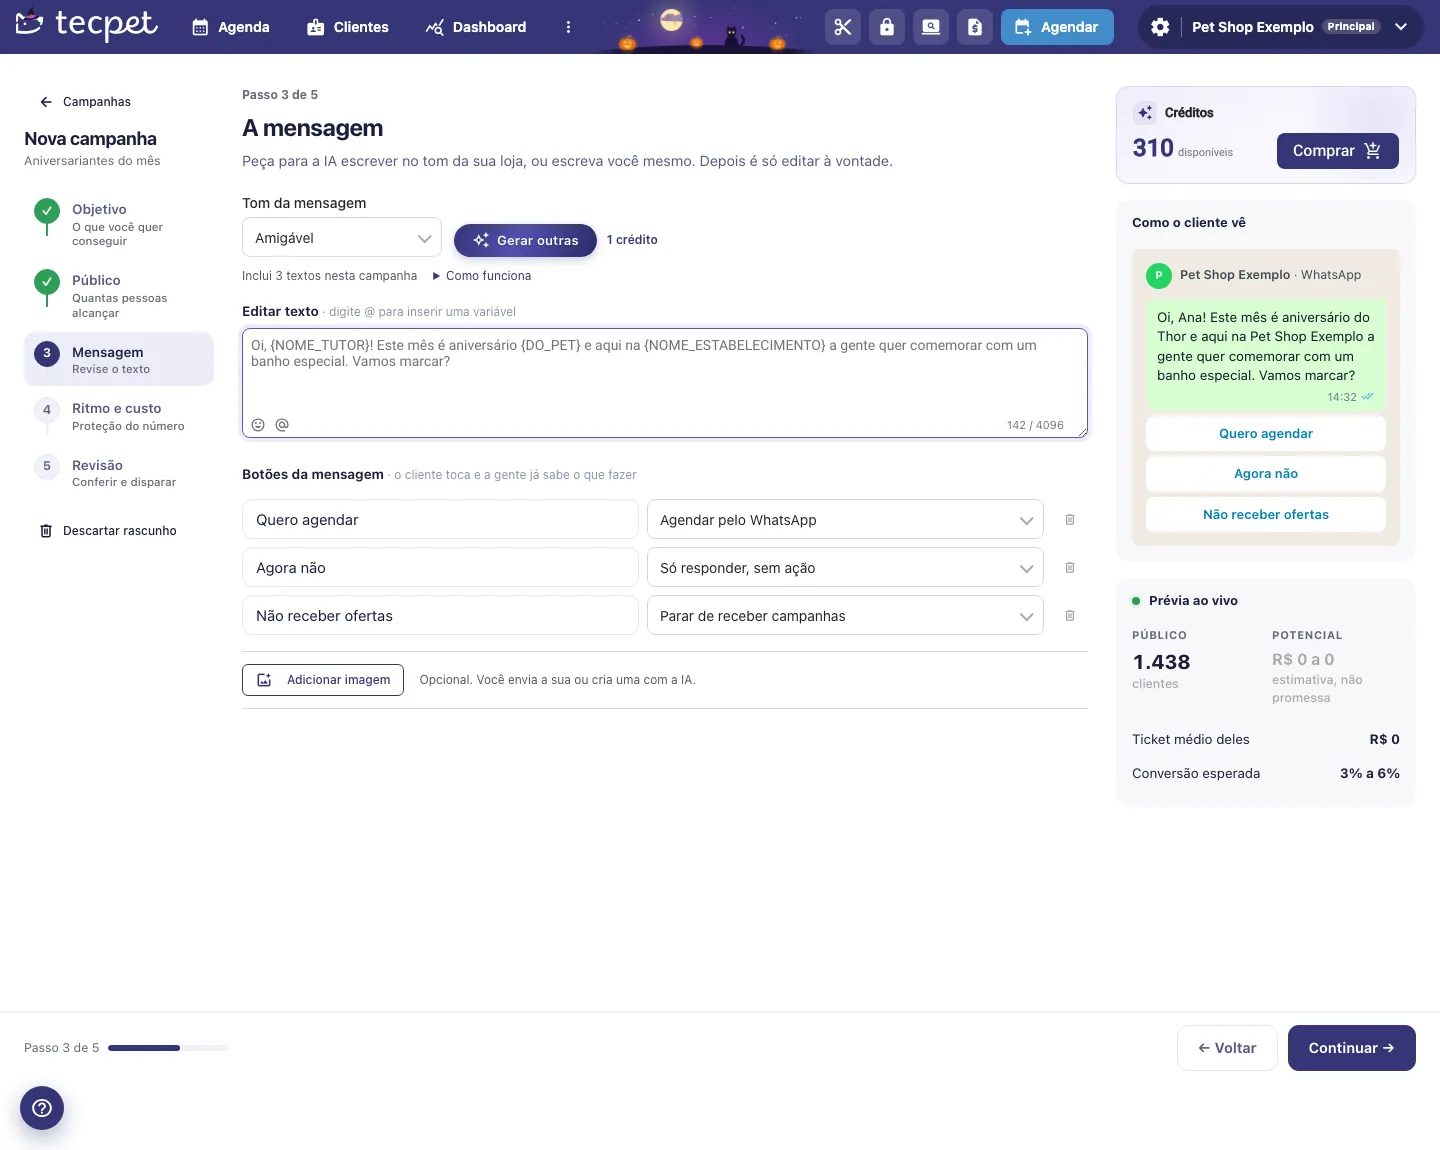
Section titled “Step 3: Write the message”In the A mensagem step, choose the Tom da mensagem (tone: Amigável, the default, Profissional, Direto ao ponto or Descontraído) and click Escrever com a IA. The AI writes 3 versions, in the Versão A, B and C tabs: choose one and edit as you like. For other options, use Gerar outras. If you prefer, click Escrever eu mesmo and type the text.
In the Editar texto field, type @ to insert a variable, which is replaced with each customer’s data when sending:
- Nome do tutor, Nome do pet (e.g. Thor), Pet com artigo (e.g. o Thor, a Mel) and Pet com do/da (e.g. do Thor, da Mel);
- Tempo sem vir, Serviço da oferta, Nome do estabelecimento and Telefone do estabelecimento.
The Como o cliente vê box shows the text already filled with a sample customer’s data.
Text rules
Section titled “Text rules”Some rules prevent you from continuing, because WhatsApp refuses or blocks this kind of message:
- the text cannot start with a variable, and two variables cannot be stuck together;
- only the variables in the @ list are valid;
- no links. Note: words with a dot in the middle that look like a website address (for example, a store name like Loja.com) also count as a link. In that case, use the Nome do estabelecimento variable instead of the name;
- the limit is 4,096 characters on WhatsApp by QR Code and 1,024 on the official API.
Other points only give a warning: text shorter than 20 characters and, on WhatsApp by QR Code, mentioning boleto, PIX or card.
On the official Meta API, the message goes to WhatsApp approval (up to 24h) and the text also needs the store name, cannot end with a variable, needs at least 4 words per variable and a button to stop receiving. The badge shows Aguardando aprovação, Aprovada pelo WhatsApp or Recusada, with the reason.
The message buttons
Section titled “The message buttons”In Botões da mensagem, each row has the button text and the action that happens when the customer taps it:
- Agendar pelo WhatsApp: the service opens the booking in the chat;
- Chamar a equipe: the chat goes to an agent;
- Só responder, sem ação: the customer gets a kind reply;
- Parar de receber campanhas: the customer leaves every campaign of the store.
On WhatsApp by QR Code, the default buttons are Quero agendar, Agora não and Não receber ofertas. Use + Adicionar botão and the trash icon to change them: up to 3 buttons, with up to 20 characters, no emoji and no accents. If you remove the leave button, a warning appears: without it, more customers tend to report the number.
Add an image (optional)
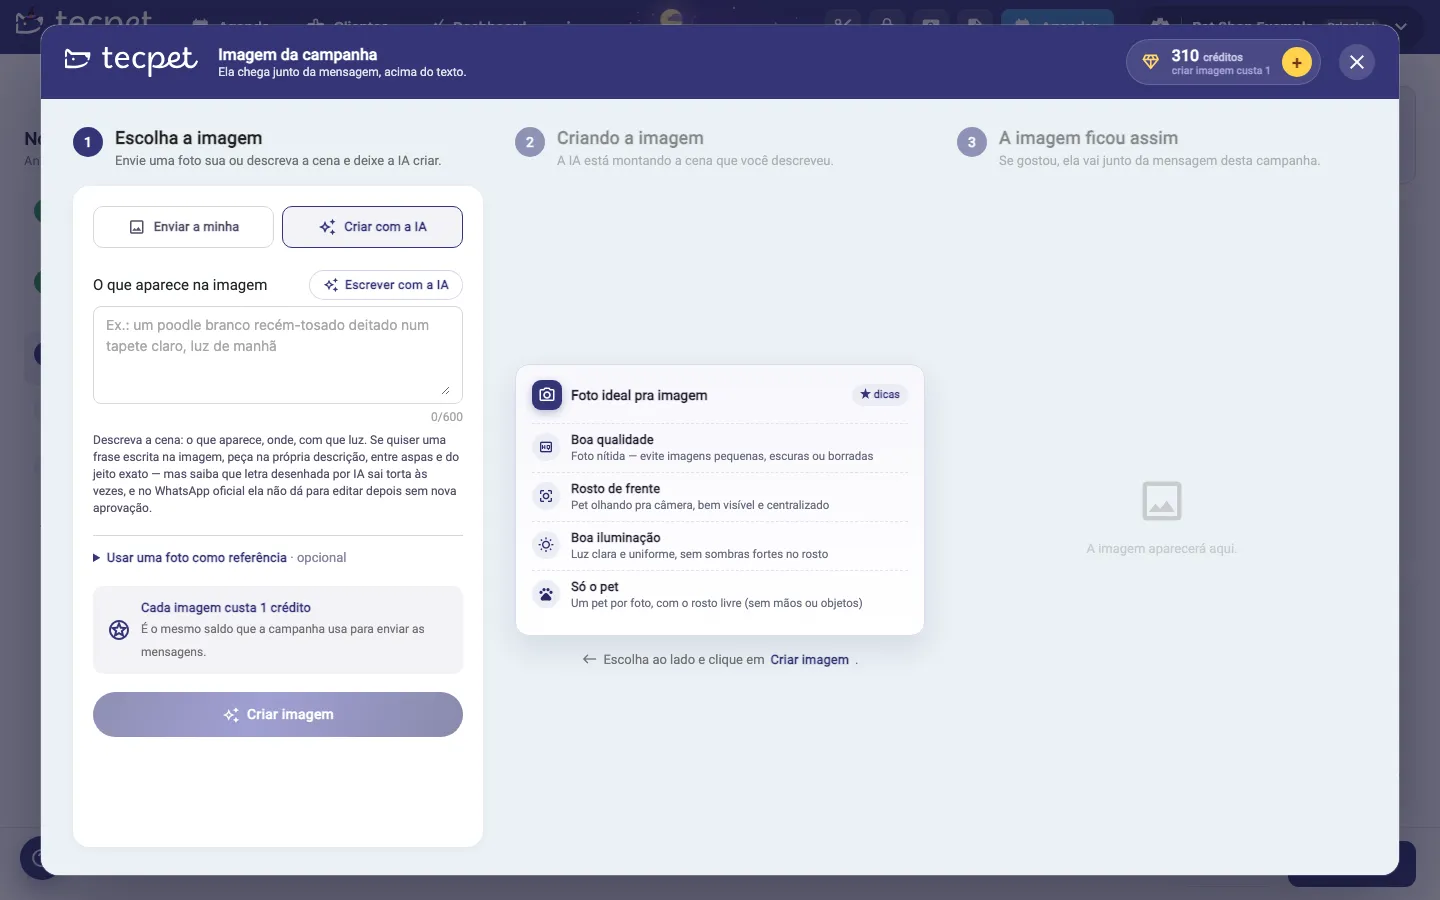
Section titled “Add an image (optional)”Click Adicionar imagem to open the Imagem da campanha window. The image arrives with the message, above the text. There are two ways:
- Enviar a minha (upload mine): drag or select a JPG or PNG photo and click Usar esta imagem;
- Criar com a IA (create with AI): describe the scene in O que aparece na imagem (or click Escrever com a IA for a suggestion), click Criar imagem and, if you like it, Usar esta imagem. Each image created costs 1 credit. You can send a photo as a reference in Usar uma foto como referência.
Once chosen, use Trocar or Remover on the message itself.
Step 4: Choose the pace and check the cost
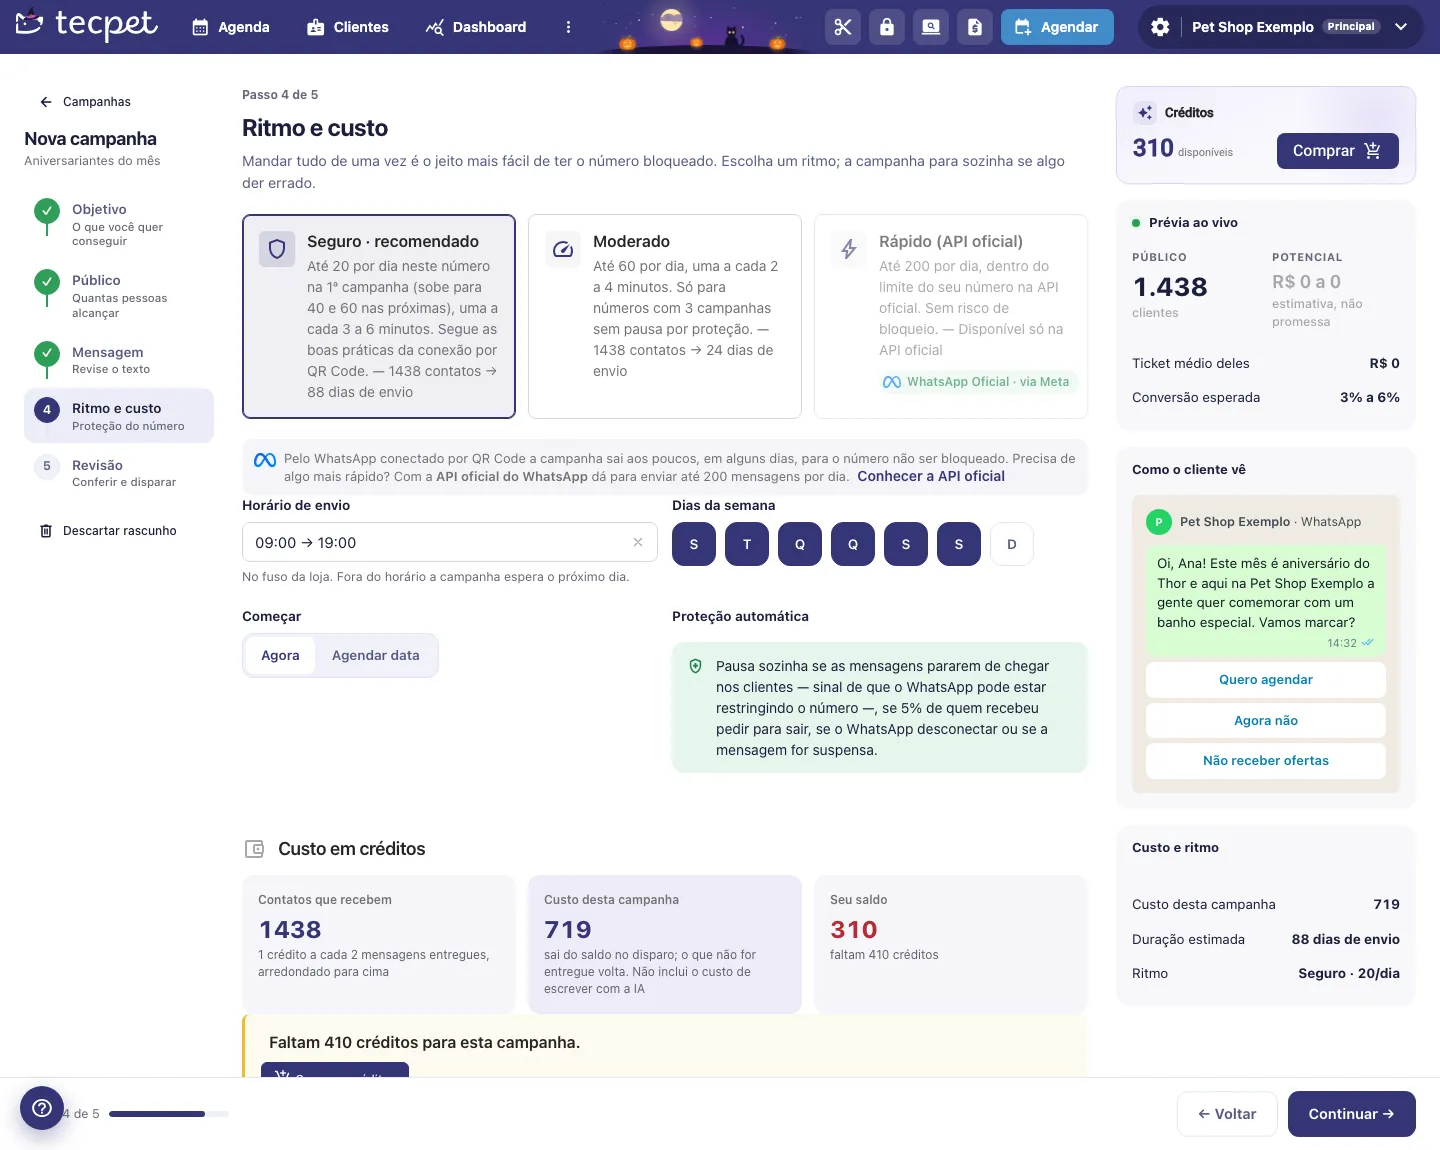
Section titled “Step 4: Choose the pace and check the cost”Click Continuar. In the Ritmo e custo step, choose the sending speed. Each card shows how many days the chosen audience takes to receive everything:
- Seguro (safe, recommended on QR Code): up to 20 a day on the first campaign, going up to 40 and 60 on the next ones, one every 3 to 6 minutes;
- Moderado (moderate): more messages a day, one every 2 to 4 minutes. Only available for numbers with 3 campaigns finished without a protection pause;
- Rápido (API oficial) (fast): up to 200 a day, within the number’s limit at Meta. It is the only option, and the recommended one, for those using the official API.
Then set:
- Horário de envio (sending hours): in the store’s time zone, from 09:00 to 19:00 by default (until 20:00 on the official API). Outside the hours, the campaign waits for the next day;
- Dias da semana (weekdays): Monday to Saturday by default;
- Começar (start): Agora (now) or Agendar data (schedule a date), choosing the start day.
The Custo em créditos block shows Contatos que recebem, the Custo desta campanha and Seu saldo. If credits are short, the warning brings the Comprar créditos button. Como os créditos são usados explains the order of use and the refund of what is not delivered. Each message costs 0.25 credit with the AI service on and 0.5 credit without it; details and an example are in How much it costs.
Step 5: Review and send
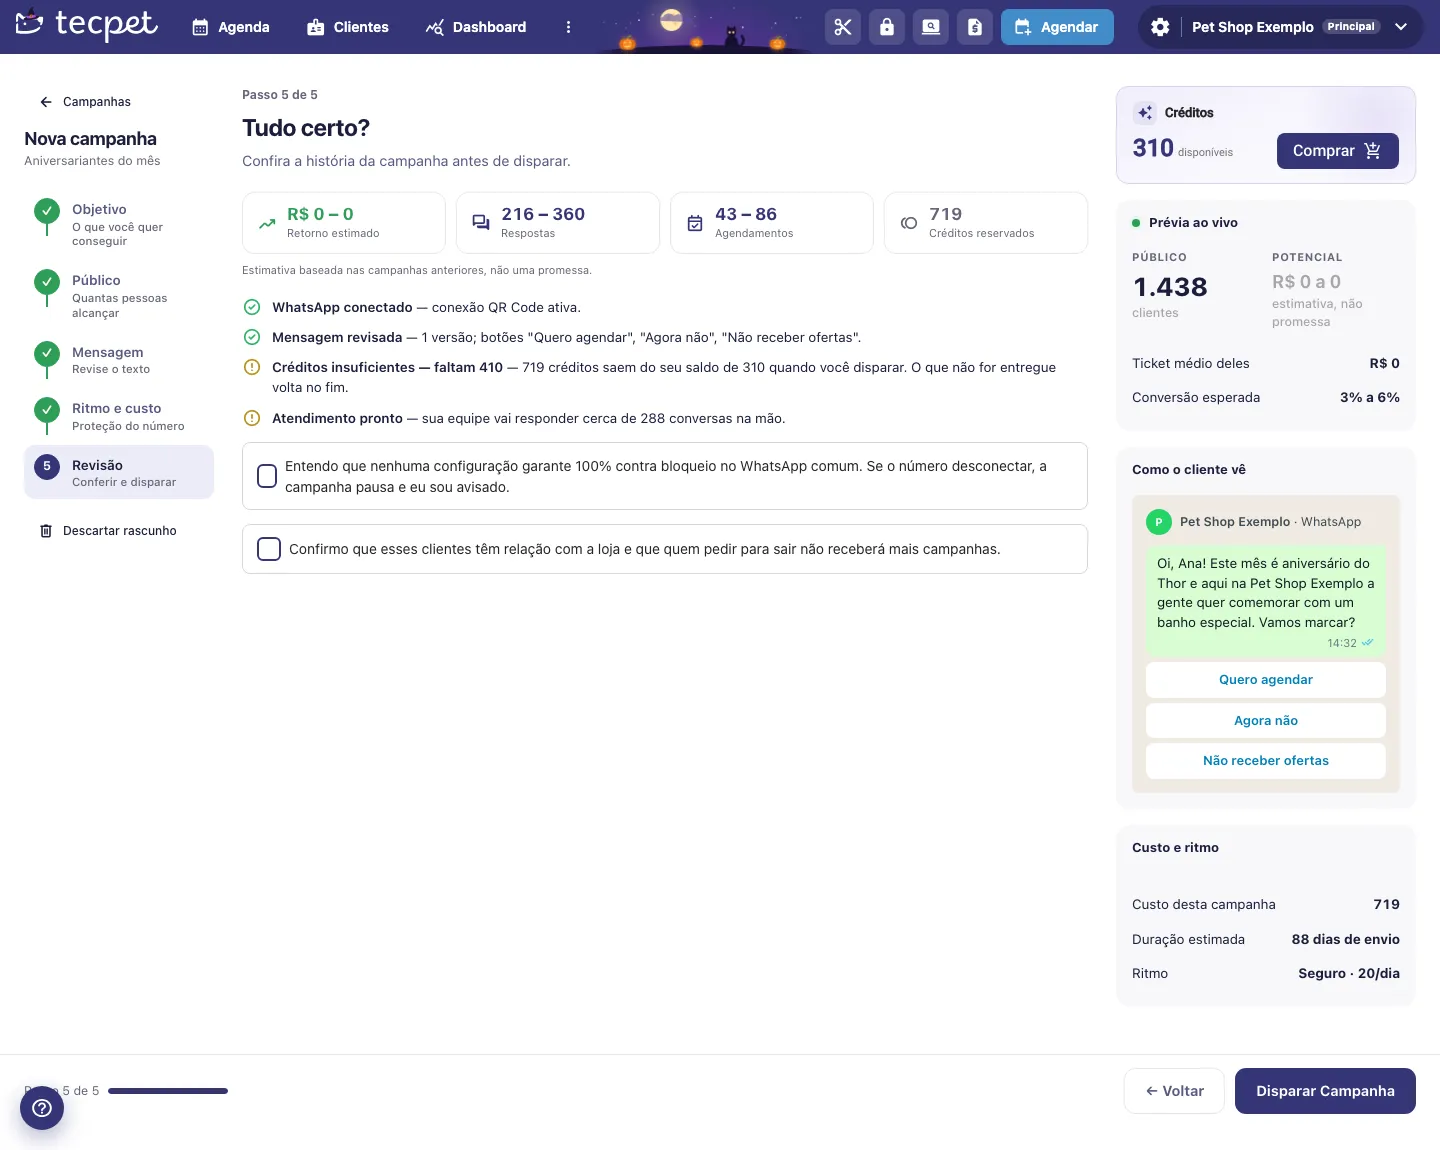
Section titled “Step 5: Review and send”Click Continuar. The Tudo certo? (all set?) screen shows the estimates (Retorno estimado, Respostas, Agendamentos and Créditos reservados, always estimates from history, not promises) and the checklist:
- WhatsApp conectado;
- Mensagem revisada, with the version and buttons. If the message is missing, the Escrever a mensagem button takes you back to step 3;
- Créditos suficientes or Créditos insuficientes, with how many are missing;
- Atendimento pronto: who will answer the chats (the AI or your team);
- Mensagem aprovada: only on the official API.
In the automatic campaign, the screen also lists what will go out by opportunity: open each group to see the message, change the text or turn the group off.
To release sending, tick both confirmations: the notice that no setting guarantees 100% against blocking on regular WhatsApp, and the confirmation that these customers have a relationship with the store and that whoever asks to leave will not get campaigns anymore. Then click Disparar Campanha (on the official API, Enviar para aprovação). For more than 1,000 customers, tecpet asks for two extra confirmations.
What happens after sending
Section titled “What happens after sending”tecpet shows Campanha disparada! with the reserved credits and the campaign moves to Rodando agora on the Campaigns screen. Messages go out little by little, within the chosen hours and days. On the official API, the campaign stays in Aguardando aprovação and starts sending on its own when WhatsApp approves the message; if it is refused, the reason appears with the Corrigir mensagem button.
To see results, pause or cancel, see Follow up on a campaign.
How to edit or discard a draft
Section titled “How to edit or discard a draft”While the campaign has not been sent, it stays in the Rascunhos tab of Suas campanhas. Click the row to go back to the wizard where you stopped; finished steps show the green ✓ and you can click them to change. To delete, use Descartar rascunho in the wizard side menu or the trash icon on the draft row and confirm with Descartar.
After sending you cannot change the text or the audience. To repeat a campaign with adjustments, use Duplicar on its detail: the copy is created as a draft.
Network head office account
In the head office account, the Público step gets the Lojas da rede field: choose which stores the customers come from (the default is Todas as lojas da rede). The Quem recebeu list, in the follow-up, also shows the Loja column. The field does not appear in the automatic campaign, which already uses the whole base.
In a single store and in a branch, the campaign only uses the store’s own customers and the Público step does not show the Lojas da rede field.