Business hours
Under Settings → Business Hours you define when the store is open. These hours are what the calendar and the AI use to offer (or not) slots to the customer. Hours are set per segment (Pet Shop, Clinic, Daycare/Hotel): each one has its own tab at the top, and you configure one at a time. The screen has the Open 24 Hours toggle, one row per weekday with a checkbox and a time-range slider, and the Save button at the end.
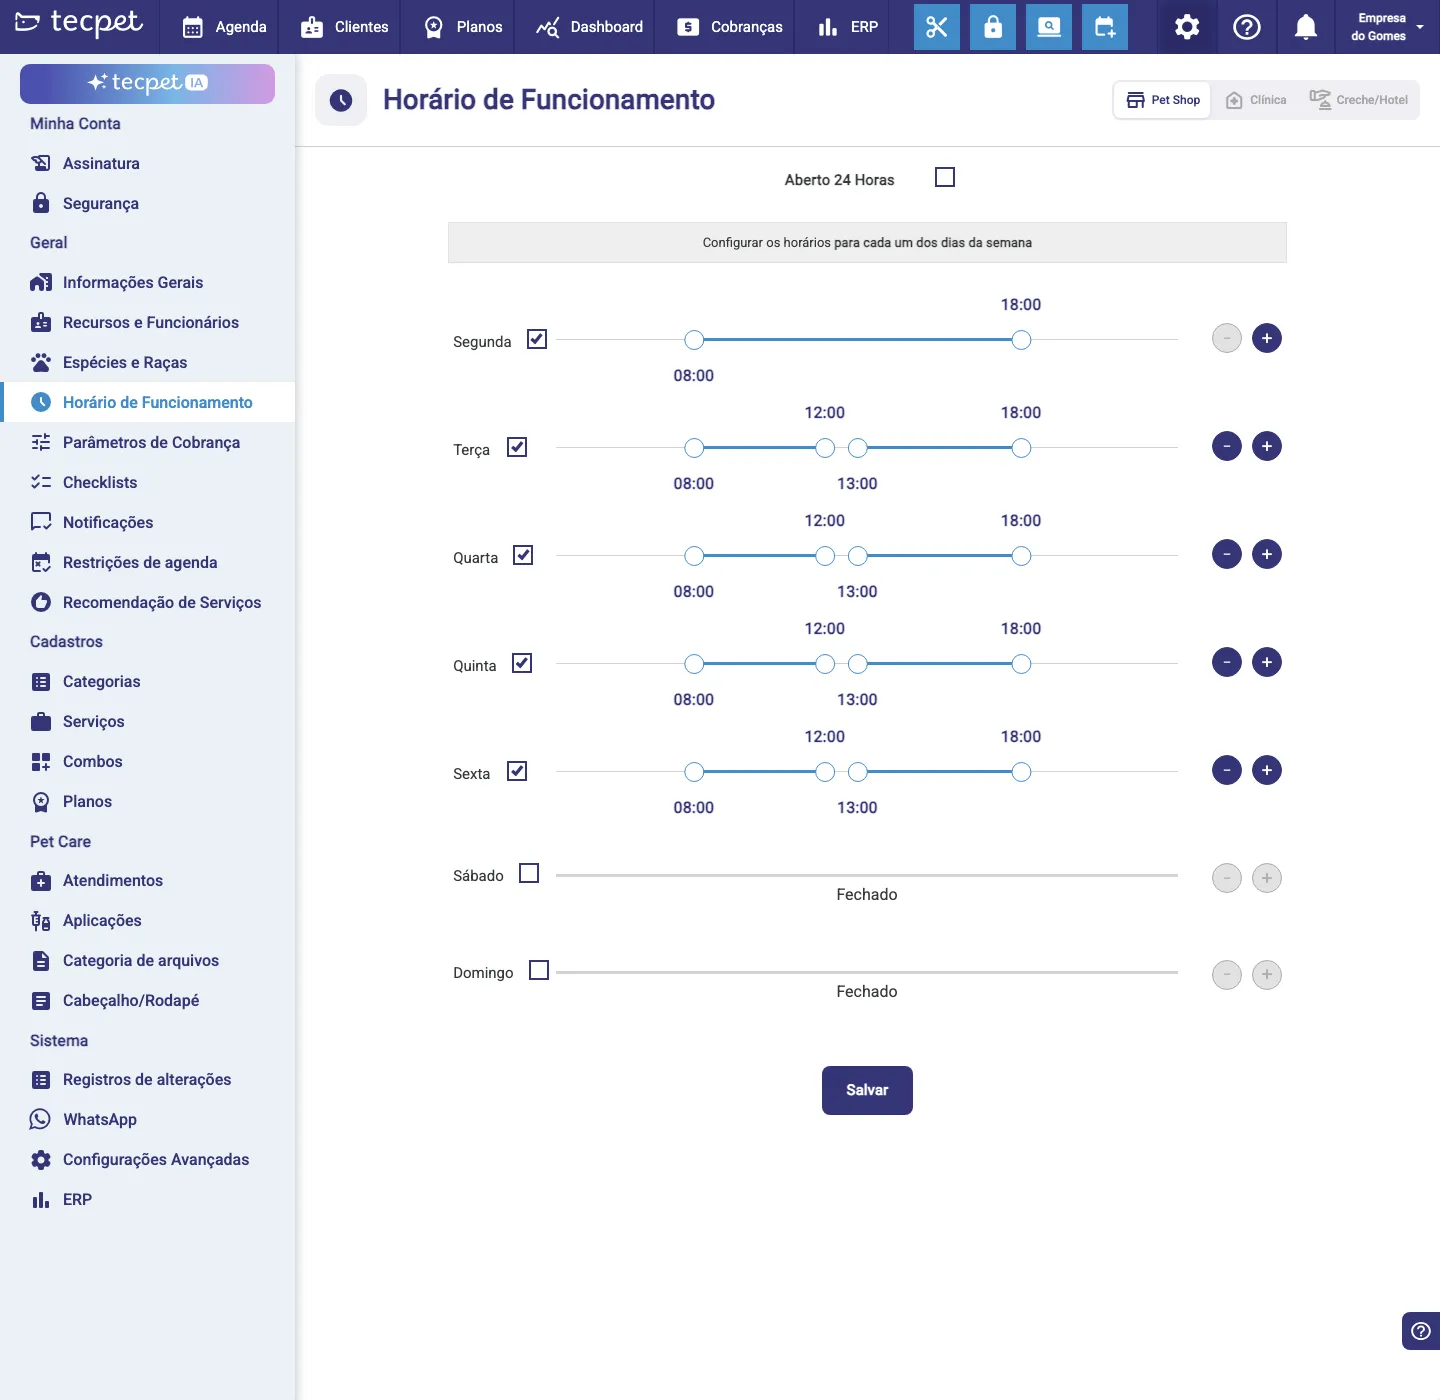
Step 1 — Pick the segment
Section titled “Step 1 — Pick the segment”At the top of the screen are the segment tabs your store has: Pet Shop, Clinic and/or Daycare/Hotel. Click the tab of the segment you want to configure. Each segment keeps its own hours — if the store serves in more than one, repeat every step on each tab.
Step 2 — Check the days the store opens
Section titled “Step 2 — Check the days the store opens”Each weekday has a checkbox on the left:
- Checked — the store opens that day and the time slider appears;
- Unchecked — the day is Closed (e.g. Sunday) and drops out of the business hours.
Unchecking a day clears its ranges; checking it again brings back the default range (08:00 to 18:00).
Step 3 — Set the time range
Section titled “Step 3 — Set the time range”For each open day, use the slider (the bar with two handles) to set from when to when the store is open. Drag the left handle to the opening time and the right one to the closing time — the label above each handle shows the time (e.g. 08:00 and 18:00).
Step 4 — Add a break, if you need one
Section titled “Step 4 — Add a break, if you need one”Do you close for lunch or a shift change? Use the + button (tooltip Add break) at the end of the day’s row to create more than one range (e.g. 08:00–12:00 and 13:00–18:00). Each click on + adds a new range, and the space between them becomes a gap with no service. The − button (tooltip Remove break) removes the last range. You can have up to 3 breaks per day — once you hit that limit, the + turns disabled.
Step 5 — Open 24 Hours (optional)
Section titled “Step 5 — Open 24 Hours (optional)”If the unit never closes (e.g. a hotel that takes guests any time), check the Open 24 Hours box at the top. It sets every day open from 00:00 to 23:59 and ignores the ranges and breaks. Unchecking it brings the screen back to the hours it had before you checked it.
Step 6 — Save
Section titled “Step 6 — Save”When you’re done, click Save (at the bottom of the screen). The “Business hours saved” message appears. The Dashboard calendar starts respecting the new hours right away; the AI may take a few minutes to update, because it reads the store settings through a path with its own cache. If you changed more than one segment, save each tab.
The screen’s controls
Section titled “The screen’s controls”A recap of what each control does:
- Segment tabs — Pet Shop / Clinic / Daycare/Hotel; only the segments the store has appear. Each tab has its own hours;
- Open 24 Hours — single box at the top; when checked, opens every day around the clock;
- Day checkbox — checks/unchecks the day (unchecked = Closed);
- Slider — the day’s time range; drag the handles to opening and closing;
- + button (Add break) — adds a new range to the day (a no-service gap between them); limit of 3 breaks;
- − button (Remove break) — removes the last range of the day;
- Save — stores the hours of the selected segment.
Limits and rules
Section titled “Limits and rules”- Up to 3 breaks per day — on the third one, the + button turns disabled;
- Unchecked day = Closed — the calendar and the AI offer no slot that day;
- Gap between ranges = no service — the gap between 12:00 and 13:00, for instance, takes no appointment;
- Hours per segment — Pet Shop, Clinic and Daycare/Hotel are independent;
- Hours work together with the calendar restrictions and the calendar block: even within business hours, those features can close specific times.
How to change it later
Section titled “How to change it later”Just go back to Settings → Business Hours, pick the segment tab you want to touch and adjust the day checkboxes, the sliders or the breaks — the same way as the initial setup. Click Save to store it. Remember to repeat on each segment you need to change.