
Custom fields
Custom fields let you create your own fields on client, pet and employee records, to store exactly the information that makes sense for your operation, your way. They live under Settings → Records → Custom fields and, once created, appear on day-to-day forms (the booking ficha, the services area, new appointment) and can automatically fill in your Pet Care documents.
How do I make the system fit my operation? #

Every business has its detail
What makes your shop unique doesn't fit a standard record.
“The info that matters to you is what brings the client back.”
You keep in your head (or in a notebook and on WhatsApp) what's special about each client and pet: the vet's license number, the breed's temperament, an allergy, the product the owner prefers. When that info isn't in the system, the team forgets, the service loses its care, and the client feels like just a number.
With custom fields you create exactly the fields your operation needs on clients, pets and staff, and they show up where the team works (the booking ficha, the services area) and even fill in your Pet Care documents automatically. The system starts speaking your business's language.
Step 1: Open Custom fields
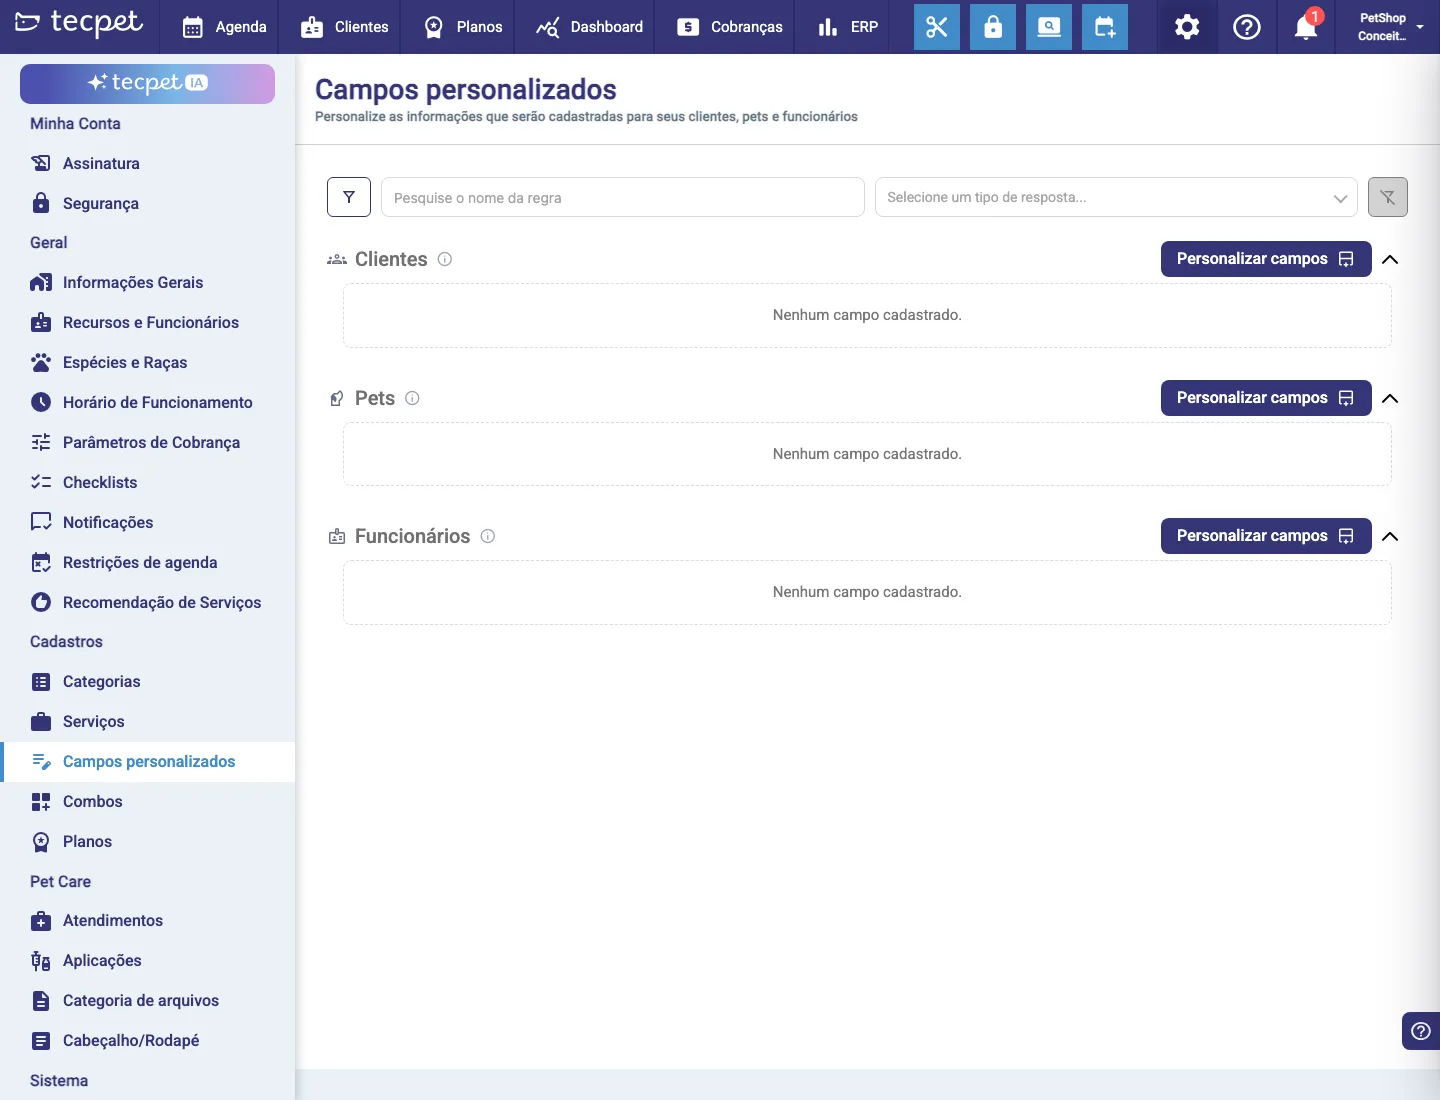
Section titled “Step 1: Open Custom fields”Go to Settings (the gear at the top) → Records section → Custom fields. The screen opens split into three groups, one per record: Clientes (clients), Pets and Funcionários (staff). Each group lists the fields already created and has the Personalizar campos (customize fields) button to add new ones.
Step 2: Add a field
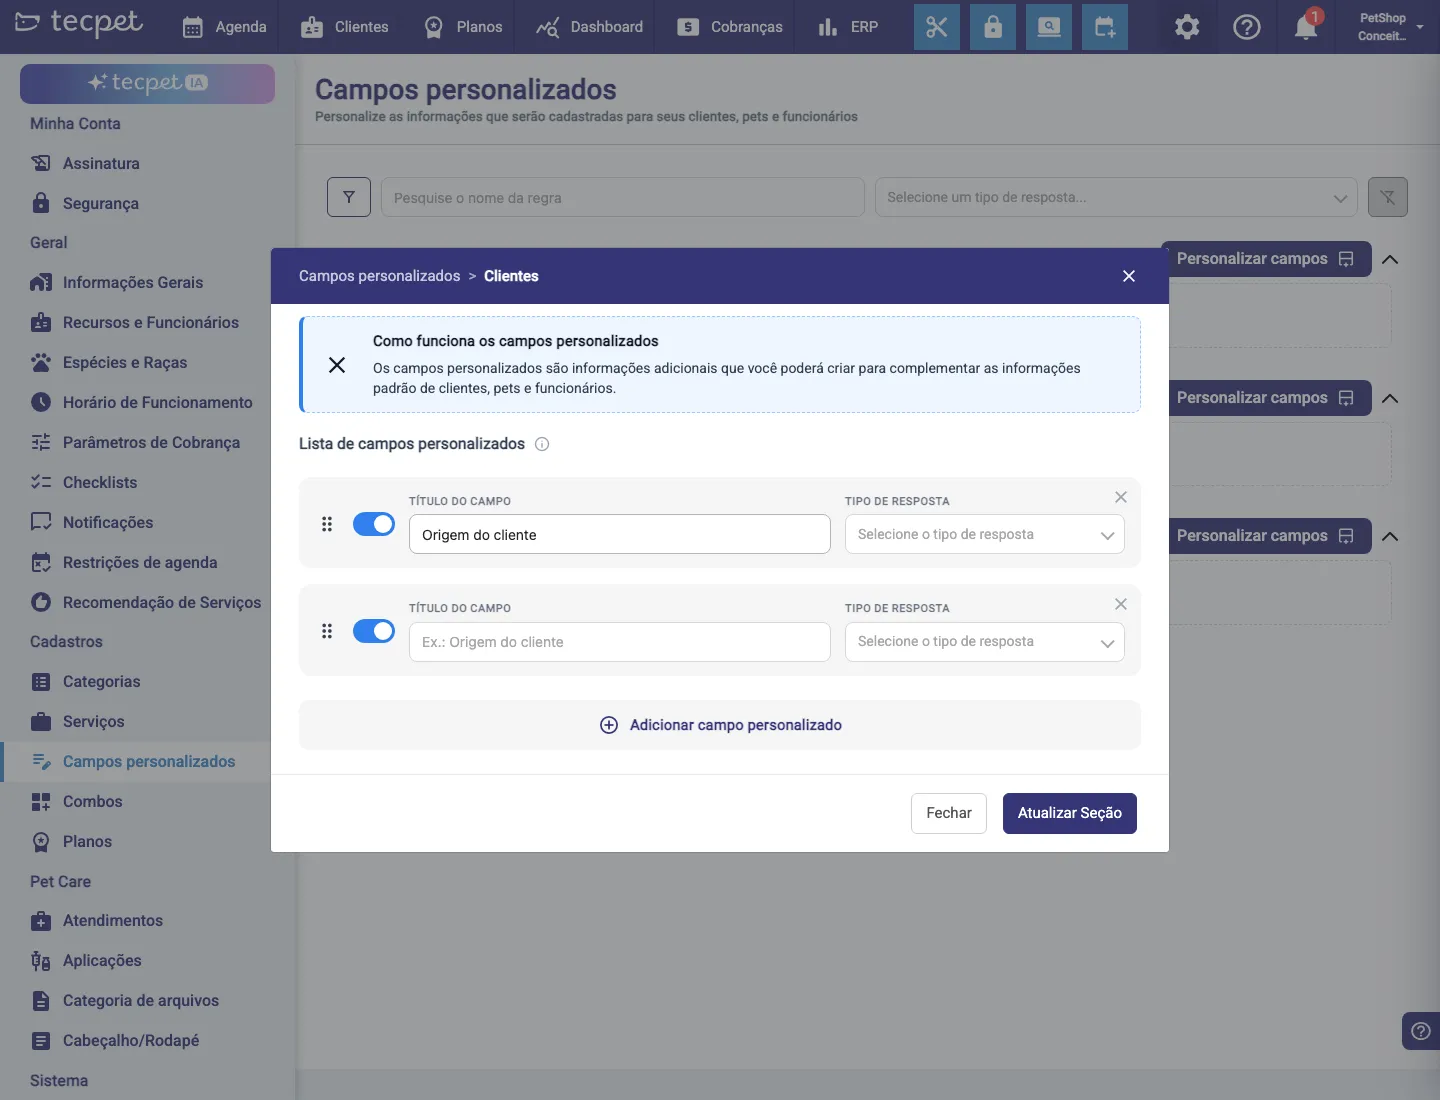
Section titled “Step 2: Add a field”In the group you want (Clients, Pets or Staff), click Personalizar campos. The Lista de campos personalizados (list of custom fields) window opens; click Adicionar campo personalizado (add custom field) to create a new field row. You can add as many fields as you like and drag the handle icon to reorder them.
The form fields
Section titled “The form fields”Each custom field has:
- Título do campo* (field title), the name your team sees (e.g. Origem do cliente, CRMV, Allergies).
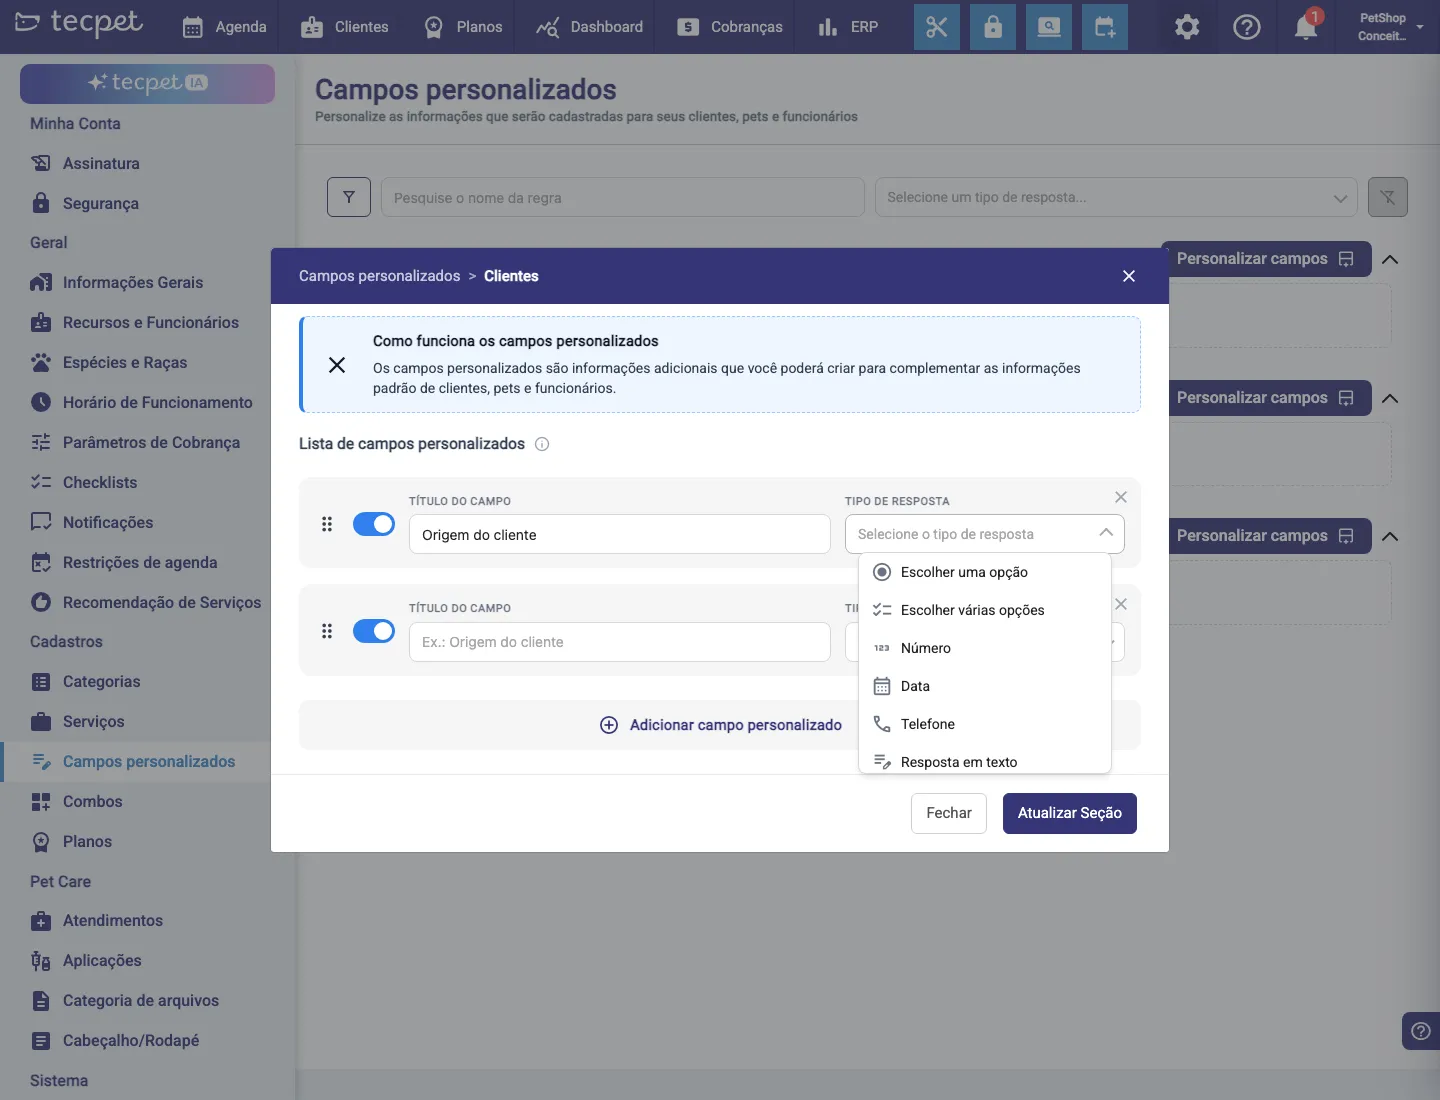
- Tipo de resposta* (answer type), defines how the information is filled in. The options are:
- Resposta em texto: free text;
- Número: a numeric value (with a unit, see below);
- Data: a calendar date;
- Telefone: a formatted phone number;
- Escolher uma opção: a list where one option is selected;
- Escolher várias opções: a list where several options are selected;
- Sim/Não: a yes/no switch;
- Arquivo: an image, video or document attachment.
- The switch (on/off) at the start of the row activates or deactivates the field without deleting it; the X removes the field.
Settings per answer type
Section titled “Settings per answer type”Some types reveal extra settings just below:
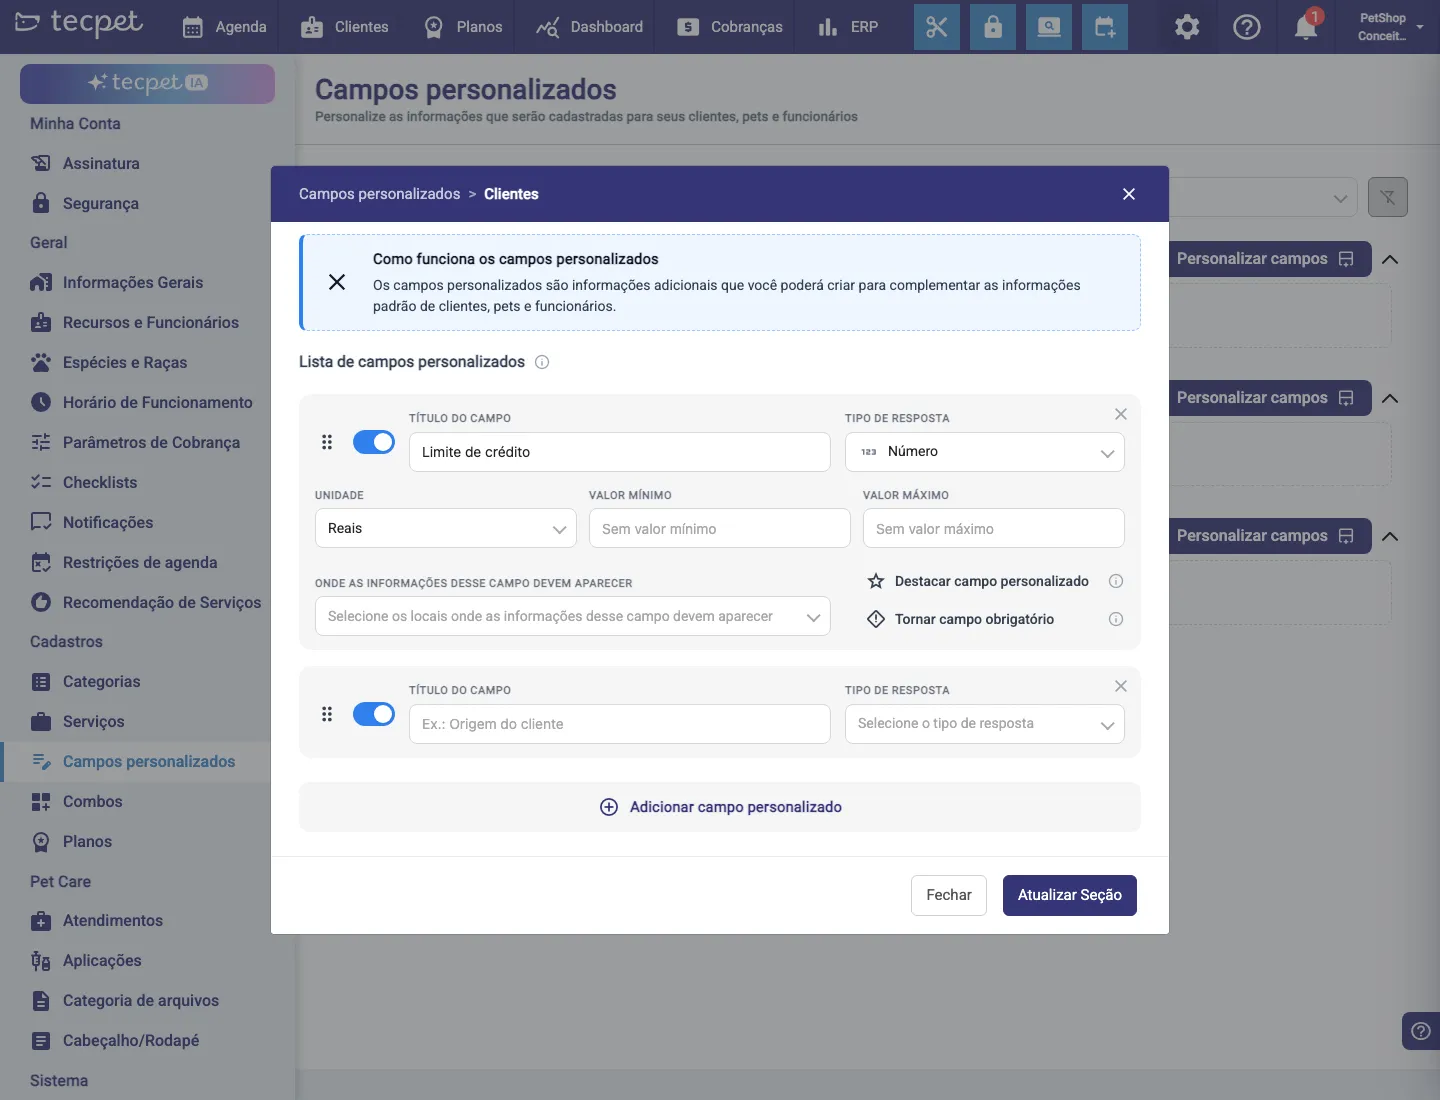
- Número (number), Unidade (unit: Reais for money, Porcentagem (%) or Outro/other), Valor mínimo (minimum) and Valor máximo (maximum) (leave blank for no limit). The value is shown already formatted per the unit.
- Escolher uma opção / Escolher várias opções: a list of Opções (options); click Adicionar uma opção for each item.
- Data (date), Permitir data futura (allow future dates) and Permitir data passada (allow past dates) control what can be picked.
- Arquivo (file), Permitir Imagem, Permitir Vídeo and Permitir Documentos define what can be attached.
- Telefone, Resposta em texto and Sim/Não have no extra settings.
Where the field appears, highlight and required
Section titled “Where the field appears, highlight and required”At the end of each field you choose:
- Onde as informações desse campo devem aparecer (where this field’s info should appear), a list of places (varies per record). For Clients: Ficha de agendamento, Petbot/tecpet IA and Novo agendamento - aba cliente. For Pets: Ficha de agendamento, Área de serviços, Petbot/tecpet IA and Modais de novo agendamento. For Staff: Ficha de agendamento and Modais de novo agendamento.
- Destacar campo personalizado (highlight field), shows the field highlighted in the selected places.
- Tornar campo obrigatório (make field required), requires the field to be filled in on the forms where it appears.
Step 3: Save the section
Section titled “Step 3: Save the section”Click Atualizar Seção (update section) to save that group’s fields. From then on, they appear on the client, pet or staff forms, according to the places you selected.
Use the fields in Pet Care
Section titled “Use the fields in Pet Care”Custom fields can also go into the Pet Care document templates and the header and footer. When building the document, you insert the field as a mention (a “chip” reading @Entity · Title, e.g. @Funcionário · CRMV); when the document is generated, the system replaces the mention with the value filled in for that client, pet or employee, already formatted (R$, % and dates come out correctly). It’s like letting the document fill itself in.
How to edit or remove later
Section titled “How to edit or remove later”Go back to Settings → Records → Custom fields, open Personalizar campos in the group, and change the field’s title, type or settings. To take a field out of circulation without erasing what’s already filled in, use the switch (on/off); to delete it for good, click the X. Always confirm with Atualizar Seção.