
Finance: overview
Finance & Billing is the area of tecpet where your business’s money gets organized. Almost everything you do in the system turns into an invoice: a completed appointment, a counter sale, the purchase of a plan or package. Those invoices come together on the Billing screen (what’s open, what’s been paid, what’s overdue) and, once the customer pays, the amount shows up on the Payments received panel, inside the Dashboard: the panel that shows how much came in, when and through which payment method. Billing answers “who owes me”; the Payments received panel answers “how much did I take in”. That panel is also where the received-payments spreadsheet you send to your accountant comes from.
In this section
Section titled “In this section”- Track billing, the screen that holds all your invoices: how to filter, settle a payment, pay several at once, send/print in bulk and reverse.
- The invoice in detail, what you see and do when you open an invoice: items, discounts, note, totals, status and the footer buttons (including how to create a standalone sale).
- On this page, further down: how to use the Payments received panel and export the spreadsheet of received payments.
Step 1: See what’s open on Billing
Section titled “Step 1: See what’s open on Billing”In the top menu, click Billing. Each row is one invoice. At the top of the screen you get the Invoice #00000 search box, the Filter search button, the Clear filters button and the tag with the period in use (e.g. Period: 21/06/2026 - 21/07/2026).
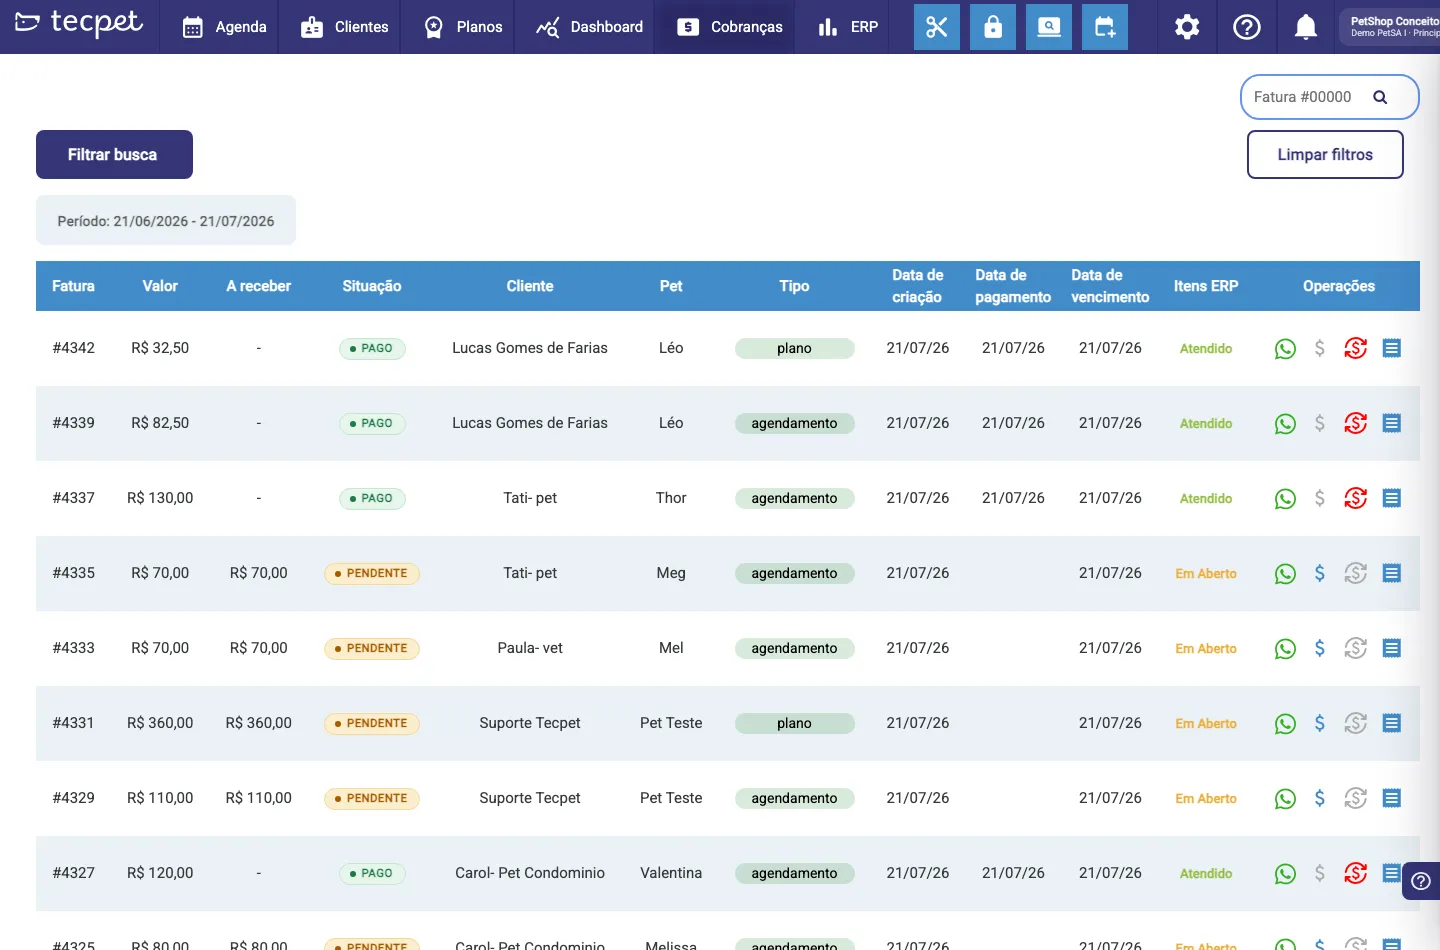
The list columns are:
- Invoice: the invoice number (e.g. #4342);
- Amount: the total;
- To receive: how much is still owed (if fully paid, it shows -);
- Status: the colored tag: PAID (green), PENDING (yellow), OVERDUE (red) or CANCELED;
- Customer and Pet: who the invoice belongs to;
- Type: where it came from (appointment, plan, standalone, voucher);
- Creation date, Payment date and Due date;
- ERP Items: only shows up if your store has an integrated management system (see the ERP section at the end);
- Actions: the buttons on each row: WhatsApp (green, sends the charge), $ (settle/pay), the circular arrow (reverse, only active on an already paid invoice) and the receipt/print icon.
The full walkthrough of that screen is in Track billing.
Step 2: Open the Payments received panel
Section titled “Step 2: Open the Payments received panel”In the top menu, click Dashboard and then, on the left-hand list, Payments received (it’s the second item of the Dashboard group, right below Financial projection). Because it’s a money screen, the system may ask for the administrator password before opening, see Administrator password.
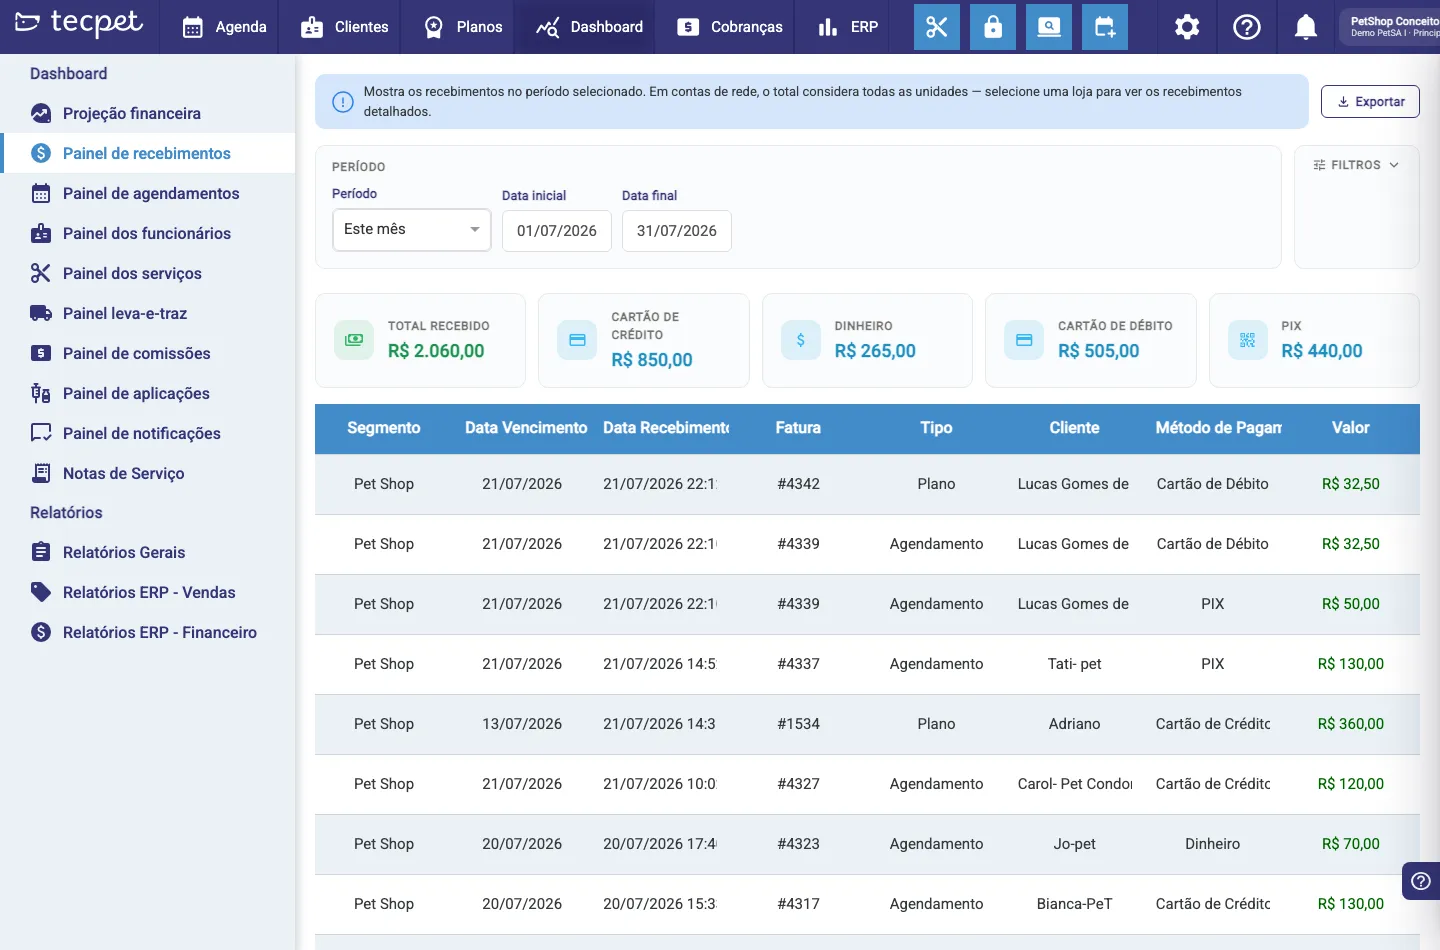
Right at the top you see the blue notice: “Shows the payments received in the selected period. On chain accounts the total covers every unit, select a store to see the detailed payments.”
Step 3: Pick the period and refine with the filters
Section titled “Step 3: Pick the period and refine with the filters”The panel opens on This month. The fields are:
PERIOD block
- Period: the options are Today, This week, Last month, This month (default) and Custom;
- Start date and End date: only become editable when you pick Custom; on the other options the system fills them in for you;
- Filter store (Store block), only appears on a chain (head office) account; it starts on All stores.
FILTERS block (click the settings icon labelled FILTERS to open it)
- Payment: filters by payment method; the first option is All. It only appears on stores that do not take payments through the management system’s POS;
- Segment: filters by store segment (Pet Shop, Clinic, Hotel, Day Care…); the first option is All. If your user only sees some segments, the field already comes limited to them;
- Customer: search a customer by name to see only their payments. On a chain account this field only becomes available after you pick a store.
Any change to the filters reloads the numbers right away and goes back to page 1 of the list.
Step 4: Read the panel’s numbers
Section titled “Step 4: Read the panel’s numbers”The cards at the top. The first card is the TOTAL RECEIVED for the period. Next to it comes one card for each payment method with activity: for example CREDIT CARD, CASH, DEBIT CARD and PIX. A payment method with no activity in the period simply gets no card.
The table. One row per payment received, with these columns:
- Store: only on a chain account, once you pick a store in the filter;
- Segment: the invoice’s segment;
- Due date: the invoice due date;
- Payment date: the day and time the payment was entered;
- Invoice: the number (e.g. #4342). It’s clickable: clicking opens the invoice without leaving the panel (the tooltip reads Open invoice #4342);
- Type: where the invoice came from: Appointment, Plan, Standalone or Voucher;
- Customer: who paid;
- Payment method: the method used. If the payment was part of a batch payment, a blue icon appears next to it with the batch’s date and total;
- Amount: the amount received, in green. A canceled (reversed) payment shows up struck through.
The list shows 20 rows per page; pagination sits at the bottom. With no results at all, the panel shows “No payments received for the selected filters.”
Step 5: Export the received-payments spreadsheet
Section titled “Step 5: Export the received-payments spreadsheet”In the top-right corner of the panel, click Export (the tooltip reads Export detailed report). The file downloads right away, in Excel (.xlsx), named Recebimentos_DD-MM-YYYY_HH-mm.xlsx: the download date and time go into the name, so you can export several times without overwriting anything.
The spreadsheet has one row per payment received, with the columns ID, SEGMENTO (segment), DATA (date), STATUS, FATURA (invoice), FATURA_VENCIMENTO (due date), TIPO (type), CLIENTE (customer), FORMA_PAGAMENTO (payment method) and VALOR (amount). On a chain account the columns LOJA (store), NOME_INTERNO (internal name) and CODIGO_INTERNO (internal code) come first as well.
If yours is a chain (head office) account
Section titled “If yours is a chain (head office) account”On a chain account the panel behaves a little differently, because it adds up every unit:
- With the Filter store filter on All stores, the panel swaps the payments table for a Summary by store block, the Summary by store heading, the line “Select a store to see the payments received.” and a table with Store and Amount received. The cards at the top keep adding up the whole chain.
- Each store’s name in that summary is clickable: clicking applies that store’s filter and opens its detailed list (with the Store column in front).
- While no store is selected, two buttons appear at the top instead of one:
- Export summary (Export the chain’s summary by store), a spreadsheet with one row per store, columns LOJA and VALOR_RECEBIDO, named Recebimentos_resumo_por_loja_DD-MM-YYYY_HH-mm.xlsx;
- Export detailed (Export the detailed report of every store in the chain), a spreadsheet with one payment per row across every store in the chain, named Recebimentos_detalhado_DD-MM-YYYY_HH-mm.xlsx.
- Once you pick a store, the two buttons become one: Export, which downloads the detailed file for that store.
In other words: for closing the whole chain there’s no need to export store by store. Leave it on All stores and click Export detailed: everything comes out in a single spreadsheet, with the LOJA column so you can filter in Excel. To better understand how the head office sees its branches, see Chain: head office and branches.
Invoice types
Section titled “Invoice types”Every invoice has a Type that shows where it came from, and it’s the same wording that appears in the Type column in both places (Billing and the Payments received panel):
- Appointment: generated by a completed appointment (tied to it);
- Plan: related to buying or using a plan or package;
- Standalone: a charge created manually, without an appointment (a product sale, for example);
- Voucher: related to the customer’s voucher/credit.
The type affects what you can edit inside the invoice, see the details in The invoice in detail.
What changes with your system (ERP)
Section titled “What changes with your system (ERP)”Without an integrated ERP, the Billing screen does not show the ERP Items column, and the Payments received panel looks exactly like the screenshots above: the TOTAL RECEIVED card, one card per payment method, the Payment filter and the Payment method column. Settling simply marks the invoice as paid in tecpet, the fiscal note, if you issue one, is done separately in your own tool.
If you use VHSYS
With VHSYS integrated, the Billing screen gains the ERP Items column, showing the status in the ERP’s wording (Open, Done, Processing, Awaiting issue, Error, Canceled). In those stores each invoice is paid one by one (batch payment doesn’t appear) to keep the items in sync with the external system. The Dashboard menu also gains ERP Reports - Sales and ERP Reports - Finance.
If payments are taken at your system’s cash register (POS), the Payments received panel changes shape: the card becomes Total settled, the per-payment-method cards disappear, and the Payment filter and the Payment method column stop showing: because it’s your cash register, not tecpet, that records the payment method. On the left-hand menu, Financial projection becomes Service projection and Payments received becomes Service revenue. The export button stays the same.
See how invoices turn into fiscal notes in What integrations are and What changes with an integration.
How to fix things afterwards
Section titled “How to fix things afterwards”- Entered the wrong payment? Open the invoice on Billing and use the reverse button (the circular arrow). The payment still shows on the Payments received panel, but struck through, and drops out of the total, so you keep the trail of what happened.
- Exported with the wrong filter? Just adjust the period/filters and click Export again. Nothing is overwritten: each file carries the date and time in its name.
- Is the invoice amount wrong? The fix is inside the invoice itself, see The invoice in detail. The panel redoes the numbers as soon as the invoice is saved.
- Want to check other numbers from the business? The other panels (appointments, staff, services, commissions) are in The Dashboard panels.