Advanced settings
Advanced settings gather the options that change TecPet’s behavior for the whole store: the password that protects sensitive screens, how prices are built, how employees identify themselves, the schedule interval and which automatic notifications stay off. Each setting is independent — you change a field, click Save and confirm with the administrator password. Change carefully: some settings affect the schedule, service prices and team access.
Step 1 — Open Advanced settings
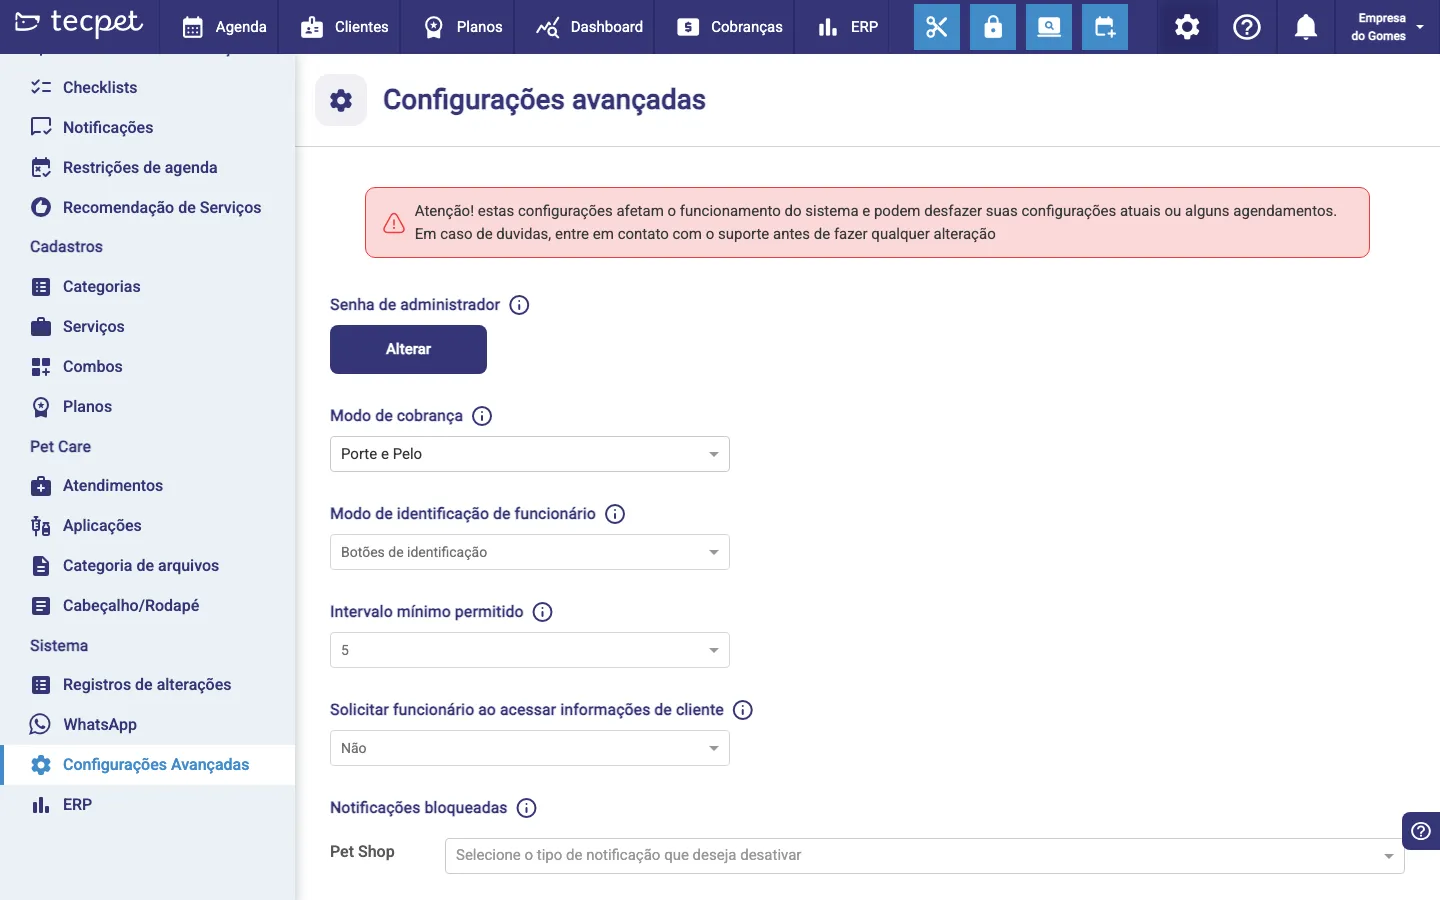
Section titled “Step 1 — Open Advanced settings”In the Settings menu, go to My Account → Advanced Settings. The screen opens with a highlighted warning and the list of settings, each with an (i) icon explaining what it does. Administrator password appears at the top and the other settings below.
Step 2 — Change the administrator password
Section titled “Step 2 — Change the administrator password”The administrator password is the 6-digit code that unlocks the system’s sensitive actions (including saving any other setting on this screen). To change it:
- Click Change on the Administrator password row;
- Fill in Current password, New password and Confirm new password — all accept only 6 numbers;
- The new password cannot be the same as the current one;
- Click Change Password.
If the current password is wrong, the system warns you and doesn’t save. From then on, the whole team uses the new password to unlock the admin options — coordinate the change with everyone who needs it first.
Step 3 — Change the billing mode
Section titled “Step 3 — Change the billing mode”Under Billing mode, choose how service prices vary:
- Open the selector and pick Size & Coat or Breed;
- Click Save (the button only appears when you change the value);
- Confirm the warning and type the administrator password.
It’s the same setting as Billing parameters — it defines the price table format. Warning: switching this mode deactivates all services, combos and plans of the store (see the caution at the end of the article).
Step 4 — Set the employee identification
Section titled “Step 4 — Set the employee identification”Under Employee identification mode, choose how the team identifies itself when operating the system:
- Open the selector and pick one of the options;
- Click Save;
- Confirm and type the administrator password.
Step 5 — Adjust the minimum allowed interval
Section titled “Step 5 — Adjust the minimum allowed interval”The Minimum allowed interval is the smallest unit of time used in the schedule — it applies to the minimum time of a service, the store’s operating interval and the employees’ hours:
- Open the selector and pick 5, 15, 30 or 60 minutes;
- Click Save;
- Confirm the warning and type the administrator password.
When you change it, the services’ price table is automatically readjusted to the new interval.
Step 6 — Require employee to access the customer
Section titled “Step 6 — Require employee to access the customer”Under Require employee to access customer info, set whether identifying the employee is needed to open a customer’s data:
- Open the selector and pick Yes or No;
- Click Save;
- Confirm and type the administrator password.
With Yes, opening a customer’s detailed data asks for the employee’s 4-digit code — useful for access control and data privacy.
Step 7 — Block automatic notifications
Section titled “Step 7 — Block automatic notifications”Under Blocked notifications you turn off types of automatic notification — and this is done per service segment (a selector shows up for each active segment of the store: Pet Shop, Clinic and Daycare/Hotel):
- In the selector of the desired segment, pick the notification types that should not be sent (or Block all notifications to turn off the whole list for that segment);
- Click Save;
- Confirm the warning and type the administrator password.
The blocked types stop going out automatically when the event happens, only in the chosen segment — the other segments stay as they were. Some essential types (like the customer’s/pet’s birthday) don’t appear in the list because they can’t be blocked.
The screen’s fields, one by one
Section titled “The screen’s fields, one by one”- Administrator password — 6-digit code that unlocks sensitive actions; changed via the Change button;
- Billing mode — Size & Coat or Breed; defines the price table format (same setting as Billing parameters);
- Employee identification mode — 4-digit code or Identification buttons; defines how the team identifies itself;
- Minimum allowed interval — 5, 15, 30 or 60 minutes; the smallest unit of time of the schedule;
- Require employee to access customer info — Yes or No; with Yes, asks for the 4-digit code to open the customer’s data;
- Blocked notifications — per segment (Pet Shop, Clinic, Daycare/Hotel); list of types to turn off, or Block all notifications.
How to revert a setting changed by mistake
Section titled “How to revert a setting changed by mistake”Got a setting wrong? Almost everything can be undone on the screen itself: go back to the field, pick the previous value, click Save and confirm with the administrator password. All changes are recorded in the advanced settings history (who changed it, what and when), so it’s easy to see what was there before. Important exception: the Billing mode deactivates services, combos and plans — switching the mode back does not re-register what was deactivated; in that case, contact support before doing anything.
With Size & Coat (the most common mode), each service’s price varies by the pet’s size (Micro to Giant) and coat (Short/Medium/Long). It’s the same mode set in Billing parameters. Keep this mode if you charge most pets by the size + coat combination.
Billing by Breed
With Breed, the price is set by the pet’s breed, no longer by size and coat. The price table in Billing parameters changes shape (one row per breed). Switching to this mode deactivates current services, combos and plans — only do it on a new store or while re-registering everything.