
Customer profile
The customer profile gathers everything about them in one place, profile data, pets, appointment history, fixed schedules, plans, billing, health chart and photos. Much of the daily routine starts here: you open WhatsApp, create an appointment, ring up a counter sale and check for open invoices without leaving the screen. What you edit under General Information feeds the schedule, the automatic notifications and the chatbot service; what shows up under Appointments, Fixed Schedules and Billing is the picture of that customer’s relationship with your shop.
Step 1: Open the customer profile
Section titled “Step 1: Open the customer profile”In the top menu, click Customers and find the customer using the Search bar (you can search by Customer, Pet, Phone, Tax ID or Microchip).
In the Operations column, on the right of the row, click the last icon: the little person. That’s the one that opens the profile.
Step 2: Get around the “Customer page” menu
Section titled “Step 2: Get around the “Customer page” menu”Once the profile is open, the left side shows the Customer page menu, always in this order:
- General Information: the customer’s profile data (this is the tab that opens by default);
- Pets: their pets, with the option to register a new one;
- Appointments: the full history, as a calendar or a list;
- Fixed Schedules: the slots this customer has held, per pet;
- Plans & Packages: the plans and packages they bought;
- Records: the history of changes and actions on the customer’s account;
- Billing: their invoices (paid, pending, overdue);
- Pet Care: the pets’ health chart;
- Gallery: the customer’s and pets’ photos and videos.
Right below the menu sit the three quick-action buttons, Open chat, Schedule and New Sale: explained at the end of this article.
Step 3: Review and edit the data under General Information
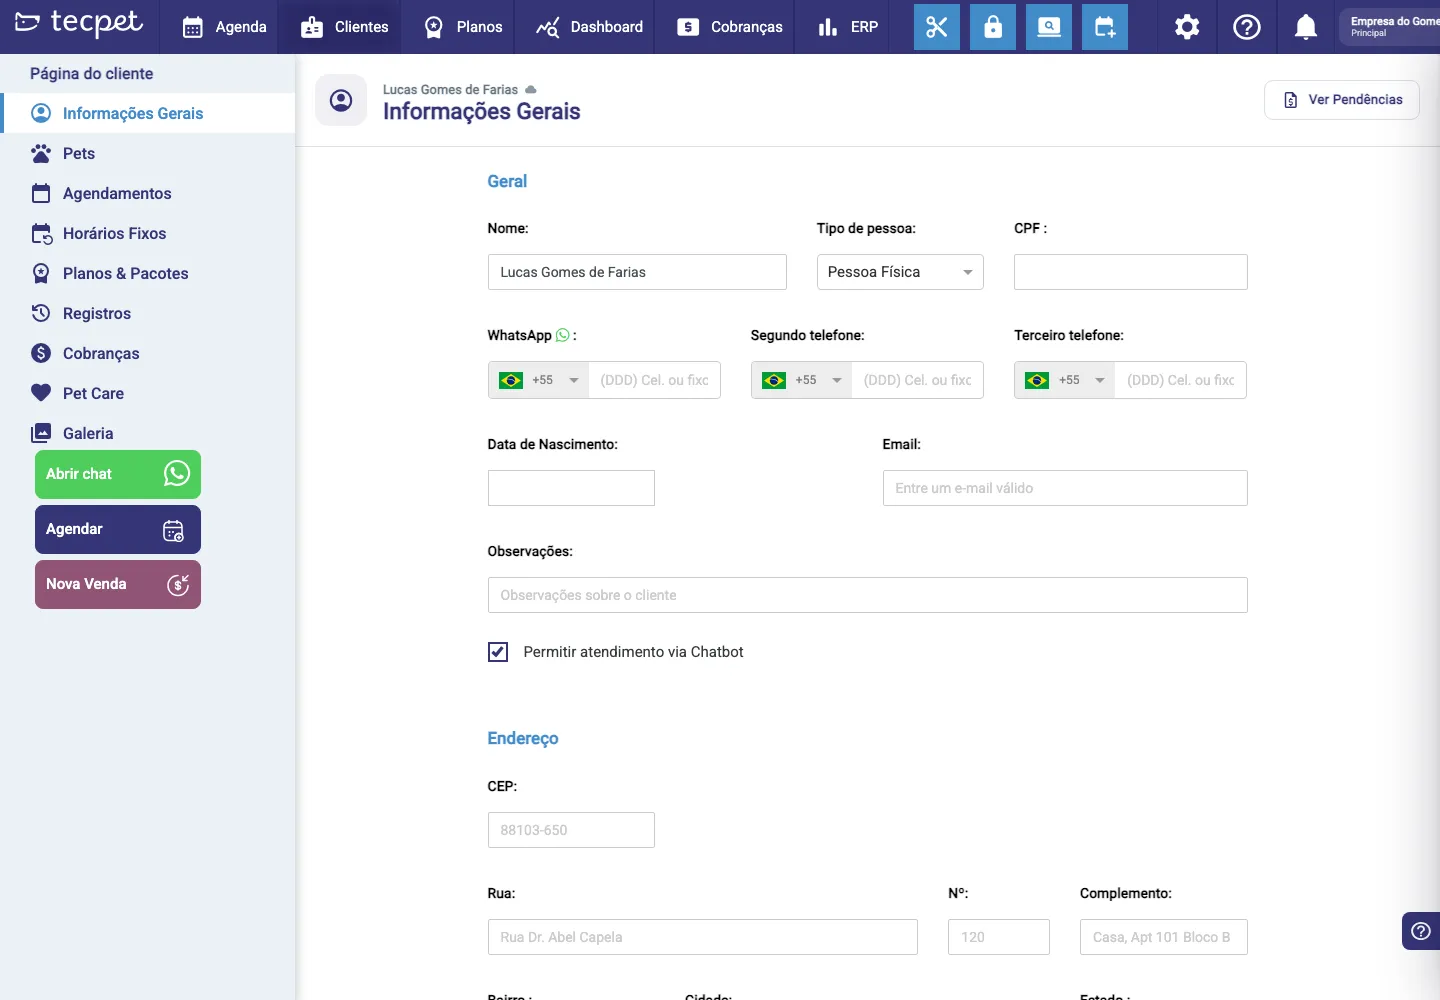
Section titled “Step 3: Review and edit the data under General Information”The tab header shows the customer’s name and, on the right, the View pending items button (it only shows for shops using the ERP with a point of sale), it instantly lists what is open with that customer.
The form is split into five blocks:
General
- Name *, how the customer shows up in the schedule, in search and in messages;
- Person type: Individual or Company; it decides which tax document is asked for;
- Tax ID: used when issuing the tax invoice and when sending data to the ERP;
- WhatsApp: with the country selector (+55 by default). This is the number that receives confirmations, reminders and the chatbot service;
- Second phone and Third phone: alternative contacts, for reference only;
- Date of birth: feeds the customer birthday notification;
- Email: for sending invoices and documents;
- Notes: a free note about the customer, visible to your team;
- Allow chatbot service: when unchecked, the customer stops being served automatically by the robot on WhatsApp and goes straight to your team.
Address
- Zip code, Street, No., Additional info, District, City and State (list Select the state). This is the address used for Pick-up & Delivery and on the tax invoice.
Blocked notifications
- Under Select the notification type, pick the automatic messages that must not be sent to this customer. Whatever you list here is blocked for them only.
Integration
- Shows the customer’s status in the ERP. Until they are pushed to the external system it reads Not synced yet.
Custom fields
- The fields your own shop created (for example, Accepts promotions by SMS?). Each shop sees its own.
At the bottom sit Remove and Save.
Step 4: Check the history on the Appointments tab
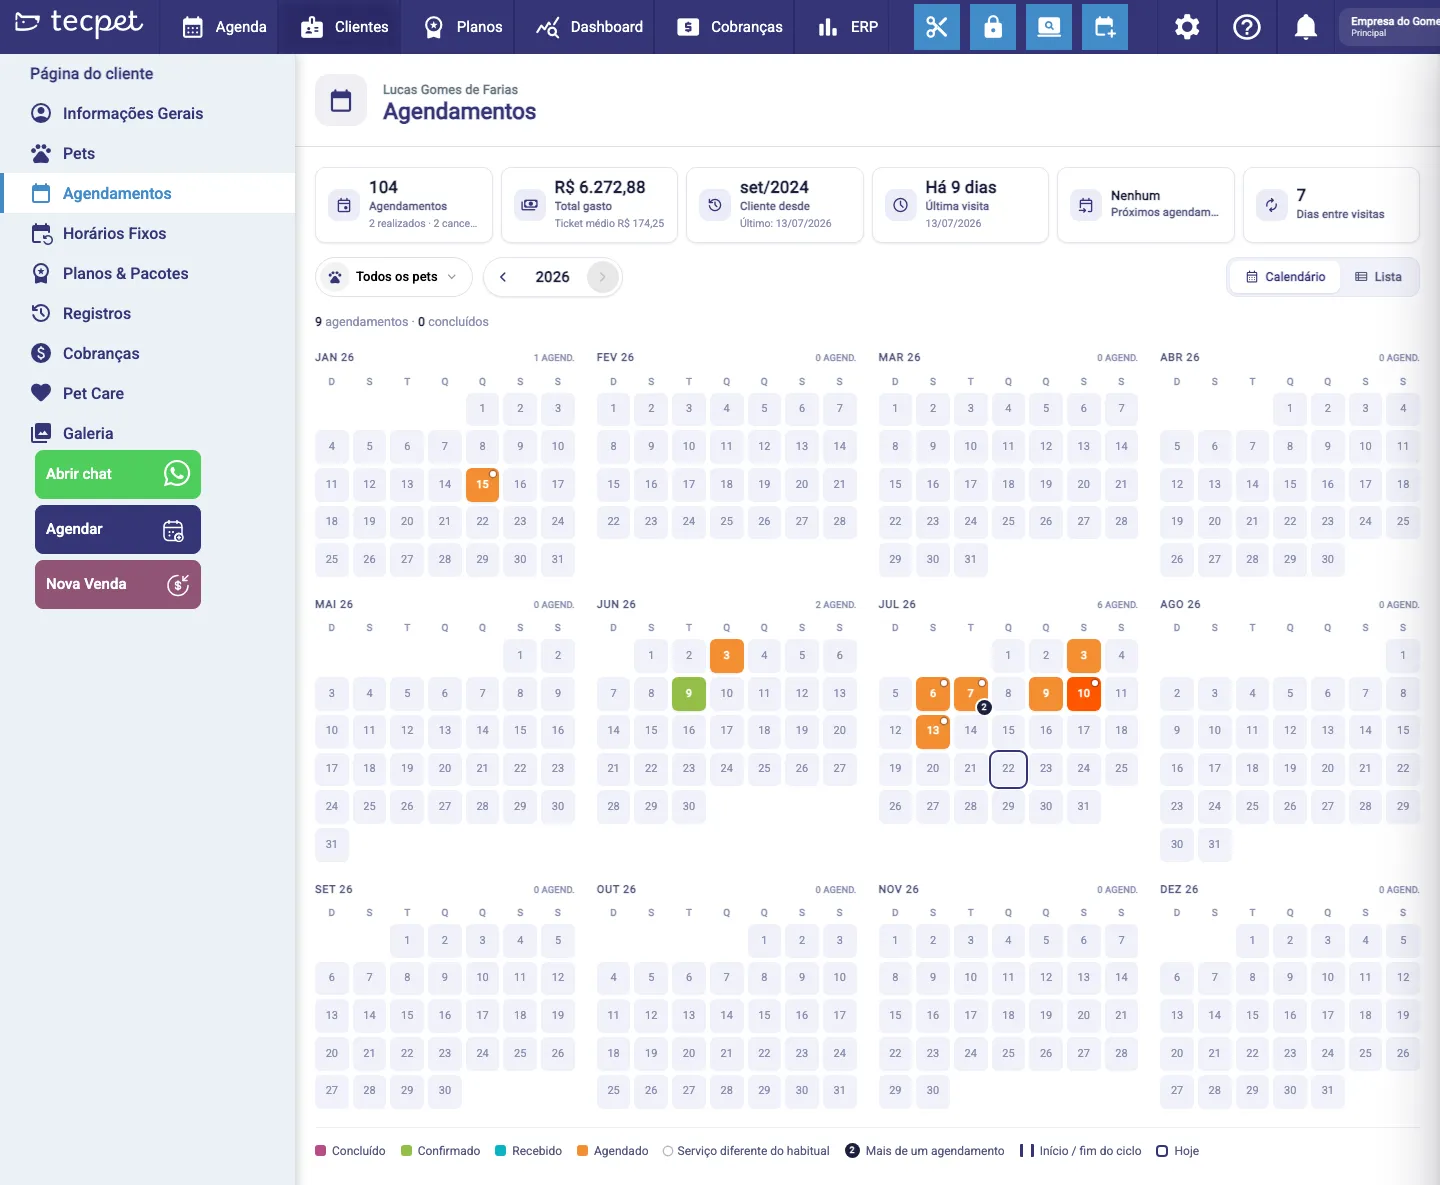
Section titled “Step 4: Check the history on the Appointments tab”Click Appointments. The screen opens with six indicators at the top, calculated over the customer’s whole lifetime (all pets):
- Appointments: the total ever booked, with the breakdown X completed · Y canceled;
- Total spent: how much the customer has left at the shop, with the Average ticket just below;
- Customer since: the month and year of the first appointment, plus the date of the Last one;
- Last visit: how many days ago they were at the shop (Today, Yesterday or N days ago) and the exact date;
- Upcoming appointments: how many future appointments they have; it reads None when nothing is booked;
- Days between visits: the average gap between one visit and the next.
Below comes the control bar: on the left the All pets selector (it opens the list with All pets and each pet, with the breed alongside) and the year navigator ‹ 2026 ›; on the right, the Calendar | List pair of buttons.
The Calendar view is the one that opens by default. It shows the whole year, month by month, with the summary N appointments · N completed on top and each month’s counter in the corner (1 appt., 6 appts.). Every day served becomes a small square colored by status. Hover (or click) a day to open the bubble with the weekday and date, the pet, the service and the time: and click it to open the appointment.
The legend at the bottom explains the markings:
- Completed, Confirmed, Received and Scheduled: the square colors;
- Service different from usual: the white dot in the day’s corner, when the service was not what the customer normally does;
- More than one appointment: the number inside the dark circle, when there was more than one visit on the same day;
- Cycle start / end: the mark on the cycle boundaries;
- Today: the outline on today’s date.
Step 5: Use the List view to filter by status and period
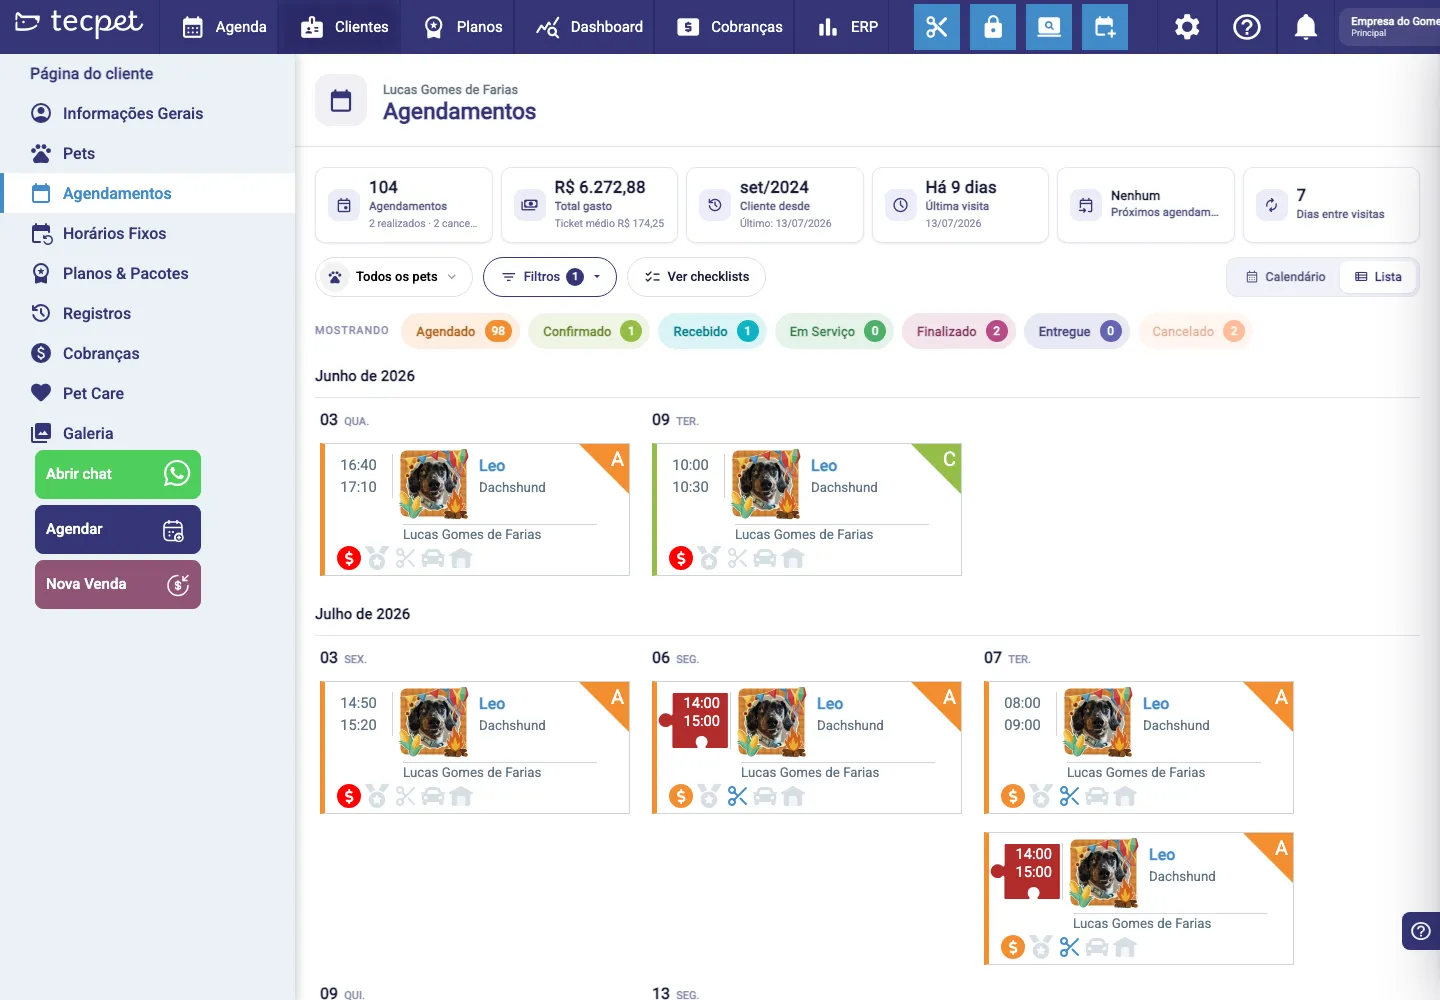
Section titled “Step 5: Use the List view to filter by status and period”Click List to see the appointments one by one. The control bar changes: the year navigator goes away and the Filters and Show checklists buttons come in.
The SHOWING row. Right below appear the status pills with the number of appointments in each: Scheduled, Confirmed, Received, In Service, Done, Delivered and Canceled. Click a pill to turn that status on or off. They all start on, except Canceled: that’s why canceled appointments don’t show until you click it.
The Filters button. It opens the Period menu, with the current range highlighted, the shortcuts This month, Last 7 days, Last 30 days and This year, a calendar to pick dates by hand, and the Clear and Apply buttons.
The Show checklists button. It turns on the history of each appointment (the stages it went through and the checklists that were filled in) inside the card itself. Once on, it reads Hide checklists.
The list comes grouped by month (June 2026, July 2026) and, inside the month, by day (03 Wed., 09 Tue.). Each appointment is a card with the drop-off and pick-up times, the pet’s photo and name with the breed, the customer’s name, the payment and service icons, and a colored corner with the status initial. Click the card to open the appointment.
Step 6: Check the customer’s Fixed Schedules
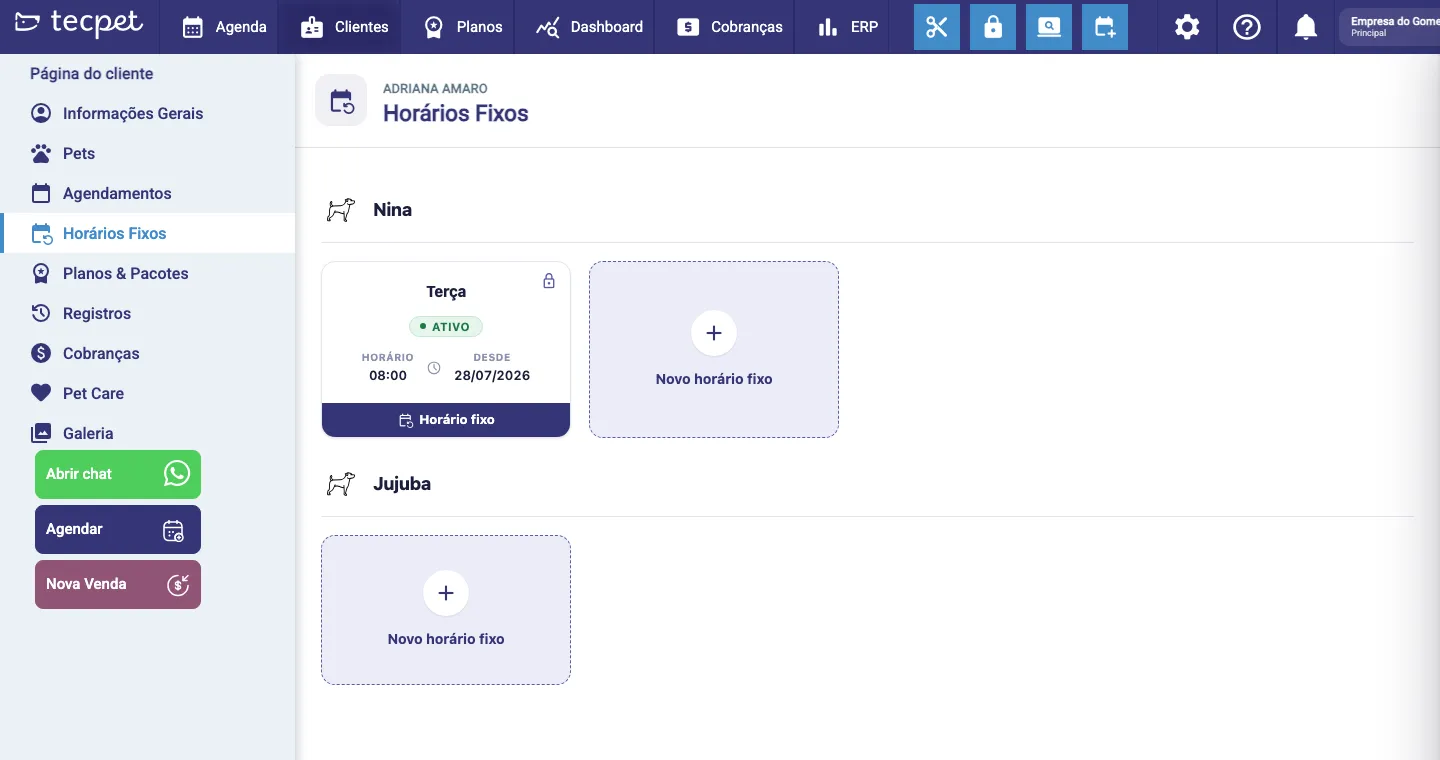
Section titled “Step 6: Check the customer’s Fixed Schedules”Click Fixed Schedules to see the slots this customer has held. The screen shows one block per pet, with the pet’s photo and name.
Each fixed schedule is a card with:
- the weekday (or weekdays): for example, Tuesday;
- the status: ACTIVE, PAUSED, CANCELING or CANCELED;
- Time: the agreed time;
- Since: the date the recurrence started;
- a padlock in the corner when the slot is held, so nobody books over it.
Click the card to open the fixed schedule and change the day/time, pause it or cancel it. Next to the cards there is always the pet’s + New fixed schedule: that’s how you create one. If the customer has no pet yet, the screen reads No pet for this customer and asks you to register one first.
The full step-by-step for creating one is in Fixed Schedule: appointments that repeat every week.
The remaining tabs
Section titled “The remaining tabs”- Pets: the customer’s pets, with the button to register a new one (see Register and edit a pet);
- Plans & Packages: the plans and packages bought, with the detail of each one (see Track plans and packages);
- Records: everything that was changed on the customer’s account, with date and author; this is the audit tab;
- Billing: the customer’s invoices, paid, pending and overdue (see Track billing);
- Pet Care: the pets’ health chart (details in the Pet Care section);
- Gallery: the customer’s and pets’ photos and videos. To upload a file, click + Add media; use Filters to find media by category. Photos attached in Pet Care also show up here.
Profile quick actions
Section titled “Profile quick actions”The three colored buttons below the menu follow you on any tab:
- Open chat (green), starts the WhatsApp conversation with the customer;
- Schedule (dark blue), opens the new-appointment wizard with the customer already selected;
- New Sale (wine), opens a counter sale for that customer.
How to edit or undo later
Section titled “How to edit or undo later”- Customer data: go back to General Information, change the field and click Save. Every change is logged on the Records tab, with date and author.
- An appointment: open it from the calendar or the list and change it right there (see Change an appointment).
- A fixed schedule: open the card on the Fixed Schedules tab to change the day and time, pause it with a return date, or cancel it. Canceling the fixed schedule does not delete the appointments already on the schedule.
- Notification blocks: remove the message type from the Blocked notifications list and save; the customer starts receiving that message again.